Mastering BLS Ventilation: Algorithms

Continued from Mastering BLS Ventilation: Introduction, then Mastering BLS Ventilation: Hardware, then Mastering BLS Ventilation: Core Techniques, and finally Mastering BLS Ventilation: Supplemental Methods

Over the past few weeks, we’ve explored a large number of BLS tools for maintaining a patent airway and pushing oxygen through it. This is good, because the only reliable way to address this dilemma is by having a large toolbox. Nobody can oxygenate every patient with just one trick, no matter how skilled they are.

But a box of tools isn’t an approach to the airway, no matter how big it is. It’s just a box. You need more than that — you need a plan. If I toss you an apneic person, what are you going to do? What if that fails? What’s plan B? And plan C? Then what happens?

The only way to answer these questions is by creating your own scheme, a roadmap to fall back upon. I can’t give it to you, because I don’t know your variables. I don’t know your specific skillsets, what you’re comfortable with, what you’ve practiced and in what situations, versus what you’ve never done in your life. I don’t know what your local protocols are, and what equipment you have available (including extra toys like supraglottic airways or Narcan/naloxone), your typical transport times, or the general availability of ALS. I don’t know what type of patients you usually encounter, how many personnel you have on hand to manage them, and what sort of extrications are involved.

But you know those things. Roll it all into a ball so you understand your resources and challenges, consider the various tools we’ve discussed, and make a plan.

Click to expand

Click here for a PDF version (recommended if printing)

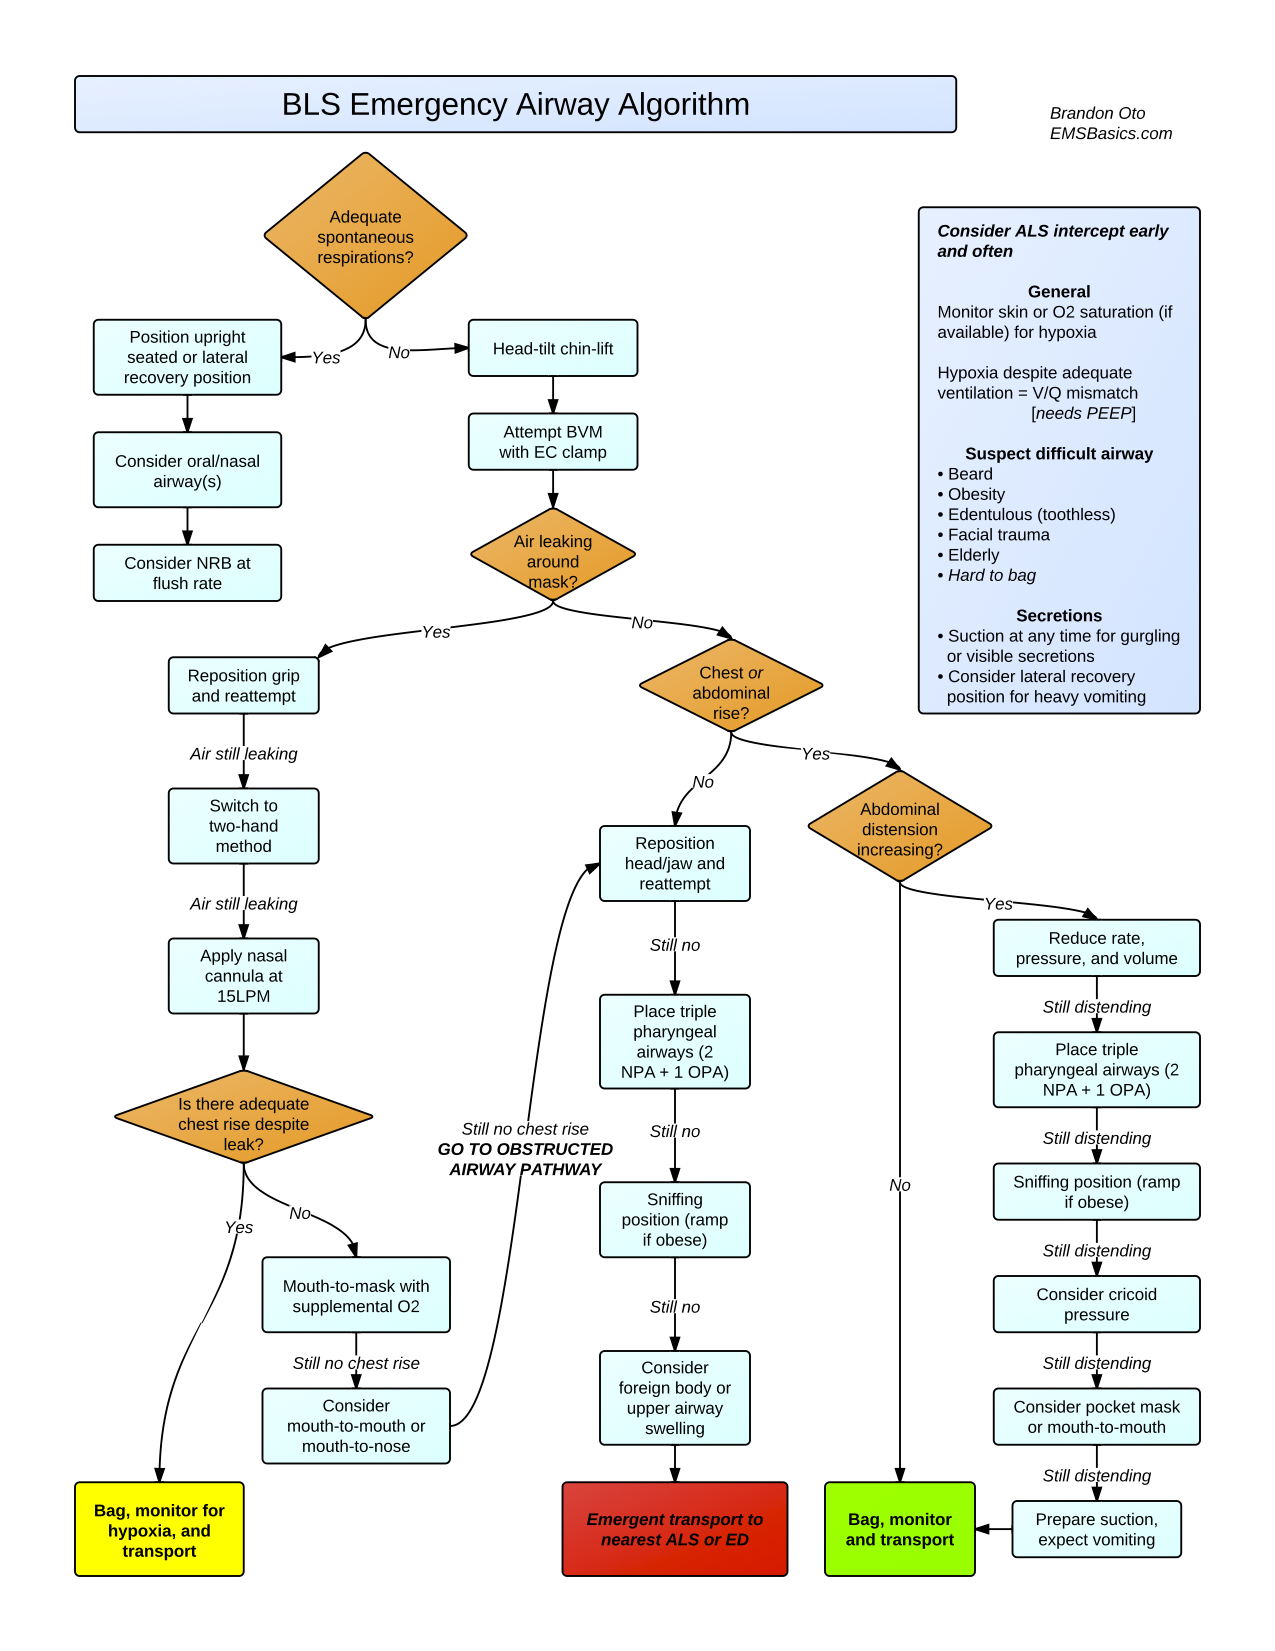
Here’s an example I concocted. This is a flowchart patterned after the airway algorithms commonly used in the ED or the ICU, and it incorporates most of the ideas we’ve talked about. It assumes certain things, so I’m not putting it forward as something to follow religiously. Rather, it’s meant as an example: this is the type of thinking you need to be doing. You probably won’t take the time to chart it out, but you should at least be thinking about it now, because figuring it out on scene with the sick person is too late. Mentally walk through what you’d do at each juncture, imagining yourself treating a real patient in your real ambulance using your real gear. Think about your responses to each dilemma, and if you discover you’re unsure about any details, seek out additional training or practice to patch those holes; for instance, spending some time with a (high quality) mannequin and a BVM can be beneficial. Even just a few minutes playing with the BVM (try bagging yourself until you really understand how the pressures and airflows work), the non-rebreather, your various airways, and so forth can help develop familiarity with little-used tools, so you truly understand how all the valves function, how to size and adjust everything, even where it can be found in your bags. This is particularly important if you rarely use these tools, because infrequent or not, you still need to exhibit mastery when the time comes.

Questions, comments, or remarks on our proposed model are welcome.

Thanks for sticking with us through this exploration of the art and science of BLS ventilation.

Mastering BLS Ventilation: Supplemental Methods

Continued from Mastering BLS Ventilation: Introduction, then Mastering BLS Ventilation: Hardware, and finally Mastering BLS Ventilation: Core Techniques


We said before that robust management of the “A’s and B’s” requires having a wide range of options and tools available to you. At the BLS level, we don’t have many, but we do have a few. Now that we’ve explored the most important methods, let’s look at a few supplemental tricks and points to ponder.


Sellick’s Maneuver

Once again, remember our upper airway anatomy: the larynx and trachea, through which air flows to the lungs, are positioned anterior to the esophagus, through which we’d prefer air did not flow. What’s more, these twin tubes are different types of structures. The trachea is built largely of cartilaginous rings, the same semi-rigid material that makes up the wobbly front of your nose; it’s not as stiff as bone, but it holds its shape well (go ahead, give your Adam’s apple a squeeze). The esophagus, on the other hand, is a fairly soft tube made of mostly muscle, and can easily be compressed flat.

This suggests a potentially useful trick. If we press upon the front of the larynx, it will retain its shape and move posteriorly, compressing the esophagus. In other words, although you’re pushing on the airway, it’ll remain open, while the esophagus behind it narrows and flattens. It’s like squishing a cardboard toilet paper roll with a metal pipe; they’re both tubes, but one is thin and easily distensible while the other is stiff and strong.

Since one of our challenges in BVM ventilation is getting air to go down the right tube, it makes intuitive sense that flattening the esophagus (the wrong tube) will help us push air into the trachea (the right tube). If we’re not successful with that, it may at least help prevent regurgitation from coming back out from the esophagus. This is particularly important because maneuvers like the sniffing position help straighten both of those tubes, so although they do open the airway, they also tend to increase the risk of gastric inflation. Worse, overly-aggressive bagging — from a first responder, for instance — can wedge open the LES guarding the stomach, and it can remain this way after you take over. Once someone’s forced it open, even gentle ventilations can enter the stomach.

This is called Sellick’s maneuver, or simply cricoid pressure. It’s properly applied by pressing gently upon the cricoid cartilage, which is a good spot because the cartilaginous ring there creates a full circle (most of the other cartilages are C-shaped). It’s helpful during intubation, since it tends to move the glottic opening into the line of sight, but has also traditionally been used to assist with bagging.

To find the cricoid cartilage, palpate the most prominent bulge of the trachea, the “Adam’s apple” or laryngeal prominence. Move your finger downward over a small indentation (the cricothyroid ligament or membrane, where emergency cricothyrotomy would be performed) until you find another, smaller bulge. This is the cricoid cartilage.

Here’s the problem: theory aside, it often doesn’t work very well. A substantial body of evidence has shown that it often doesn’t do much to reduce gastric inflation, nor to impair regurgitation, and can even partially occlude the airway. This led the AHA to state that “. . . the routine use of cricoid pressure in adult cardiac arrest is not recommended” in the 2010 update to their BLS recommendations.

That doesn’t mean it’s useless, but it certainly suggests it shouldn’t be one of our first moves. It’ll help if we take care to do it correctly: pressure should generally be gentle (too hard and you’ll compress the semi-rigid larynx itself), straight back (it’s easy to “roll” to one side and fail to transmit the pressure to the esophagus), and applied nowhere but the cricoid cartilage. I also find that using your index and middle fingers, as in the illustration above, better facilitates this type of pressure than a thumb-and-forefinger grip. Use it as a last resort after other methods to minimize gastric inflation have failed — particularly the simplest and most effective, which is simply bagging with less force (ease the air in, don’t shoot it in) — titrate the amount of pressure to the desired effect, and in the end, don’t be surprised if it fails.


Pocket Masks

People may look at you like you’ve got six heads if you suggest it, but using a “pocket mask” is still a valid and indeed a recommended method for ventilation. Many BLS units carry the devices, which are essentially the same type of mask you see on the BVM, plus a port for supplemental O2 and a one-way or filtered valve to prevent cootie exchange. (If you don’t have such a device, you could simply detach the mask from your BVM and breathe into the hole, removing your mouth between breaths to let the patient exhale. This won’t be as effective of a barrier to infection, since there’s no one-way port, so it’s your call — but the risks are probably minor. You might even be able to increase FiO2 by leaving a cannula on the patient… or wearing one yourself.)

The advantages of this method are numerous. First of all, because you have two hands available to hold the mask, you’ll rarely have difficulty making a seal. Second, it’s extremely easy to titrate the volume and pressure of the breaths you give; unlike with the BVM, where you’re brusquely squeezing a rubber sac, with the pocket mask you’re using your pulmonary apparatus (your lungs) to assist the patient’s pulmonary apparatus, and it’s very easy to maintain tight control over the variables. Simply breathe in normally (not a deep breath) and exhale into the mask with gentle force, stopping when you see the chest rise. You should be able to do this with almost infinitely gentle pressure, making gastric inflation very unlikely.

The disadvantages: you can’t provide 100% oxygen, although if you attach the tubing and crank up a high flow, you can probably provide ample FiO2 for anybody without significant V/Q problems. But the bigger problem is the “ick” factor. Although research has shown that the risk of contracting an infectious disease during mouth-to-mask ventilation is very small, many providers still aren’t comfortable getting that close, preferring to literally stay at arm’s length. But remember: if you’re unable to effectively ventilate an apneic patient and you’ve exhausted all other options, this is a life-or-death situation, and ickiness should not be a key concern.


Mouth to Mouth

What if even the pocket mask fails, or for some reason you have no equipment of any kind available?

There’s always direct mouth-to-mouth ventilation. Nobody will fault you for opting out of this, because of the aforementioned ick factor and the theoretical chance of disease transmission, although again, research has suggested the risk is small. But if all else fails, it should be considered an option, and whether you’ll attempt it is solely up to you. Sheet-type barrier devices, which some people carry on their keychains, may reduce either ick factor or real risk, although you’re probably unlikely to find one around unless you carry your own. Remember that you’ll need to pinch or otherwise seal the nose; if your hands are busy maintaining an airway, you may be able to accomplish this by pressing your cheek against the nares.

If the mouth is obstructed or otherwise non-patent, mouth-to-nose ventilation is a viable alternative; simply ensure their mouth is shut and breathe into the nares. If a stoma is present in the neck, mouth-to-stoma or mask-to-stoma (an infant-size mask may yield the best seal) ventilation can be an option, although depending on how it’s constructed you may need to seal both the nose and mouth to make it work.

Just options, folks. Airways need options.


Jaw Thrusts

Along with manipulating the head, we know that shifting the jaw forward is essential for opening the upper airway. In fact, when we walked the Halls of the Student EMT, the wise men told us that for patients in spinal immobilization, it’s all we’re allowed to do. (A little later they usually said “. . . however, a patent airway takes priority over spinal precautions,” but most of us had already dozed off at that point.)

In any case, translating the jaw forward as far as possible, no matter how you do it, can open the airway substantially.

Along with the classic jaw thrust, there’s another method that’s rarely seen anymore. It’s real easy: with one hand, grab their mandible by the chin and lower teeth and pull up. It works. Could you get bitten? Yes. You also can’t bag them while you’re holding their jaw in your hand like Hamlet. So it’s more of a first aid tactic, but it’s very idiot-proof, so it’s nice to know about. You can see it working in this video.


Risk Factors for Difficult BVM Ventilation

It’s one thing to have a wide range of options for dealing with difficult-to-bag patients, but it’s also helpful to know before you dive in when a patient is likely to become difficult. It can help inform your decisions about priorities and flow of care, as well as the need for ALS and transport destinations.

Patients who are often challenging to bag include:

  • The obese. Ample soft tissue tends to occlude the upper airway (this is why they often suffer from sleep apnea), adipose tissue bears down on their chest and diaphragm, and they’re generally difficult to position how you’d like. Ramp them and get a good sniffing position ahead of time (don’t try to dynamically head-tilt them while you apply the mask — situate them beforehand, so all you’ll need to do while you bag is maintain the jaw thrust), use airway adjuncts liberally, and plan ahead — don’t ever assume it’ll go smoothly, or you’ll find yourself in over your head without backup plans.
  • Bearded patients. Thick beards and other facial hair make obtaining a mask seal difficult. It can help if you smear it down with some water-based lubricant (such as your NPA lube), but it can also make a mess of everything until you’re slip-sliding away like Paul Simon. You could also shave them a bit if you have a razor (with your AED gear, for instance), although they probably won’t thank you later unless it’s quite necessary.
  • Sleep apnea. If you happen to know (via history) that the patient suffers from sleep apnea — or to a lesser extent, even that they snore at night — this indicates an existing predisposition toward upper airway occlusion when their level of consciousness is mildly depressed, so you can expect it to be that much worse when they’re entirely comatose.
  • The elderly. Everything is harder with old people, including bag-mask ventilation, for numerous reasons.
  • Anyone with a difficult-to-protract mandible. You probably won’t know this by looking, but if you go to initially address the airway and find that you’re unable to lift the jaw until the lower teeth are at least aligned with the upper teeth (preferably until they’re anterior), you’re probably going to have a hard time, and will need to compensate by achieving optimal extension and a sniffing position.
  • Anyone with gross trauma to the face or neck, which may create airway occlusion, hinder your ability to make a mask seal, or generate substantial blood and other fluids requiring aggressive suctioning.
  • Edentulous (toothless) patients. Aside from the fact that they’re usually elderly, patients without teeth have minimal structure to the oral cavity, giving you little to press against with the mask and obtain a seal. If dentures are present, it will help to leave them in; if not, make sure to place an OPA, which provides a little support at least. Make an effort to outwardly “spread” the air-filled skirt of the mask before applying it, which helps ensure that its maximum surface area remains in contact rather than curled uselessly underneath. Also consider this alternate mask placement, which may be more successful: the mask is shifted upward, so the lower edge meets the lower lip directly.


The End-Expiratory Pop

This is an interesting, unusual, and advanced technique which I’ve only ever seen advocated by the Department of Critical Care at the University of Pittsburgh. Briefly, it consists of the following: you bag with a two-person technique if at all possible, ensuring an excellent seal (which is mandatory) and letting you focus solely on the bag. You inflate as normal, release the bag and let the patient exhale, and then near the end of the expiratory phase, you “catch” them with a small squeeze to the bag, preventing their lungs from fully deflating. This may not seem possible, because there’s a valve present that allows exhaled air to vent, but that valve’s position is determined by the relative pressures on each side, so if you insufflate gas at a higher pressure than the patient’s exhaled gas, it’ll open in rather than out. This creates a sealed, temporarily closed system supported by the pressure you’ve created in the bag. If you don’t believe it, try bagging with the mask sealed against a table, or even upon your own face using clean gear.

View an example of the technique in this video clip, from :25 to :55. Here they’re simulating assisting with spontaneous respirations, probably one of the best applications for this method.

This yields two advantages: first, it gives you an excellent “feel” for pulmonary compliance. With a leak-free seal and balanced inspiration/expiration, compliance should remain consistent. If the resistance you feel suddenly decreases, you most likely have a leak. If it increases, you likely have either an obstruction or are “breath stacking,” failing to fully allow for expiration before beginning the next breath. With practice you can develop an excellent tactile sense of the bag-lung interface… as long as your mask seal remains flawless.

Second, and more profoundly, this actually creates positive end-expiratory pressure, or PEEP. In other words, you’re maintaining positive pressure in the lungs even after exhalation, where the alveoli ordinarily might collapse. By never quite “touching ground,” pressure-wise, you keep alveoli partially distended and portions of the bronchial tree “splinted” open that otherwise might have collapsed, particularly in disorders like COPD or CHF. This is the same principle used by CPAP or BiPAP devices, and it’s a wonderful boon that’s often the only way to effectively oxygenate patients with significant atelactasis (collapsed alveoli) and shunt (portions of the lungs that air is unable to reach). If you have a patent airway and are introducing adequate amounts of 100% oxygen, yet the patient remains hypoxic (according to skin signs or pulse oximetry), it’s almost certainly because of a V/Q mismatch like this, and that situation cannot be solved without PEEP or radically more aggressive measures.

The reason this trick is so cool is because it’s probably the only way to apply PEEP at the BLS level, since in most areas we do not carry CPAP devices, or even PEEP valves for the BVM. It’s theoretically possible to tape over or otherwise partially occlude the exhalation port of the BVM, narrowing the space for expiration and therefore providing some back-pressure, but this is totally unmeasurable, not easily titrated, and interferes with the entire phase of expiration. Although trickier, the “Pittsburgh PEEP pop” is better.

Why squeeze at the end of expiration? If you squeeze earlier, you’ll interfere with exhalation of gas, which needs to happen if we’re going to adequately blow off CO2 and avoid “stacking” breaths. If you squeeze later, you missed your chance to prevent a “zero pressure” state in the lungs, so you’re starting from zero again.


Key Points

  1. Sellick’s maneuver (i.e. cricoid pressure) can be helpful for reducing gastric inflation, but is often ineffective or even counterproductive. Use it as a last resort, applying only gentle and direct pressure, and if it’s not working, stop.
  2. Mouth-to-mask, mouth-to-mouth, mouth-to-nose, or mouth-to-stoma can all be effective backups to BVM ventilation, particularly when unable to achieve a mask seal or unable to ventilate without inflating the stomach.
  3. Expect obese, bearded, elderly, toothless, or traumatic patients to be difficult to bag.
  4. A small amount of PEEP can be created with a normal BVM using a small end-expiratory squeeze; this also helps confirm the ongoing integrity of the mask seal.

Next time we’ll give a method for combining all of these concepts into a cohesive approach to the BLS airway.

Continued at Mastering BLS Ventilation: Algorithms

Mastering BLS Ventilation: Hardware


Continued from Mastering BLS Ventilation: Introduction

The basic tool of BLS oxygenation is the bag-valve-mask, aka the bag-mask (as the AHA calls it), aka the Ambu-Bag (as most in-hospital staff call it, after one of the popular manufacturers), aka the self-inflating resuscitator. We’ll talk about techniques for optimizing for BVM success later. For the moment, let’s discuss some of the other auxiliary aids available. As we do, remember our main challenges: if we don’t minimize the resistance to airflow into the trachea, we’ll be prone to inflating the stomach instead of the lungs. And if we don’t minimize obstructions higher in the pharynx, we won’t be able to introduce any air at all.


Nasopharyngeal and Oropharyngeal airways

The NPA (or nasal trumpet) and OPA are the mainstays of BLS airway adjuncts. Essentially, they’re just curved pieces of plastic or rubber, designed to be inserted into the upper airway to prevent soft tissue from collapsing and obstructing the lumen.

When I first learned about these, it was just after hearing about the head-tilt chin-lift and jaw thrust, which were purportedly enough to open any self-obstructing airway. Why did we need these tools? “This way,” my instructor advised, “you don’t have to sit there holding their airway open.”

Well, yes and no.

The standard theory behind these devices is this: in a supine, unconscious patient, the tongue (and other soft tissue) wants to collapse into the pharynx. If we can jam something in the way, it will essentially “splint” open the passage — stick a foot in the door — much as if we were holding tissue back with a tongue depressor. Positioning the head and neck in such a way that it widens the relevant gaps would accomplish the same thing.

Under this thinking, we have several redundant tools to accomplish the same purpose. Whether we open the airway by tilting their head and lifting their jaw, or by sticking an OPA in the mouth, or by sticking an NPA in the nose, the result is the same.

But this doesn’t quite reflect reality. Sometimes it will, but in many patients with difficult airways, it’s not so simple to maintain a patent passage for airflow. In an obese patient with challenging upper airway anatomy, the amount of soft tissue standing in your way may be profound, and it can obstruct the lumen in multiple places. Additionally, tone may be so lacking that it easily “molds” around anything you stick in there.

In other words, if you place a BLS airway, the only breathable passage you’re really guaranteed is the lumen enclosed by the device itself: the central hole or grooves. And that’s not very much room. Our goal isn’t to create a tiny breathing tube, it’s to maximize the amount of usable airway — we’d like to be able to ventilate through as large a diameter as possible. That means using everything we can.

So proper positioning is helpful. So is an OPA. And perhaps an NPA. Or two.

In fact, if at all possible, it’s always worth trying to insert multiple airways. This is typically not taught to EMTs (since textbooks subscribe to the the “splinting” rather than the “protected lumen” theory), but it’s widely practiced in the ED and by experienced paramedics. If you’re having any difficulty at all bagging, shoot for an OPA with bilateral NPAs; filling all the available holes with patent airways is always a good idea.


Remember what you’re actually doing with each airway. With an NPA, you’re separating the soft palate from the superior and posterior nasopharynx, and if it’s properly sized, it should be long enough to create a passage through the laryngopharynx, nearly to the epiglottis. (If it’s too long, it can stimulate the gag reflex, or jam into the vallecula or epiglottis, actually obstructing the larynx; if it’s too short, it may not protect the laryngopharnyx, or even may not fully span the nasopharynx, allowing the soft palate to shut.) With an OPA, you’re separating the lips, depressing the tongue to prevent it from obstructing the oral cavity, and more importantly protecting the laryngopharynx in the same way the NPA does — keeping the tongue or other anterior structures clear.

So if you only insert an NPA, the nose is your only guaranteed airway. If the mouth itself is shut — and we typically squeeze it shut when we bag using the “EC clamp” technique — nothing will flow through the oropharynx. Conversely, if we only insert an OPA, there is no guarantee that the nasopharynx will remain patent, particularly where the soft palate wants to meet the posterior pharynx.

So use both, because we want it all.


OPAs are more widely used, but it’s a shame to neglect the NPA. The advantage, of course, is that patients with an intact gag reflex can still tolerate an NPA, whereas the OPA may stimulate vomiting. It’s unwise to use the “try and see” approach with the OPA, because there’s nothing quite like copious emesis to make a difficult airway more difficult. Kyle David Bates teaches the helpful tip of inspecting for saliva and secretions collecting in the mouth; if there are none, the patient likely has an intact gag reflex. If they are present, an OPA is probably safe. But suction is always worth keeping on-hand and prepared.

It’s taught that NPAs are contraindicated in patients with significant facial or cranial trauma, on the theory that you may pass the device through a basal skull fracture right into the brain. This is probably a negligible risk; the entire concept seems to be based on two (yes, that’s the number before three) case reports in the literature. If your suspicion is quite high (blood from the nose with a positive halo test, for instance), you may want to steer clear, but with a truly difficult airway, remember that oxygenation is more important than an extremely remote risk of poking the patient’s noodle.

NPA placement can be facilitated by ensuring you lubricate the device first (water-based jelly should be available, although traditionally the patient’s saliva can be used as a last resort), aiming “in” (posteriorly) rather than “up” (superiorly), and lifting the nose to facilitate this angle. Also, remember that each nasal fossa has erectile tissue which takes turns engorging and partially obstructing airflow (allowing cyclical “resting” of the mucosa), so at any given time, one nare will likely allow easier NPA passage than the other; if you’re having difficulty, just switch sides. (Stripping part of this tissue away from the concha will occasionally cause post-insertion bleeding, but it’s rarely significant.)

As for the OPA, we usually teach insertion with the tip pointing up, followed by a 180-degree rotation once it’s fully inserted. Just remember that it’s also acceptable and sometimes easier to insert it tip-down while holding back the tongue with a tongue depressor or finger.

Another somewhat prosaic benefit to the OPA is that it may help provide structure to edentulous [toothless] patients when you’re trying to bag them, although simply leaving dentures in place can also work.


Apneic Oxygenation

You may not think that the lowly nasal cannula and non-rebreather mask really qualify as useful airway tools in an apneic patient. But oh, you would be wrong.

Pop quiz: is it possible to oxygenate the blood without actively moving any air? In other words, can you breathe without breathing?

You might say no. But why not? Gas exchange in the alveoli is not an active process; you’re not forcing the O2 molecules across the membrane by any chemical or muscular exertion. They simply diffuse passively, like gin dispersing into your tonic. All you’re doing when you breathe (either spontaneously or via positive-pressure ventilation) is providing a fresh supply of air to ensure that the concentration of oxygen in the alveoli remains higher than the concentration in the blood (thus allowing diffusion to occur). If we can keep the alveolar oxygen levels high without breathing, that’s just fine.

Suppose, for instance, that we place the apneic patient on a nasal cannula at relatively high flow. This should fill the pharynx with near-100% O2. Even without breathing, gas exchange is occurring in the alveoli; oxygen is diffusing across the membrane into the blood where it binds hemoglobin, and carbon dioxide is diffusing the opposite direction. Far less CO2 is moving out than oxygen is moving in, however (due to differences in solubility and hemoglobin affinity), so there’s actually a net “loss” of gas. This creates some “suction” or a partial vacuum in the alveoli, which will draw in whatever gas is waiting in the upper airway to fill it. Since we’ve flushed that space with pure O2, oxygen will move down that gradient, enter the alveoli, and continue diffusing into the blood, creating a continuous flow. Using this method, patients have been demonstrated to maintain reasonable sats for ridiculously long periods (up to 100 minutes in ideal circumstances).

This is a technique called apneic oxygenation. Although referred to by different names, it’s not new (among other things, it’s a traditional component of most brain-death evaluations), but it’s recently been getting more publicity. In particular, Scott Weingart of EMcrit and Richard Levitan recently published a paper comprehensively describing its use in difficult intubations. They advise placing a cannula at 15 L/min in order to suffuse the pharynx with near-100% O2, and this recommendation has some support in the literature. (Interestingly, whether the patient has their mouth open or closed may not matter.) We’re usually taught that nasal cannulae shouldn’t be used at flows this high, since it’ll dry and irritate the mucosa of the nose, and this is true; however, for short periods in critical patients, a dry nose is not the foremost concern.

How could this be useful for our purposes? Our main challenge with the BVM is ensuring that positive pressure goes where we want it to. This is obviously essential. But if bagging is initially challenging, could we potentially buy time? As long as the airway down to the glottis is open to flow, at least partially, it takes no skill at all to place a cannula (probably already present) and run up the flow to 15 L/min. Even if we’re totally unable to ventilate effectively, this will help keep the patient oxygenated and saturated while we work on a more definitive solution.

A couple of caveats: first, there must actually be a somewhat patent (if not totally secure) airway for this to work. If upper airway structures (or even a foreign body) have totally occluded the nasopharynx or laryngopharynx, no oxygen will reach the trachea. Second, this is a short-term temporizing measure only, because although it may help oxygenate, it will not help to “ventilate,” meaning to remove waste carbon dioxide; as discussed, CO2 is much less capable of passively diffusing without actual tidal movement to clear the alveolar space. Sustained apnea will therefore lead to continually increasing hypercapnia. Finally, this is really intended for patients with largely normal V/Q ratios; it will probably be of limited use for patients with significant shunt (e.g. bronchoconstriction, pulmonary edema, etc.) or dead space (e.g. pulmonary embolism). In other words, it’s of little help to your respiratory patients, whose problem is that their lungs aren’t working properly; if they’re moving air at all, they’re most likely suffusing their alveoli with high-concentration O2, it’s just that they’re just unable to exchange it. They need something like CPAP to help recruit more usable alveoli. Apneic oxygenation is for patients with working lungs who merely aren’t breathing spontaneously or adequately protecting their airway.

Can’t you just use a mask for this? Eh. Studies suggest that O2 from a non-rebreather tends to remain outside the face (in the bag and mask itself) unless the patient actually breathes, since it’s easier for the gas to simply overflow from the exhalation ports than to penetrate their airway; this is distinguished from the cannula, which actually shoots pressurized oxygen directly into the nasopharynx.

However, when it comes to patients who do still have some spontaneous respirations, a non-rebreather can certainly be useful, and here’s a way to supercharge it. Contrary to popular belief, you’re not actually delivering 100% oxygen with a typical mask at 15 L/min — more like 60–70% in most cases. This is due both to the poor seal it generally forms with the face and to the fact that at least one external port is usually left open to room air, so that if the oxygen supply is interrupted or becomes inadequate the patient won’t be suffocated. However, you can get closer to 100% FiO2 by simply cranking up the flow. Once you hit around 30–60 L/min, enough surplus oxygen is overflowing through the mask that the patient should be breathing nearly pure O2. Your portable oxygen tank probably won’t allow a flow this high (and it’d quickly run empty if it did), but most wall- or ambulance-mounted regulators should, although it may be near their maximum flood. Just crank the regulator up to 15 and keep turning until it won’t turn anymore; the indicator won’t change, but the flow will keep increasing. (Although I won’t be the one to recommend it due to the [likely overstated] safety concerns, you could probably also get good results by taping over any valveless ports in the mask, and holding it tightly sealed to their face — or better yet, letting them hold it.)

It may seem convenient, incidentally, to simply press a BVM against their face. Although this may — may — produce an effective seal, it provides poor O2 flow for spontaneous respirations; often times patient-initiated breaths simply bypass the reservoir and draw room air.


Key Points

  1. When it comes to BLS airway adjuncts, the more the better. Two NPAs and an OPA is ideal.
  2. NPAs are generally safe; the risk of penetrating the cranial vault is probably negligible.
  3. Don’t go poking around with the OPA in already-difficult airways; make an effort to determine whether a gag reflex is present before stimulating it.
  4. If an open airway to the lungs exists, but ventilations are difficult, a nasal cannula at 15 L/min is an excellent way to provide apneic oxygenation as a temporizing measure to maintain saturation.
  5. The only “high-flow” oxygen device on your ambulance for a spontaneously-breathing patient is a non-rebreather with flow of 30+ L/min.

A general reminder: although we are cavalier with failing to include in-line or footnoted citations, these are all evidence-based recommendations, and readers are encouraged to inquire for the literature behind anything that seems surprising or dubious.


Continued at Mastering BLS Ventilation: Core Techniques, then Mastering BLS Ventilation: Supplemental Methods, and finally Mastering BLS Ventilation: Algorithms

Mastering BLS Ventilation: Introduction

Sometimes, patients can’t breathe. When that happens, we need to breathe for them.

Simple enough. This is life support at its most fundamental, and many of the interventions classified as “BLS” are found here — techniques and devices for artificially supporting the body’s airway and breathing.

And it doesn’t seem so hard. When they taught it in class, it only took a day or two, and a few pages in the textbook encompassed the subject. How to size an OPA, how to hold the BVM, something about jaw thrusts, and you’re through. Spend a few minutes playing with a mannequin and now you’re an expert.

In the real world, though, this is not child’s play. Managing the airway of a sick, apneic patient is, at best, a high priority; at worst, it’s an unqualified catastrophe. Case reports and horror stories of airways gone wrong can be found under every roof: the failed intubation, the disastrous cricothyrotomy, the foreign body obstruction that couldn’t be cleared. These are emergencies because as we all know, without an airway, you cannot survive. It’s simple stuff.

And then there’s the BVM — aka the bag-valve-mask or “Ambubag.” Ask a room full of novice EMTs and they’ll all agree it’s about as straightforward as tying your shoes: slap it on, squeeze, any idiot could do it. But ask the senior medic in the corner, and he may paint a grimmer picture. Jeff Guy has described it as a more difficult skill than endotracheal intubation, yet one of the hot topics today in prehospital medicine is whether paramedics should remove intubation from their scope of practice because it’s too hard. But nobody’s going to take away the BVM. It’s irreplaceable; it’s the first and last line, the means of ventilation that any patient starts with, and the fallback if your next move fails. The only problem is that doing it well, and for really tough patients, doing it at all, is a purely skill-based exercise. It’s the Jedi’s lightsaber: simple, versatile, but designed for an expert.

The point is that establishing a patent airway in a sick person who can’t do it themselves, and ventilating them using that airway, is such an important task that it generally mandates a large toolbox. Airways are often managed via complex flowcharts or algorithms, where one method can yield to another if it fails, and then to another and another. Countless different devices and methods are available, so that even when obstacles are present, any moron can stumble onto something that works before the patient crashes altogether.

And then there’s us. The Basic EMT stands at the bottom of the spectrum in terms of training, yet is expected to oxygenate any patient using nothing but the meager BLS jump-kit. He has the BVM, a couple of basic airways, masks, cannulas, suction, positioning — and beyond that, just his wits and skills. And as for those, he probably spent little to no time actually practicing them in class, and may perform them only rarely in the field.

This won’t do. When it comes to psychomotor skills, these are the most essential, because we don’t have a Plan B. If BLS techniques fail, our only recourse is to sprint for the hospital or ALS, and hope nobody dies along the way.

So let’s talk about all the principles and tricks of creating a BLS airway and ventilating with the BVM. First, we’ll need to understand why it’s hard.


Basic Physiology

Ordinarily, we suck at breathing.

I mean we literally suck. We drop the diaphragm and widen the ribs, expanding the area inside our chest. This expands the lungs, forcing them to suck air into the only opening available — through the mouth and nose, down the pharynx, through the trachea, and into the bronchial tree.

That’s assuming that the airway is open, of course.

Now, what if I whack you over the head, and your body loses the ability to spontaneously breathe? We’ll want to breathe for you. Can we pull down your diaphragm and expand your chest? Not very easily, unless we stick a plunger on your sternum, or put you in an iron lung. Instead, we reverse this process: rather than creating negative pressure inside the chest, we force positive pressure in from the outside. Rather than sucking, we blow.

Blowing is a little tricky, though. One of the main problems is that there’s more than one place for air to go. Consider the pharynx, the working area of your upper airway. We can get there via two paths: the oropharynx (via the mouth and over the tongue), or the nasopharynx (via the nostrils), but they arrive at the same place, the laryngopharynx (or hypopharynx). What happens next?

If we peered into your hypopharyngeal space, we would see that two openings emerge below. One leads to a tube which lies posterior (toward your back): your esophagus, which conveys cheeseburgers and beer into your stomach. One leads to a tube which lies anterior (toward your front): your trachea, which brings air into the lungs for gas exchange. Remember these relative positions — the trachea is in front, and you can palpate it at the neck (the “Adam’s apple” is part of it). The esophagus lies behind this, and is not usually externally palpable.

Given that food and air both enter via the pharynx, how do we ensure that cheeseburgers ends up in the esophagus and air ends up in the trachea? Well, the gatehouse to the trachea is the larynx (the “voicebox,” where vocalization occurs), and the opening to this chamber is called the glottis. The glottis is normally open, but when you swallow, a couple of drape-like vestibular folds and a little flap, the epiglottis, are pulled in to cover the larynx. The result is that food is forced into the esophagus.

What about the other direction? The esophagus is formed from rings of muscles called esophageal sphincters, which help “milk” food downward when you swallow. The bottommost ring is the lower esophageal sphincter, which opens during swallowing, but otherwise is mostly constricted, sealing off the esophagus from the stomach itself. This prevents air from passing down and gastric contents from coming up (something we know as heartburn).

To summarize, as you sit here reading this, your esophagus is clamped off by your lower esophageal sphincter, and your trachea is open, allowing you to breathe. But if you take a bite of your coffee-cake, your epiglottis and vestibular folds will block off your airway, your esophageal sphincter will open, and the food bolus will be directed into your stomach.


Down the wrong pipe

The trouble with blowing instead of sucking is that we have no way of aiming where we blow.

I know what you’re thinking. If we force air down the pharynx, the esophageal sphincter should block off the stomach, ensuring that it flows into the larynx and down the trachea. Right?

Here’s the problem. Even ordinarily, your esophageal sphincter only clamps down with a small amount of force — say around 30 cmH2O (centimeters of water, a unit of pressure). This is plenty to prevent air from flowing in during regular respiration. But if air were to be pushed in with greater than 30 cmH2O of force, it will squeeze past the sphincter and enter the stomach. And if we clamp a BVM over your face and squish the bag, we can easily exceed that much pressure.

It gets worse. In order for the esophageal sphincter to work even that well, it requires muscular tone (constant stimulation), just like your postural muscles need tone to keep you from falling over. What happens when you’re unconscious? Sphincter tone decreases. So in the people we’ll actually be bagging, opening pressure may be 20–25 cmH2O or even less. Thus it’s even easier for positive pressure ventilations to force their way into the stomach.

The result? When squeezing the BVM, air often enters the stomach along with (or instead of) entering the lungs. Not only is this pointless, it makes it even harder to inflate the lungs (a bigger abdomen creates pressure on the diaphragm), decreases cardiac preload, and increases the risk of vomiting — which will further obstruct the airway.

The easiest solution is to put a tube into the trachea and seal it off — i.e. endotracheal intubation (or variations on that theme, such as a blind airway). Then we can blow air directly into the lungs without any chance that it’ll enter the wrong pipe. Unfortunately, those are tools we often lack as BLS providers.


Angles and Tissues

All of those structures we’ve been describing? They’re soft.

Soft and squishy. And it’s not just the esophageal sphincter that loses tone when you become unconscious.

In ordinary circumstances, the airway is a supple but structured arrangement of tissues that maintains its form. This is important, because there’s not very much space in there. So in the unresponsive patient, it’s no surprise that some of those tissues might collapse together, blocking off the lumen between them. (Check out this fluoroscopic video.)

The tongue is the worst. Tongues are basically big blobby muscles, attached at only one end, and if you remove all firming tone, they just flop wherever gravity takes them. So put an unconscious person supine, and gravity pulls the tongue back into the pharynx, blocking all airflow.

Or the larynx and supralaryngeal tissues run into the posterior pharyngeal wall. Or the soft palate does. Either way, anterior structures end up touching posterior structures, leaving no room in between. Our airway involves a tight 90 degree turn, and this is not a design that remains open without active maintenance. So if we want to breathe for these people, we need to find a way to unblock everything. (Like the jaw thrust — check out this airway cam.)


Mask Madness

Trying to push air into someone’s lungs by holding a mask over their face is like trying to blow up a tire by… well, holding a mask over the valve.

I teach CPR, and I can count on one hand the number of times I’ve handed the BVM to somebody and watched them achieve chest rise on the mannequin the first time. Heck, I demo the things and I don’t always pull it off.

Effectively sealing an air-filled plastic mask to someone’s face and then squeezing the bag is a task meant for more hands than any human possesses. Doing it on somebody who’s dying is exponentially more difficult. Add in the fact that they’re probably obese, toothless, vomiting, crumpled in a corner or bouncing around an ambulance, and enshrouded in a thick ZZ Top beard. Now try to get it all done without losing your cool or breaking your proper ventilatory rate. Having fun yet?


Key points

  1. BLS ventilation using basic airways, positioning, and the BVM is a difficult, complex, and undertrained skillset for the EMT-B. Yet since we often lack rescue devices or alternate ventilation methods, it is critical that we learn to master it.
  2. Preventing gastric inflation would be difficult even in healthy people, and is extremely difficult in the apneic and unresponsive patient.
  3. Loss of tone in unconscious patients lying supine reliably produces soft tissue airway obstruction which must be cleared.
  4. Obtaining a proper mask seal is a necessary prerequisite for BVM use, but is often difficult or impossible for a single rescuer.

Tune in next time to see some solutions to these challenges.

Continued at Mastering BLS Ventilation: Hardware, then Mastering BLS Ventilation: Core Techniques, then Mastering BLS Ventilation: Supplemental Methods, then finally Mastering BLS Ventilation: Algorithms

A Million and One Towelplications

Yes. Towels, sir. I said towels.

What’s the big deal with towels? Well, you’ve got them around, first of all. Or you ought to. A decent stock of linen really amounts to essentially supplies for an ambulance, and yes, I maintain that even if you do use the crinkly disposable paper sheets. Blankets for sure, sheets if you use ’em, and towels. Lots of towels.

Towels are the duct tape of padding-related conundrums. If you can’t do it with a towel, it doesn’t need doing. Other than stopping bleeding, checking your oil, and (I suppose) actual cleaning, most applications involve using them as some sort of padding. But to become a towel samurai, you’ll first need to learn the three basic towel forms: Rolls, pads, and snakes. (Towel supply is a little limited at this exact hour, so I’ve substituted an old bath towel, which I’ll thank you not to abuse.)


The Towelbox

Pads are simply towels folded flat, into squares or rectangles of the desired size, like a napkin. Good for basic flat padding purposes — just make sure you fold intelligently to obtain the size and thickness you need (and don’t be afraid to stack multiple towels together).


Rolls, on the other hand, are constructed by folding long rectangular pads and then rolling them into fat, tight little cigars, like toilet paper. Great for makeshift pillows, extra-thick padding, and anything requiring bulky structure or space-filling.


Finally, snakes are towels unfolded to their full length and then twisted (or folded very thin) to make long noodles. You can even tie them end-to-end to make ropes. Great for “lengthwise” padding, makeshift towlines, wrapping around stuff, etc.

Got it? Good. Now, here’s a few uses for the things beyond just cleaning up your messes.


Padding Voids

You were taught to do this in school, and then you promptly stopped bothering. Shame on you. It takes practice to get good at it, but if you do, you can seriously reduce the physical abuse you’re inflicting on your patients by backboarding them.

Make small rolls to fill the lumbar void, and rectangular pads for thick spaces like between the legs. Blankets may be needed for particularly large areas, which is fine — blankets are just towels on steroids, after all.

Take the time to pad in a similar fashion when applying splints, particularly box-style splints, and you can substantially increase their effectiveness. Works great for scoop stretchers too. Patient with a hip fracture on the ground or in a bed? Scoop them up, and generously pad between and over their legs. Once you secure the straps there should be nowhere to move, and you’ve turned the device into a secure, large-scale lower-body splint with essentially no movement of the limb. Not bad.


Silencing Equipment

We talked about this before — particularly when it comes to backboards, which have a habit of banging around in their enclosures, a towel roll (or if the gap is slim, a thick pad) can be a quick fix to muffle the noise a little.


Head Immobilization

Most services nowadays have gone over to commercial head blocks or headbeds; the days of sandbags (or liters of saline) are sadly over. However, there are still places that use primarily towel rolls, and even if you carry commercial blocks they make a great backup — and we always need backups. Frankly, I think good towel rolls work better than most other methods, too; they compress and mold against the head, making them both comfortable and secure.

Stack together two or three large towels, folded into long rectangles, then roll them together tightly into a thick cylinder about the same length and not much thinner than a human head. Take some tape (I like 2″ cloth tape for this) and tape a couple rings to hold it together — a loop near both ends seems to yield better padding than looping the middle. Make a second roll just like it, and you’ve got headblocks! (The roll depicted is probably a little longer than necessary.)

Secure them alongside the patient’s head and tape the same as you would commercial blocks. Just make sure they’re fat enough to provide real support; a single rolled towel, for instance, never seems like enough bulk.


Ghetto Collars

So you sized the patient, you reached for a no-neck C-collar, and it’s too small. Oh, it’s not a matter of neck length; they are indeed neckless. Rather, it’s a question of girth. They’re just too big for the collar to reach around. And sadly, although most rigid cervical collars come in a variety of heights, there are usually no options to size for diameter (pediatric collars may be smaller, but there’s rarely any “bigger” size available). What to do?

Try a towel snake. Using a long towel (or two), twist it into a thick rope and wrap it around the patient’s neck like a scarf. Don’t choke them, but wrap it snugly; most towels seem long enough to circle a typical neck with plenty of overlap, which I leave in the front as a chin support. Slap a little tape across the overlap to more or less secure it, and there you have it — a good-faith attempt at cervical immobilization, not as effective as a rigid collar but far better than nothing. (You can always sit there holding manual immobilization too, I suppose. But remember that the collar is mostly a reminder, and the blocks and straps are doing the majority of the work to actually limit motion.)


We could go on forever about towels, and I don’t even know most of the tricks; this is the sort of thing you figure out gradually over the course of a long career. (Although Christopher Watford did turn us onto towel animals as popularized by Carnival Cruise Lines, and if you can master those you’ll be a big hit at parties.) Thom Dick has a stellar collection of ideas that he writes about in his columns. We’ll probably do a sequel to this eventually, but in the mean time — what are your favorite uses for towels?