Glucometry: Clinical Interpretation

Continued from Glucometry: Introduction and Glucometry: How to Do it

Implementing glucometry into your overall assessment means understanding three things: when to use it, what the results mean, and when it fails.


Indications

First of all, by and large the only people with derangements of their blood sugar should be diabetics. The rest of us are generally able to maintain euglycemia through our homeostatic mechanisms, except perhaps in critical illness causing organ failure and similar abnormal states. Now, if someone injected you — a non-diabetic — with a syringe of insulin, you’d become terribly hypoglycemic, since it would overwhelm your body’s ability to compensate for the loss of glucose. But nobody’s likely to do that if you’re not a diabetic, unless it’s meant for somebody else and a drug error occurs, or I suppose if they’re trying to assassinate you.

With that said, people walk around who are diabetic and don’t know it. I’ve lost track of the patients I’ve transported who presented with signs suggestive of a diabetic emergency, denied a history of diabetes, and came back with a BGL of 600. Well, my friend, I have some bad news for you. “Everybody is diabetic, even if they’re not” is my attitude. Almost a fifth of older Americans are diagnosed, and the older and sicker they are, the more common it is.

Which brings us back to: who needs a BGL?

The most correct answer is anybody with clinical indications of either hypo- or hyperglycemia. As we saw, diabetes itself is really associated with hyperglycemia, which is why the classic signs of hyperglycemia are usually used to diagnose diabetes: polyuria (excessive urination, as extra glucose is excreted by the kidneys and brings water along with it osmotically), polydipsia (excessive thirst and water consumption, to replace the fluids urinated out), and polyphagia (constant hunger, since despite all the sugar floating around it’s not reaching the cells very easily). If your patient is complaining of those, you might be the first one to discover their condition. The diagnosis doesn’t require elaborate tests and imaging; a fasting glucose over 126 BGL tested on multiple occasions, or just once in combination with clinical symptoms, or a post-prandial (after eating) glucose exceeding 200, is the definition of type II DM. (With that said, I wouldn’t go around diagnosing your patients; that’s not your job, and you’re not quite that good.)

Once the glucose gets higher than the “renal threshold” — usually around 180 in average folks — the body starts to excrete it into the urine. This can actually be detectable by chemical dip-stick, or even by odor and texture at very high levels.

When hyperglycemia becomes severe and prolonged enough, we start to worry about diabetic ketoacidosis. Although burning fat and protein is not necessarily dangerous (some popular diets actually put you into a mild ketogenic state intentionally), extensive accumulation of ketones caused by a total lack of insulin (as in type I diabetics — DKA is rarely seen in type II) creates a metabolic acidosis in the body. This is when the long-term harm of hyperglycemia becomes a short-term hazard. DKA causes altered mental status, usually elevated states of confusion and disorientation, and combative behavior isn’t uncommon. Combined with the acetone odor that sometimes presents on the patient’s breath — which can smell like alcohol — DKA patients can seem suspiciously like drunks, and treating them like drunks is a great way to go down a bad path. (A word of wisdom: not only is everybody diabetic, but drunks are definitely diabetic.) DKA also frequently presents with symptoms of dehydration, due to the osmotic water loss in the urine; nausea and vomiting; and deep, rapid Kussmaul breathing to blow off the acidic CO2.

A few situations can cause short-term hyperglycemia, including stressors of any kind (there’s even “white coat hyperglycemia,” where patients tend to produce elevated sugars at the doctor’s office), but these typically won’t produce anything like the massive levels leading to DKA.

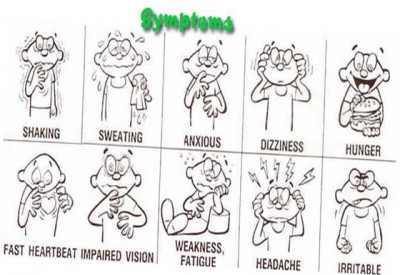
With all of that said, you need to really build up some glucose before hyperglycemia becomes symptomatic, and even more than that before it becomes acutely dangerous and unstable. That’s why as a rule, we’re more concerned with hypoglycemia, usually due to medication administration, physical exertion, or metabolic demand exceeding what was expected. Hypoglycemia again presents as altered mental status, in this case more often an inhibited rather than an elevated state: confusion, lethargy, disorientation, inability to focus or follow commands, weakness, headache, seizures, and eventually coma and death. The fun part is that the impairments can present as focal as well as generalized deficits: unilateral weakness of the limbs or face, speech slurring, poor gait, vision abnormalities, and more. In fact, hypoglycemia is a neurological chameleon, and can look like almost anything; it’s particularly notorious for imitating strokes, and for causing (not imitating) seizures. Interestingly, kids are particularly prone to hypoglycemia due to their gigantic heads, full of glucose-hungry brain.

Despite all this, the primary manifestations of early hypoglycemia are actually not symptoms of hypoglycemia. Rather, they’re caused by catecholamines — by the body releasing stress hormones, primarily epinephrine, in a response to the emergency. (This is not an irrational move: epinephrine helps us release and retain glucose.) As a result, we often seen the same signs we’d expect in anybody with a profound sympathetic stimulus: pale and diaphoretic skin, anxiety and shakiness, tachycardia and hypertension, even dilated pupils. Wise diabetics recognize the early signs of this sympathetic response and drink some Pepsi. As levels keep dropping, these symptoms combine with the neurological effects of glucose starvation to produce a confused, sweaty, increasingly stuporous individual. If left untreated, finally the sugar drops until we’re looking at the picture of impaired and diminished consciousness caused by true hypoglycemia. So just like always, the signs of compensation are our early warning system; once the body decompensates, it’s already late in the game.

To make a long story short, anybody with altered mental status, or any kind of general systemic complaint (weakness, fatigue, anxiety, nausea, etc.) should probably get their glucose tested, whether or not they have a known history of diabetes. This is true even if you suspect another cause, such as stroke. Not only can diabetic emergencies look like anything, they can also be comorbid; it is extremely common for patients to have another problem, yet also to bring a high or low sugar along for the ride, due to the illness throwing a wrench in their normal intrinsic and extrinsic glycemic homeostatic systems.

A number of years ago, there was some limited but compelling research that suggested poorly-controlled blood glucose (meaning not severe derangements but merely small deviations from the ideal range) was associated with increased mortality among an inpatient population with a wide variety of conditions. In other words, if you were hospitalized with something like sepsis, you were more likely to end up dying if your sugar tended to float around 160 instead of 110. As a result, it become trendy to practice extremely tight and aggressive glucose management for virtually everybody; diabetic patients were being tested every few hours and ping-ponged around using medication to keep their numbers textbook-perfect. More recently a number of studies have suggested that this may be less important than was thought, and in fact that excessive paranoia leads to a lot of iatrogenic harm from accidental insulin overdoses. This battle is still being fought in the hospitals, but for our purposes a reasonable take-away would be: when managing acute illness, from sepsis to head injury to cardiac arrest, once everything else is done it’s not a bad idea to check the patient’s sugar.


What’s the Number Mean?

So you’ve taken a blood glucose, either by capillary finger-stick or from a venous sample. Now what?

We mentioned that the “normal” range is something like 70–140. Diabetics seeking to control their condition and not have their toes falling off in a few years usually strive for tighter control of their BGL than is needed for acute care; a sugar of 175 is a little on the high side for a routine check, but a pretty meaningless elevation for our purposes.

All things are also relative, in that a given BGL must be compared to the patient’s baseline to predict its effects. In other words, poorly-controlled diabetics who are routinely sitting at 200 may become symptomatic of hypoglycemia at relatively high levels, whereas very well-controlled diabetics who usually run lower may be able to drop very low indeed without noticing it. However, a few rules-of-thumb are useful:

Non-diabetics usually become noticeably symptomatic below a sugar of, on average, about 53. (Diabetics, particularly those who are usually poorly-controlled, are more variable — their average symptomatic threshold is more like 78.)

After a recent meal, diabetics may demonstrate hyperglycemia to various degrees depending on whether they ate a Cobb salad or an entire chocolate cake. Non-diabetics should not exceed 200 or so. A few people can exhibit hypoglycemia after meals, due to alcohol consumption, “dumping syndrome,” or some other phenomena, but far more often they’ll exhibit similar symptoms without any true hypoglycemia; some people get shaky and sick due to postprandial epinephrine release.

After an unusual period of fasting (“haven’t eaten since yesterday”), non-diabetics should still have a largely unremarkable sugar. For diabetics, it will depend mainly on how much and what type of medication they’re using.

There’s usually a gap of 10–20 mg/dL between hypoglycemia that’s noticeable to the patient (i.e. sympathetic effects) and hypoglycemia that causes cognitive impairment (i.e. neurological changes). This is their safety margin, when they’re taught to eat or drink some fast carbs; if it keeps dropping they may no longer be able to take care of themselves.

But here’s the problem: the sympathetic “warning signs” can be mediated or impaired for various reasons. For one thing, if your body has to flip that switch often, you become numbed to it, and your hypoglycemic thresholds becomes lower and lower. And many patients with various metabolic and endocrine failures simply can’t muster much of a stress response — the same reason why the elderly may not produce tachycardia and other shock signs when they become hypovolemic. Finally, drugs like beta blockers that directly block sympathetic activity can seriously obscure hypoglycemia. Grab your nearest bottle of beta blockers and read the list of adverse effects: one will be hypoglycemic unawareness, a five-dollar term that means beta blockade can make it difficult to know when your sugar drops low.

Another important consideration in evaluating glucose levels is the expected trend. For instance, a BGL of 70 in a diabetic patient might not excite anybody. However, if you’re testing her because her nurse said that she just accidentally received four times her normal insulin dose, then a BGL of 70 should be alarming, because it’s probably going to keep dropping, and she doesn’t have very far to go.

To make a long story short, the clinical effects of both hypo- and hyperglycemia can vary substantially. What to do? It’s simple: assess the patient physically, obtain a history of their oral intake, medications, and metabolic demands (such as exercise), test their sugar if there’s any possibility of glucose derangement, and compare all those data against each other. A low number in the setting of obvious clinical symptoms is bad. A low number in an asymptomatic patient, or a normal number in a patient with highly suggestive signs and symptoms, should force you to bring out your thinking cap and weigh the odds.

What about treatment? Severe hypoglycemia needs ALS or the hospital — they’ll receive IV dextrose. Severe hyperglycemia needs the hospital only, where they’ll receive carefully-dosed insulin; this is generally considered too dangerous to administer in the field (although patients may have their own), so paramedics are reduced to giving fluid boluses, which may help dilute high glucose concentrations (not a very elegant solution) and is probably needed by a patient in DKA anyway, but isn’t really a fix.

What about oral glucose, in the cute little tubes we carry? Typically these are gels containing 15g of glucose, taken orally (either swallowed or held in the mouth — against the cheek or under the tongue — until it’s absorbed). Do they work? Sure. But it’s not much sugar and it’s not very fast. I found one source that suggests 15g of oral glucose should raise the BGL by 50 mg/dL within 15 minutes of administration — but I’ve never found it to be nearly that effective. In my experience, a bump of about 10 mg/dL per tube is about the best you can hope for in the short-term. If you need more than that, go with the medics and the IV syrup.


Testing Errors

When is a tested capillary or venous glucose unreliable? Usually it’s your fault.

Well over 90% of BGLs that test outside the maximum error range (remember, around 15%) are due to user error. Some of the main ones:

  • Your meter requires lot coding, and you failed to do so or used strips from the wrong lot.
  • You failed to clean the skin before lancing, contaminating the sample (not to mention creating an infection risk), or you had some D50 on your glove and it got mixed in there.
  • Rather than gently wicking the sample into the strip, you “smeared” the two together with mechanical pressure, interfering with the expected reaction process.
  • You drew blood from an arm with an IV infusion of D50, TPN, or other meds distal to it. Particularly when peripheral perfusion is poor, always try to sample at a different limb from any running drips.
  • You tried to reuse a non-reusable strip (gross).

Okay, okay, so nobody’s perfect. Factors that may not be as obvious include:

  • Temperature. The test reaction is designed to function within a specific temperature range, which is broad (often around 40–104 degrees) but not limitless, so don’t use them in freezing weather, and try not to leave your equipment ungaraged without climate control when it’s very hot or cold out.
  • Altitude. Just in case you’re an Everest expedition doctor.
  • Humidity. The strips have trouble when it gets very humid.
  • Air. The reagents in the strips will actually degrade if exposed to air for sufficient periods of time, so make sure that you keep them in their tightly-sealed case, and follow their printed expiration dates.
  • Time. If you draw whole blood and leave it around (much more likely to happen in the laboratory than in the ambulance), the erythrocytes will metabolize glucose at about 5-7% per hour.

The good news is that in many of these situations, internal error-checking within the glucometer will recognize the problem, and flash an error rather than a reading. Errors messages are usually numbered and can be informative, but each manufacturer uses different codes, so read the manual if you want to know what “ER2” means. (Hint: not enough blood in the sample is by far the most common.) Many of the other problems can be caught if you regularly check the meter using a known-value test solution, which you should be doing anyway according to most drug and safety agreements. (By the way, both the test strips and those vials of solution are usually meant to expire a few months after opening — the printed date is for an unopened bottle — so if they’ve around forever it’s probably time to retire them.)

What about physiological states that can interfere with the reading? We’ve discussed a few, but briefly:

  • Hematocrit. Anemia from any cause, including cancer or blood loss, causes falsely high readings. High crit, common in neonates, causes falsely low readings.
  • PaO2. Oxygen interferes with the electrochemical redox reaction; thus high concentrations of dissolved oxygen cause falsely low readings, and low PaO2 (i.e. hypoxia) cause falsely high readings, potentially masking a true hypoglycemia.
  • pH. Primarily in meters using the glucose oxidase enzyme, alkalosis will cause falsely elevated readings, while acidosis causes falsely low readings. The acidosis of DKA can therefore cause falsely low readings, masking the profound underlying hyperglycemia, so if the clinical picture screams DKA, don’t necessarily let the glucometer tell you different.
  • Macronutrients. High levels of circulating proteins or fats can cause falsely low readings due to dilution.
  • Hypoperfusion and inadequate circulation. See our previous remarks on this, and remember that venous sources will be more accurate than capillary.

Finally, are there medications that can interfere with glucometer accuracy? There sure are. These in particularly are highly device-dependent, with the glucose oxidase-type meters most often affected. Generally, the effects are not profound, but occasionally they may be clinically relevant.

  • Ascorbic acid. Better known as Vitamin C, some people take megadoses of this stuff, thinking it’ll cure their cold or flu. Depending on the meter it can cause falsely high or low readings, usually a minimal change, but at “megadose” levels the effect can be significant.
  • Acetaminophen. Also known as Tylenol. The effect is similar to ascorbic acid, but even more modest; it should only be considered in major overdoses, and even then the difference is unlikely to break 35.
  • Dopamine. Massive doses, such as might be used for intensive inotropic support, can modestly influence glucose dehydrogenase-based meters.
  • Mannitol. High doses can elevated the measured BGL by around 35.
  • Icodextrin. This is a dialysate solution used for peritoneal dialysis (not hemodialysis — this is where they pump fluid into the abdomen, let it sit, then drain it out), mainly in patients with diabetes. It metabolizes to maltose, which can cause falsely elevated readings in certain meters. There’s at least one tragic and unfortunate case report of a patient death resulting from massive insulin overdose due to this effect, not noticed until the true BGL was obtained by laboratory analysis. If your patient undergoes peritoneal dialysis, try to find out what dialysate is used, and if that’s not possible, it may be safest to assume their sugar is lower than you’re measuring.


Conclusions

After all this you’re probably thinking glucometry is so convoluted and rife with pitfalls that you’re better off just eyeballing how sweet your patients are. But don’t let me turn you off! This remains one of the best assessment aids we have, because diabetic emergencies remain some of the most common, most treatable, and most easily confused disorders that we encounter. We can’t perform exploratory surgery, and we may never see prehospital CT scans, but this is a diagnostic test that’s so cheap and simple, with such real potential to affect your decisions, that it should be available everywhere. If you maintain your equipment, learn how to do it right, and keep a few basic confounders in mind, it’ll serve you well as one of your most reliable tools.

Glucometry: How to Do it

Read part one at Glucometry: Introduction

So we want to know how much glucose is in our blood. How can we determine this?

Most modern systems involve a handheld electronic meter, which accepts disposable test strips. The general method:

  1. Insert a strip into the meter; this usually turns it on automatically, and the screen will indicate when it’s ready for a sample.
  2. Clean the patient’s fingertip with an alcohol swab.
  3. Using an automatic lancet (a spring-loaded needle), prick their finger-tip, drawing out a droplet of blood. You may need to push or massage the skin toward the puncture site in order to “milk” blood out, particularly if there’s poor circulation.
  4. [Optional] Many services recommend wiping away the first drop of blood and drawing out a second for your sample.
  5. Once you have a sizable, “hanging” drop of blood, apply it directly to the sample site on the test strip. It will wick inside and be absorbed.
  6. The meter will usually display some kind of count-down. Once it’s finished analyzing, it will show the blood glucose concentration (BGL) in mg/dL or mmol/L.
  7. Apply a band-aid to the site, and dispose of the test strip, lancet, and other bloody bits as appropriate.

What magic happens when you apply blood to the strip? There are a few methods.

(Skip this paragraph if chemistry wasn’t your favorite class.) As a general rule, the glucose in the sample is broken down by an enzyme (often glucose oxidase, or a version of glucose dehydrogenase). This reaction is proportional to the glucose concentration, and can be visualized by the accumulation of an indicator; the more glucose that reacts, the more color develops, and this is measured by a photometric transmission sensor. Alternately, in most current sensors, a more modern and somewhat more robust electrochemical method is used; here glucose is selectively oxidized, and electrons are pulled across a mediator to an electrode, which measures the current generated — either average, peak, or total depending on the type of analysis.


Results

Across the US, blood glucose is measured in the units mg/dL (milligrams per deciliter). In much of the rest of the world, the unit is mmol/L (millimoles per liter). This means that if your paramedic buddy from the UK is telling you about a diabetic he treated, the numbers may seem peculiarly low. Since we’re mostly Yanks here, we’ll be working in mg/dL, but if you ever need to convert to mmol/L, you can simply divide it by 18 (or multiply by 18 to get from mmol/L back to mg/dL).

Much like vital signs, textbook ranges for “normal” blood glucose levels vary. A loose range for practical purposes would be around 70–140, although ideally we should be under 100 most of the time, and routinely testing over 125 is not a great indicator for your health. Numbers will be elevated after eating, but non-diabetics still shouldn’t break 200 or so.

Although we’ll talk more about clinical interpretation later, in general it’s safe to say that the lower the number, the more each point matters. The difference between 70 to 50 can be profound, while the difference between 200 and 180 may be totally undetectable.


Accuracy and Precision

Glucometers have evolved through quite a few generations by now, and they continue to improve in robustness and reliability. Most diabetics use them regularly to track their sugar and thereby guide their diet and medications.

How accurate are they? Depends on who you ask. The American Diabetes Association says that at a minimum, they should give readings within 15% of the true value, and ideally manufacturers should shoot for an error of under 5%, at all concentrations. But percentages can be a confusing way to measure it, because as we observed, a 15% difference at a sugar of 500 (a possible range of 425–575) may mean little, while a 15% difference at a sugar of 60 (a range from 59, which is low, to 69, which is about normal) can be rather important. So the FDA says this instead: 95% of the time, for values below 100, meters should be within 20 points of the true value, while for values above 100, they only need to be within 20 percent.

Whatever the case, every meter varies, but generally they can be relied upon to fall within about 15% of reality, as long as no user errors or confounding factors (we’ll talk about those) are present.


Blood Source

Traditionally, capillary blood for glucometry is taken from the fingertips. This is painful, so most modern glucometers have been evaluated to determine their accuracy when blood is drawn from alternate sites. Any location with lean, vascular muscle close to the surface (i.e. not too much fat overlying, which you may not be able to penetrate with a lancet) can be usable — the forearm is the most common site. The research has shown that this practice is generally fairly accurate for routine purposes, but the danger is that BGL from the forearm lags behind that from the fingertips. It takes longer for these readings to approach reality — about 30 minutes, in fact, before you’ll read the same from the forearm as you’d read at the fingertip, and until then the numbers may be radically wrong (for instance, a reading of 145 when it’s really 50). So glucometer manufacturers recommend that diabetics always use the fingertip when there’s any question of hypoglycemia, when they’ve recently eaten, or any time when it’s important to have the most current and accurate figure. Obviously, this is always important for EMS, so we should generally stick to fingers.

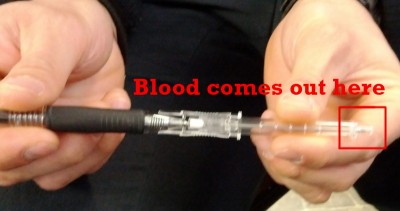
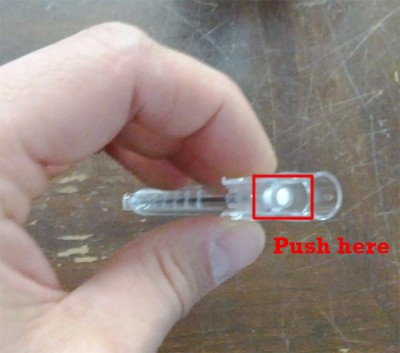
On the other hand, in many areas it’s common for paramedics to start IVs and then use a drop of blood from the catheter’s flash chamber for glucometry. Briefly, like so:


A used catheter (needle inside)


The rubber stopper behind the flash chamber


Press on the rubber until a usable drop of blood comes out the end


This method works, saves you the trouble of lancing a finger, and spares the patient some extra pain. But it’s usually considered technically incorrect, because the blood in the catheter is venous, whereas glucometers are calibrated for capillary blood. See, since venous blood has already given up glucose to the tissues whereas capillary blood is still in the process of doing so, venous BGL is lower than from capillary sources — usually about 5–10 mg/dL. (If by chance you have a source of arterial blood, then that should be higher still.) However, after eating, particularly carb-rich foods, capillary sugar may be as much as 25% higher than venous, because of the extra glucose sequestered in the muscular tissue. (Stockpiling this fuel is why marathon runners like to “carbo load” before events.)

With that said, I’m going to make a controversial recommendation: in most cases, whenever it’s available, venous blood should be used instead of capillary blood. If someone has started an IV, then you should be using that instead of a fingerstick. Why? Despite the small and usually predictable difference, in sick people, it’s actually a more accurate result.

In sick people, circulation is often impaired; this is particularly true in situations like shock, sepsis, and the mother of all shock states, cardiac arrest. When perfusion is poor, the first thing we lose is the peripheral circulation, and it doesn’t get more peripheral than the capillaries of the fingertips. What does this mean? It means that in many acute patients, when it’s important to have accurate diagnostics, capillary blood sugars can be utterly, totally inaccurate. Since blood is no longer moving actively through the periphery, it tends to “pool” there stagnantly, letting the tissues chew through its glucose supply without resupplying it. This results in a falsely depressed capillary BGL even when the venous BGL is normal. Conversely, it’s also possible that in poor circulation, the distal capillaries are the “last to hear” about a drop in sugar, resulting in a falsely elevated BGL. But high or low — usually low — it’s not reliable. Anybody with impaired circulation should get a venous glucose if there’s a chance of it affecting care. (And if there’s no chance of it affecting care, then why do it?) By the way, this includes impaired local circulation, such as patients with PVD. Not that a diabetic would ever have PVD…

(Edited 6/12/12: A few commenters have pointed out that the practice of drawing blood samples from used IV catheters can present a safety risk; although modern safety catheters usually retract or obscure the needle, this is not a fail-proof mechanism, and pushing on the plunger can potentially lead to an accidental stick. We should all be sensible about this sort of thing, so be cautious and give a moment of serious thought to the conditions, equipment, and your technique before trying such a move — and of course be aware of any policies your service has on the subject.)


Coding and Calibration

The important business during glucometry is taking place in the test strip, where the actual chemical reaction occurs. Since this is a rather minute organic event, individual test strips tend to vary a little in their performance.

Traditionally, this is handled by lot coding. Each batch of strips (they come in packs of so-many) would usually include an electronic coding strip, which looks like a regular test strip, with some extra electronics attached. You insert it into the meter, and it automatically calibrates it for the current lot. If your device works this way, it is essential that you code your meter for the lot you’re using, and do not mix your strips with those from other lots; your results can be off by over 30% due to using the wrong code. However, many current glucometers no longer require coding, either by automatically self-calibrating using information in the strip itself, or by controlling manufacturing tolerances so that all strips are the same. Read the manual or check your policy!

Now, is a rose a rose, or are there different BGLs out there? Really, there are two that matter. When we prick the finger and sample capillary blood, we’re measuring the glucose concentration in whole blood — the raw, unmodified stuff running through your veins. We could also take that blood, centrifuge out all the big cells (particularly red blood cells), and measure the glucose in the plasma that remains. This latter method is how it’s done in the laboratory, and this is the gold standard for this type of test. (In the handheld glucometer, the test strip usually uses a filter to either absorb or lyse the red cells, but their presence still affects the measured concentration.)

Why does this matter? Only because whole blood BGL differs slightly from plasma BGL. Since the number is a concentration, and the presence of hemoglobin slightly dilutes the blood, plasma values are typically 5-15% higher than than whole blood values. In most of us it’ll be about 11%, but the exact difference depends on how much space your red blood cells are filling up, aka your hematocrit, so that estimate only works for people with a normal “crit” (around 45). The higher your crit, the larger the difference (and the levels of other circulating lipids and proteins can be relevant as well). The good news? In order to make home BGL readings comparable to laboratory readings, most glucometers report results as a “plasma equivalent,” either by assuming a normal crit and performing a quick mathematical adjustment, or by actually measuring the hematocrit. Some meters can be set to display either whole-blood or plasma equivalents, and ideally we should know which we’re looking at, but plasma is usually the default.


Ketones?

We know that when hyperglycemia becomes severe, the body often develops high levels of ketones in the blood and urine. (These are involved in a secondary metabolism that cells can use as an alternative to directly consuming glucose.) Lots of ketones in a diabetic is a corroborating sign of a highly elevated sugar, and suggests deterioration to diabetic ketoacidosis, a dangerous state involving a deranged pH.

There are handheld meters that can measure ketone levels, but simple glucometers can’t. However, many models have a feature where, if BGL is found to be over a certain level (often around 300), an indicator will light up with a warning like: ketones?

This is not indicating that ketone bodies are present, which the meter can’t know, but is merely a reminder that at these glucose levels, we should consider the possibility of their presence. Which, as clinical wizards, we already knew, so it doesn’t tell us much. (In fact, it’s more intended for patients, who may have the specialized strips with which to measure their ketone levels.)


Takeaway points:

  1. Glucometry can vary by around 15% even when it’s working correctly.
  2. Use venous blood (e.g. from an IV) rather than capillary blood (from a fingerstick) whenever possible.
  3. If using capillary blood, use a finger rather than alternate sites like the forearm.
  4. If your meter needs coding, make sure you do it.
  5. Remember that many conditions (such as shock, PVD, and a recent meal) can alter capillary BGL, and some (such as anemia or hyperlipidemia) can even alter a venous reading.
  6. Ordinary glucometers don’t measure ketones.


Tune in next time for a discussion of more clinical phenomena that can influence blood glucose readings, as well as interpreting and applying the results in real patients.


Editor’s note: Remember that although we often don’t cite specific references for our figures and data, if you ever want to know what studies or evidence we’re using to support our claims… just ask! We’re happy to oblige. This applies to all of our posts, but may be particularly germane for this one, where some specific and possibly controversial points have been made.

Product Review: Shoes for Crews Maverick

About a month ago I was solicited over email by a marketing agent working on behalf of Shoes for Crews, a designer and vendor of its own line of work shoes and boots. They offered me a free pair of their boots — my choice — in exchange for a review on this site.

I was, at the time, extremely reluctant and uncertain about this. I have very little to offer as a blogger and “authority,” and the small service I do provide is largely predicated upon my credibility; in other words, I may not know much, but I try to be as honest, impartial, and accurate with the small amount of information that I do provide. Taking free swag in exchange for kind words seems like a slippery slope at best. It’s more important to me to be able to, in the future, recommend a specific product because it’s worked well for me — without anybody wondering if I’m getting a kick-back for it — than to benefit from occasional free goodies.

I eventually agreed under the clear and explicit terms that I would write exactly what I thought, with no prevarication or white-washing. If I liked the boots, I’d say that; if I had reservations, I’d share them; and if I thought they had no role in EMS, then I’d say that too, and in that case their marketing effort would be counter-productive. They agreed to this, which I suppose was a calculated gamble.

So here’s the review. I doubt that this company will be sending me more boots, whether or not they appreciate this post, but in the future the same type of situation may arise, so I’m very eager to hear any opinions — positive or negative — on this practice. Does it leave a bad taste in your mouth, and make you less inclined to run your eye over our next volume on drug interactions or pulsus paradoxus? Or do you find this sort of thing useful?


The Company

Shoes for Crews is not a new company, although they’re new to me; they’ve been around for several decades now. Their claim to fame seems to be their slip-resistant soles, which use a patented tread-pattern and material to allow high traction in dangerous environments like wet floors or oil splatters. Their line runs from slip-ons to high-top firefighting boots, and the general theme is similar to Red Wings — basically footwear for working folks who are on their feet all day and need both comfort and protection.

Lately they seem to have been making a marketing blitz, possibly due to enlisting the help of the service that contacted me, and I’ve been seeing their ads everywhere. I even received a memo from HR at my job offering a company discount for their products. The social media angle has been aggressive (via Facebook, Twitter, and obviously blogs like this), and on some level I have to admire it. After all, it’s clearly working.

In my experience, boots for EMS fall into about three ranges. There’s the low-end range, ballpark of $40 or so, which is mainly low-cut shoes you find at Walmart or other generic retailers, intended for waiters and entry-level jobs. They can look good and seem somewhat serviceable for brief periods, but invariably they fall apart, sometimes catastrophically, after a few months. After that, there’s the mid-range, around $100, where the bulk of workhorse EMS and police boots fall — Bates, 5.11, Rocky, etc. These are good boots that wear well and last, perhaps, from 1–4 years depending on care and your tolerance for their final appearance. (All of my own boots have been this type.) Finally, there’s the high-end lines — Haix, Danner, and others — usually in the $200 range. These should last approximately forever, are built from high-end materials with scrupulous manufacturing, and ideally add an extra level of comfort.

Shoes for Crews seems to sit on the low end of the mid-range category. Many of their boots are in the $70–$80 territory, which is a pretty affordable boot if you’ll wear it for a solid few years.


The Boots

As I flipped through their collection, my first impression was that there weren’t too many styles that seemed suited for EMS. Typically our uniforms require black footwear that will take a polish, and I like a side-zip for easy ins and outs.

The models that seemed most appropriate included the Ranger; the Yukon; the Expedition; the Empire; and the Legionnaire. (None, sadly, included a zipper. Maybe next year.) Eventually, I settled on the Maverick, a recent release.

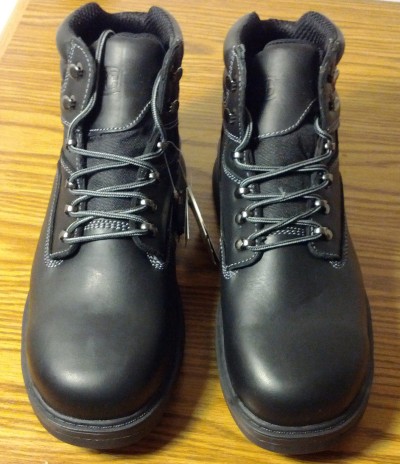
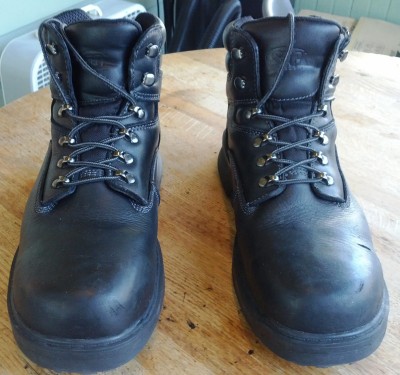
Here they are new out of the box:

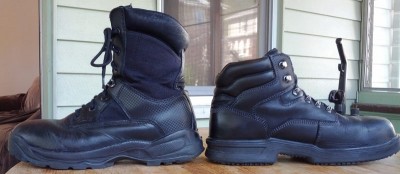
First impression: well-built, good looking all-leather boots. They are relatively low-cut, but they are clearly boots and not shoes; here’s a comparison next to my 5.11 ATACs.

They do have a white-threaded stitching, adding a bit of accent against the black; however, it is barely noticeable and I doubt would run afoul of anybody’s uniform policies. After a few polishes it will probably fade completely.

The lacing system is a typical hiking-boot style, with hooks instead of D-rings for the top two pairs. This is supposed to make it easier to get your foot in and out, but to me it just adds to the lacing process and makes donning and removing them a bit of a chore. I also noticed a couple of the hooks get bent outward during regular use; they bent back easily, but it may be a common issue. Although I didn’t try it, I wonder if you could use a pair of pliers to fold them tightly in around the lace, converting them into semi-permanent lace-retaining tubes instead of open hooks.

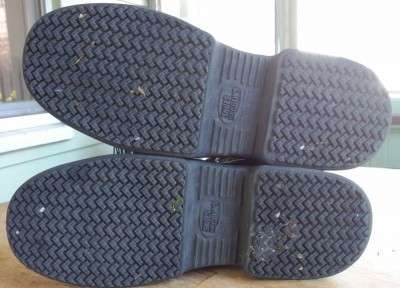
Here’s the slip-resistant soles after some wear:

Slip resistance, although undoubtedly positive, is not exactly something I lay awake at night worrying about. However, I admit that these soles felt good, with solid traction on all surfaces including soapy washfloors and the occasional grease patch. They seemed to do well on loose soil as well, although I didn’t do much off-roading in them. They are also, for any aspiring ninjas, very quiet.

The uppers are all leather, without any nylon or mixed surfaces. Although it takes longer to polish, I prefer this look to a two-tone or “patchy” style; one does wonder how well it breathes in the heat, but I had little trouble on some reasonably hot days. They felt decent in the cold as well (it’s been a rollercoaster month), so for moderately extreme temperature ranges I’d give them a thumbs up.

The product page makes the fairly strong claim of “waterproof.” Many boots say water resistant and some say waterproof, but within the low and middle price ranges this usually means some kind of external treatment or half-hearted membrane that lasts a year or two at the most. I saw no mention of a Gore-Tex or similar liner on mine, so that may be the case here as well. However, they do have a gusseted tongue, and on moderately rainy days, as well as a leisurely test session of soaking them in several inches of bathwater, I noticed not one drop of moisture penetration.

This is how they look after about a month of use (every shift at work plus many days off):

So they’re reasonably durable. The leather is actually somewhat soft, so I have some concern for how it’ll hold up in the long-term; you notice one small cut already on the left boot. I gave them one quick shine when I first received them, and that’s held up well. The particular style at the edges also seems to help prevent scuffing the toe. The included laces do seem pretty frail, already looking a little scruffly after a month, and I’ve read reviews that others have had similar experiences; laces are easily replaceable, of course.

These have a composite toe, which I found quite light compared to steel toes I’ve used in the past. Combined with the lower cut, they’re overall not heavy boots, although obviously heavier than a soft-toed variant. The good news is that the toe is very roomy and never felt confining, which is something I’ve always experienced with safety toes; the box is built quite high, which is actually noticeable from the outside, giving a bit of a square, blocky look.

How about comfort? These are actually quite comfortable boots. Partly it’s because of the low cut (which makes driving particularly easy), but mainly they just feel like boots designed for humans to wear, unlike many uniform boots which seem primarily intended as ornate buttcaps for bipedal robots. They are quite rigid, with a steel shank and more arch support than I’ve ever had in a boot, and the feel of the heel and overall “stance” against the ground is very stable and comfortable. I feel better lifting in these than in my current boots, extremely stable while stair-chairing, and I could almost certainly wear these to the gym to squat, press, and deadlift without any difficulty. The collar is heavily padded, and although it took a few days before it stopped feeling noticeably stiff against my ankle (the only real break-in), after that it’s been perfect. The insoles are replaceable, too, if you have your own orthotics.

My two biggest gripes, in the end, are these:

  • The low cut. Every pair of uniform paints I’ve ever received has been (at least after a wash) laughably short, barely reaching my instep while standing and “flooding” embarrassingly whenever I bend my leg. As a result, wearing a low-rise boot like this makes the gap extremely noticeable; my pants almost don’t reach my boots even while standing. With properly-fitted pants, it wouldn’t be as bad, but I still feel that a medium-rise boot is a more professional look.
  • No zipper. I tried to adjust to this, but particularly on overnight shifts, it’s a deal-breaker; having to lace and tie these every time I pull them on, and reverse the process to get them off (even just to rest my feet for a bit) is like switching from a cotton T-shirt to a corset. It’s enough to make me wonder if I could buy a center-zip panel like Haix makes and lace it into the front, but I doubt it would fit.

Final Thoughts

So with all of that said and done, what are my take-away impressions of these boots?

They are generally well-thought-out work boots, very appropriate for their primary market (for instance, warehouse personnel, contractors, or repairmen), and with an overall pretty good quality. They are obviously not specifically aimed at the EMS/fire/police market, but there are not too many gaps (targeted “EMS boots” are usually bizarrely overbuilt, anyway), and the main difference seems to be one of feel. My quibbles with them are enough that they won’t be replacing my existing boots, but I will wear them occasionally, and in fact they make decent-looking off-duty shoes (my girlfriend approves). Moreover, I know many field staff who don’t mind, or even prefer, low-cut and zipperless uniform boots, and for them I do recommend the product. The value is good, and if you can find some sort of discount (and they seem to be falling from trees), all the better.

I’d love to hear from anybody else who’s tried these, or better yet, one of the other Shoes for Crews models; I’d suspect that many of them are pretty similar in the overall feel, but there may be some important distinctions.

Best of all, SfC has provided me with a coupon code for one more free pair of any of their products to give away to one of you lucky folks. EMS Basics isn’t exactly The Price Is Right, and we don’t do a lot of contests, but here’s what I’d like to do: if you’re interested in a free pair of boots, post to the comments below describing:

  1. What boots you currently wear, and what you like/dislike about them
  2. What features are important to you in a pair of uniform boots
I’ll pick a random winner from those who respond.

Eight More Tips on Ambulance Wrangling

Our apologies for the lack of updates while we battle technical difficulties here at EMSB HQ. Here’s a few quick tips to tide you over until the next meaty helping of knowledge.

Still learning your way around that temperamental home-away-from-home we call the ambulance? Try these ideas for making life easier. As always, they apply foremost to the Ford diesel chassis, but may work elsewhere as well.

  1. If your stretcher mount is misadjusted, you may have trouble getting the side-rail to “release” and lock home when you insert the stretcher. Whether it’s too tight or too loose, try the following maneuvers, in this order: pull back (toward you); stand on the step and lift it directly up; sit on the leftmost side of the bench seat, place your feet on the lower deck of the stretcher base (this is the rail upon which the wheels are mounted, not the upper rail that holds the mattress), and use your legs to firmly press it into the side bracket. Do not, except in utter extremis, solve this problem by “slamming” the stretcher against the wall.
  2. If your backboards don’t fit their slot snugly, they tend to bang around at every turn. Try folding a large towel or two into a thin strip (6″–12″), rolling it tightly so that it forms the thickest possible pad, then stuffing it into the void so that everything’s held snug. (You can stuff anything in there, but you need something pretty substantial and the rolled towel seems to work best.)
  3. If you have a module power switch in the cab, but no remote switch for the patient compartment heat/AC, get in the habit of leaving the thermostat switched on in the back, blasting whatever air is appropriate for the weather. Then to save the battery, kill the module power whenever you shut off the engine. That way, you can pre-heat or cool the passenger compartment while on your way to a call by just throwing the switch up front.
  4. If you’re not feeling up to shutting your door to the cab, you can usually get it to close by shoving it outward hard and letting it “bounce” off the hinge and recoil shut. In fact, you may be able to bounce the passenger-side door closed (if you’re at the wheel and an absent-minded partner leaves it open) by tapping the gas and then hitting the brake. A caveat: I have yet to hear the opinion of fleet maintenance on this practice.
  5. If it’s a truly scorching day, park in the deepest shade you can find, set the high idle (usually by locking the parking break), and prop open the hood to help ventilate. (The hood will often stay open without use of the support rod if you lift it all the way up and rest it against the windshield.) Remember that “Max A/C” recirculates the interior air, making it increasingly cold, while “Norm A/C” will continuously introduce fresh air.
  6. From the “off” position, turn the ignition key backward (towards you) rather than forward to activate the “accessories” mode. This activates the FM radio, windows, etc. but will automatically shut off power before your battery runs dangerously low; that way you can sit there with power without running the engine. However, test this to see if your two-way radios will remain on in this mode; I’ve seen it work both ways.
  7. Look around the passenger compartment, particularly on the rear doors. Are there any speakers visible? If so, you can probably pipe music back here from the FM radio in the cab, a great way to keep patients entertained if they’re game. Just like in your car, the radio should have settings to adjust the balance, which controls how much volume comes through the left vs. the right speakers, and the fade, which controls how much volume comes through the front vs. the rear speakers. Normally, it will be faded all the way forward; just adjust it into the middle to pump your jam through the speakers in both compartments. Try asking what genre they prefer, and for bonus points, plug in your iPod for a fully DJ-able experience. Just remember to fade everything forward again at the end of the call, or you’ll inadvertently subject all your future patients to your Taylor Swift Experience.
  8. Run your seatbelt adjuster (there should be a slider where it attaches to the wall) all the way up to the top, keep it buckled, and the belt will make a pretty decent pillow for your cheek.
Anyone else have some good ones to share?

What’s it got in its Pockets?

As a reward for bearing with me on the very, very, very, very, very long journey through shock, let’s turn to a somewhat lighter topic. This is a perennial favorite on the online EMS haunts: what do ya carry in your pockets during your shift?

Personally, I’m of the belief that everyone on the ambulance should have at least a few essential items:

Gloves — a more or less essential tool, even if you don’t always wear them you should always be prepared to, and there’s nothing worse than needing to hunt down a pair when things are moving quickly. Sometimes I’m surprised at how many you can go through on a single call. I keep a handful in one pocket and a single lonely pair in another, so I have a “ready” set that can be easily grabbed without having to peel them off from the wad. Remember to restock your supply when the call is done.

Paper — something to write on. Although I find that I write down less the more experienced I become, this is still a non-negotiable tool. I’ve carried a variety of small pads, but nowadays prefer a stack of 3×5 index cards held together with a binder clip — they work better when you’re writing something to hand to someone else, which I often am (noting vitals to give to my partner, for instance). Cards are also useful for holding open the latch on self-locking doors, leaving notes, and various other miscellaneous tasks.

Pen — ’nuff said. Even if your service has gone mostly digital, an EMT without a pen is like a knight without a sword. Also useful for poking blood samples from catheters for glucometry, testing sharp peripheral sensation, and stabbing zombies in the eyeball.

Watch — admittedly not usually stored in the pockets unless you’re Mr. Monopoly. Other than mundane needs like determining when you get to go home, without a working timepiece you can’t properly take vital signs. (Pulling out your cell phone here is only one step better than recording your signs via x-ray “vital vision.”) Something durable, light, and cheap is recommended, but anything that counts seconds will work.


That covers the absolute essentials. But there are a few other items that I’d place just barely behind essential, including:

Flashlight — some sort of small but bright penlight usually works well. This isn’t a clinical penlight for examining pupils — you’d probably burn their jelly right out — but something bright enough for searching a night-time scene, finding things you’ve dropped, and otherwise navigating the darker areas of life. Quite essential on certain shifts and valuable at all times; I recommend something water resistant, with a clip. I like the Streamlight Stylus Pro.

Shears — for all those things in the world that need cutting, a pair of standard trauma shears can’t be beat. Aside from stripping clothes off your patients, with a firm grip these can cut anything including the horizon — seatbelts, wayward tubing, tape, whatever. They also come in handy for wedging into doors, holding open fuel handles, reflex testing, and chucking at angry geese.

Knife — most people seem to carry one, and there’s always one guy who asks “why? shears work better.” Shears do work better for most cutting, but a knife works better for prying, poking, scraping, or levering, and that’s typically how it gets called into use. In almost no case will a knife be useful (or appropriate) in a clinical role, but it seems to be continually called into use for the daily minutiae of EMS — opening packages, fixing equipment, and so on. An affordable but quality folding knife with a clip and a lock is a good choice, and I’m a believer in half-serrated blades — that way you have a smooth edge for prying or slicing, but also an aggressive edge to start cuts in tough materials. I use a Spyderco Delica, an old classic.

Phone — perhaps it shouldn’t be, but nowadays a good cellphone seems almost irreplaceable. I use mine to speak with dispatch or supervisors when the radio isn’t appropriate, to call medical control, occasionally to give ED entry notifications… to note door codes and other tidbits… it has a GPS when needed, and useful reference apps like Epocrates (which includes cool tools like a pill identifier)… you can Google to check drugs names or disorders you’re unfamiliar with… real-time language translators are available… the list goes on. See the DroidMedic for ideas on using these little multitaskers.

Stethoscope — most folks seem to own one, but they don’t always have it on them. If there’s one truism to this job, it’s that the times when the poop hits the fan are never the times you’d expect it to, so try and be prepared. Your service probably provides cheap scopes, which tend to be loud but poor at filtering out background noise, making them less than useful in a busy scene or ambulance. For better or for worse, a stethoscope is also something of an identifier for the medical professional, and can do much to convince the public that you Know Things. Littmann is the most famous and popular brand, but you can probably spend less on others if you know what you’re getting. If it’s not in your pocket you’ll probably forget it when you need it, so I like a model that’s fairly light and can lay flat; I use a Littmann Master Classic II, which has no bell (which tends to be difficult to use in the chaotic prehospital environment anyway) and as a result has a very low-profile head. Mine’s in the most obnoxious baby blue I could find and my name’s all over it, in an attempt to discourage light-fingered coworkers.


Finally, there are the things that aren’t particularly vital, but come in handy if you’re willing to stick them in a pocket somewhere.

Penlight — a standard assessment tool. Probably available in your bags or cabinets but it’s convenient to have one immediately available.

Pocket reference — I recommend making your own.

Extra pen — because pens disappear. I also like to carry a permanent marker for things like labeling unmarked BP cuff bags (put on a bit of tape and write on that — is it an infant cuff? adult cuff? a bunch of OPAs?), marking pulse points, and the like.


There have been other things I carried in the past, but nowadays this about makes up my pocket milieu, and seems to strike a good balance of utility vs. clanking like the Tin Man. (Some people like to store stuff on their belt, but I tend to find that a little silly.) I have a work bag with other junk in it, but that’s a topic for another day.

Anyone have other items they find terribly useful? The variety on this issue seems nearly limitless.