Read part one at Glucometry: Introduction
So we want to know how much glucose is in our blood. How can we determine this?
Most modern systems involve a handheld electronic meter, which accepts disposable test strips. The general method:
- Insert a strip into the meter; this usually turns it on automatically, and the screen will indicate when it’s ready for a sample.
- Clean the patient’s fingertip with an alcohol swab.
- Using an automatic lancet (a spring-loaded needle), prick their finger-tip, drawing out a droplet of blood. You may need to push or massage the skin toward the puncture site in order to “milk” blood out, particularly if there’s poor circulation.
- [Optional] Many services recommend wiping away the first drop of blood and drawing out a second for your sample.
- Once you have a sizable, “hanging” drop of blood, apply it directly to the sample site on the test strip. It will wick inside and be absorbed.
- The meter will usually display some kind of count-down. Once it’s finished analyzing, it will show the blood glucose concentration (BGL) in mg/dL or mmol/L.
- Apply a band-aid to the site, and dispose of the test strip, lancet, and other bloody bits as appropriate.
What magic happens when you apply blood to the strip? There are a few methods.
(Skip this paragraph if chemistry wasn’t your favorite class.) As a general rule, the glucose in the sample is broken down by an enzyme (often glucose oxidase, or a version of glucose dehydrogenase). This reaction is proportional to the glucose concentration, and can be visualized by the accumulation of an indicator; the more glucose that reacts, the more color develops, and this is measured by a photometric transmission sensor. Alternately, in most current sensors, a more modern and somewhat more robust electrochemical method is used; here glucose is selectively oxidized, and electrons are pulled across a mediator to an electrode, which measures the current generated — either average, peak, or total depending on the type of analysis.
Results
Across the US, blood glucose is measured in the units mg/dL (milligrams per deciliter). In much of the rest of the world, the unit is mmol/L (millimoles per liter). This means that if your paramedic buddy from the UK is telling you about a diabetic he treated, the numbers may seem peculiarly low. Since we’re mostly Yanks here, we’ll be working in mg/dL, but if you ever need to convert to mmol/L, you can simply divide it by 18 (or multiply by 18 to get from mmol/L back to mg/dL).
Much like vital signs, textbook ranges for “normal” blood glucose levels vary. A loose range for practical purposes would be around 70–140, although ideally we should be under 100 most of the time, and routinely testing over 125 is not a great indicator for your health. Numbers will be elevated after eating, but non-diabetics still shouldn’t break 200 or so.
Although we’ll talk more about clinical interpretation later, in general it’s safe to say that the lower the number, the more each point matters. The difference between 70 to 50 can be profound, while the difference between 200 and 180 may be totally undetectable.
Accuracy and Precision
Glucometers have evolved through quite a few generations by now, and they continue to improve in robustness and reliability. Most diabetics use them regularly to track their sugar and thereby guide their diet and medications.
How accurate are they? Depends on who you ask. The American Diabetes Association says that at a minimum, they should give readings within 15% of the true value, and ideally manufacturers should shoot for an error of under 5%, at all concentrations. But percentages can be a confusing way to measure it, because as we observed, a 15% difference at a sugar of 500 (a possible range of 425–575) may mean little, while a 15% difference at a sugar of 60 (a range from 59, which is low, to 69, which is about normal) can be rather important. So the FDA says this instead: 95% of the time, for values below 100, meters should be within 20 points of the true value, while for values above 100, they only need to be within 20 percent.
Whatever the case, every meter varies, but generally they can be relied upon to fall within about 15% of reality, as long as no user errors or confounding factors (we’ll talk about those) are present.
Blood Source
Traditionally, capillary blood for glucometry is taken from the fingertips. This is painful, so most modern glucometers have been evaluated to determine their accuracy when blood is drawn from alternate sites. Any location with lean, vascular muscle close to the surface (i.e. not too much fat overlying, which you may not be able to penetrate with a lancet) can be usable — the forearm is the most common site. The research has shown that this practice is generally fairly accurate for routine purposes, but the danger is that BGL from the forearm lags behind that from the fingertips. It takes longer for these readings to approach reality — about 30 minutes, in fact, before you’ll read the same from the forearm as you’d read at the fingertip, and until then the numbers may be radically wrong (for instance, a reading of 145 when it’s really 50). So glucometer manufacturers recommend that diabetics always use the fingertip when there’s any question of hypoglycemia, when they’ve recently eaten, or any time when it’s important to have the most current and accurate figure. Obviously, this is always important for EMS, so we should generally stick to fingers.
On the other hand, in many areas it’s common for paramedics to start IVs and then use a drop of blood from the catheter’s flash chamber for glucometry. Briefly, like so:

A used catheter (needle inside)
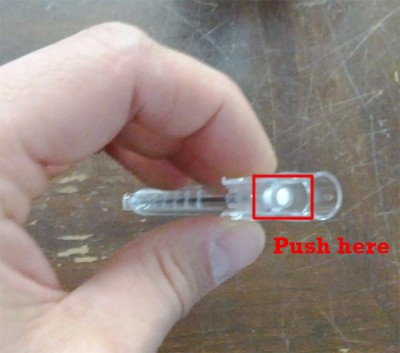
The rubber stopper behind the flash chamber
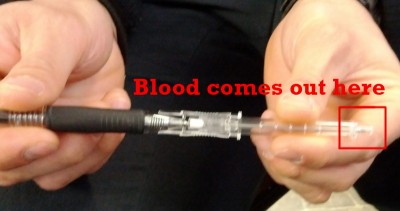
Press on the rubber until a usable drop of blood comes out the end
This method works, saves you the trouble of lancing a finger, and spares the patient some extra pain. But it’s usually considered technically incorrect, because the blood in the catheter is venous, whereas glucometers are calibrated for capillary blood. See, since venous blood has already given up glucose to the tissues whereas capillary blood is still in the process of doing so, venous BGL is lower than from capillary sources — usually about 5–10 mg/dL. (If by chance you have a source of arterial blood, then that should be higher still.) However, after eating, particularly carb-rich foods, capillary sugar may be as much as 25% higher than venous, because of the extra glucose sequestered in the muscular tissue. (Stockpiling this fuel is why marathon runners like to “carbo load” before events.)
With that said, I’m going to make a controversial recommendation: in most cases, whenever it’s available, venous blood should be used instead of capillary blood. If someone has started an IV, then you should be using that instead of a fingerstick. Why? Despite the small and usually predictable difference, in sick people, it’s actually a more accurate result.
In sick people, circulation is often impaired; this is particularly true in situations like shock, sepsis, and the mother of all shock states, cardiac arrest. When perfusion is poor, the first thing we lose is the peripheral circulation, and it doesn’t get more peripheral than the capillaries of the fingertips. What does this mean? It means that in many acute patients, when it’s important to have accurate diagnostics, capillary blood sugars can be utterly, totally inaccurate. Since blood is no longer moving actively through the periphery, it tends to “pool” there stagnantly, letting the tissues chew through its glucose supply without resupplying it. This results in a falsely depressed capillary BGL even when the venous BGL is normal. Conversely, it’s also possible that in poor circulation, the distal capillaries are the “last to hear” about a drop in sugar, resulting in a falsely elevated BGL. But high or low — usually low — it’s not reliable. Anybody with impaired circulation should get a venous glucose if there’s a chance of it affecting care. (And if there’s no chance of it affecting care, then why do it?) By the way, this includes impaired local circulation, such as patients with PVD. Not that a diabetic would ever have PVD…
(Edited 6/12/12: A few commenters have pointed out that the practice of drawing blood samples from used IV catheters can present a safety risk; although modern safety catheters usually retract or obscure the needle, this is not a fail-proof mechanism, and pushing on the plunger can potentially lead to an accidental stick. We should all be sensible about this sort of thing, so be cautious and give a moment of serious thought to the conditions, equipment, and your technique before trying such a move — and of course be aware of any policies your service has on the subject.)
Coding and Calibration
The important business during glucometry is taking place in the test strip, where the actual chemical reaction occurs. Since this is a rather minute organic event, individual test strips tend to vary a little in their performance.
Traditionally, this is handled by lot coding. Each batch of strips (they come in packs of so-many) would usually include an electronic coding strip, which looks like a regular test strip, with some extra electronics attached. You insert it into the meter, and it automatically calibrates it for the current lot. If your device works this way, it is essential that you code your meter for the lot you’re using, and do not mix your strips with those from other lots; your results can be off by over 30% due to using the wrong code. However, many current glucometers no longer require coding, either by automatically self-calibrating using information in the strip itself, or by controlling manufacturing tolerances so that all strips are the same. Read the manual or check your policy!
Now, is a rose a rose, or are there different BGLs out there? Really, there are two that matter. When we prick the finger and sample capillary blood, we’re measuring the glucose concentration in whole blood — the raw, unmodified stuff running through your veins. We could also take that blood, centrifuge out all the big cells (particularly red blood cells), and measure the glucose in the plasma that remains. This latter method is how it’s done in the laboratory, and this is the gold standard for this type of test. (In the handheld glucometer, the test strip usually uses a filter to either absorb or lyse the red cells, but their presence still affects the measured concentration.)
Why does this matter? Only because whole blood BGL differs slightly from plasma BGL. Since the number is a concentration, and the presence of hemoglobin slightly dilutes the blood, plasma values are typically 5-15% higher than than whole blood values. In most of us it’ll be about 11%, but the exact difference depends on how much space your red blood cells are filling up, aka your hematocrit, so that estimate only works for people with a normal “crit” (around 45). The higher your crit, the larger the difference (and the levels of other circulating lipids and proteins can be relevant as well). The good news? In order to make home BGL readings comparable to laboratory readings, most glucometers report results as a “plasma equivalent,” either by assuming a normal crit and performing a quick mathematical adjustment, or by actually measuring the hematocrit. Some meters can be set to display either whole-blood or plasma equivalents, and ideally we should know which we’re looking at, but plasma is usually the default.
Ketones?
We know that when hyperglycemia becomes severe, the body often develops high levels of ketones in the blood and urine. (These are involved in a secondary metabolism that cells can use as an alternative to directly consuming glucose.) Lots of ketones in a diabetic is a corroborating sign of a highly elevated sugar, and suggests deterioration to diabetic ketoacidosis, a dangerous state involving a deranged pH.
There are handheld meters that can measure ketone levels, but simple glucometers can’t. However, many models have a feature where, if BGL is found to be over a certain level (often around 300), an indicator will light up with a warning like: ketones?
This is not indicating that ketone bodies are present, which the meter can’t know, but is merely a reminder that at these glucose levels, we should consider the possibility of their presence. Which, as clinical wizards, we already knew, so it doesn’t tell us much. (In fact, it’s more intended for patients, who may have the specialized strips with which to measure their ketone levels.)
Takeaway points:
- Glucometry can vary by around 15% even when it’s working correctly.
- Use venous blood (e.g. from an IV) rather than capillary blood (from a fingerstick) whenever possible.
- If using capillary blood, use a finger rather than alternate sites like the forearm.
- If your meter needs coding, make sure you do it.
- Remember that many conditions (such as shock, PVD, and a recent meal) can alter capillary BGL, and some (such as anemia or hyperlipidemia) can even alter a venous reading.
- Ordinary glucometers don’t measure ketones.
Tune in next time for a discussion of more clinical phenomena that can influence blood glucose readings, as well as interpreting and applying the results in real patients.
Editor’s note: Remember that although we often don’t cite specific references for our figures and data, if you ever want to know what studies or evidence we’re using to support our claims… just ask! We’re happy to oblige. This applies to all of our posts, but may be particularly germane for this one, where some specific and possibly controversial points have been made.
Very interesting, and well written! I’d love to know your sources for this. Thanks!
For any tidbit/section/topic in particular? I gotta a million over here.
Great article! I would like to add one thing about take blood from your IV cath. The health and safety issues. We must be safe! For many years this technique was supported and widely used until we had a needle stick injury because the safe lock failed or was never engauged. This resulted in a claim to WSIB. (workers insurance program). This claim was denied by the employer and WSIB based on the fact the medic failed to follow manufacture recommendation on the handling of sharps. Any unnecessary handling of a share can put you at risk of needle stick injury. Therefore, if it means the pt gets two pokes so don’t get any than that go for me.
Very interesting point, Stan, and I can certainly see how this could happen if the safety mechanism failed (although I don’t know how common that is). I can certainly see how it would be discouraged at a service level for this reason. On an individual level the answer seems to be awareness of the possible hazard and prudence both in practicing the physical skill and considering when it’s appropriate.
I suppose there are other ways to sample small amounts of blood once an IV has been established, although I don’t know how many elegant ways there are! Anyone have a suggestion?
Usage of the IV cath for a blood sample and its safety issues is a valid point. IV caths, like the one pictured, totally encase the needle. Others, such as the one used by my service, do not encase the needle, rather, a ‘blunting’ device is deployed through the needle. While this can be done safely (mopst of the time) with practice, it should be considered a definite ‘no go’ when attempted in a moving ambulance. I am going to get some pictures up on my blog site soon. I would like to link to this article, if that is OK.
Always okay to link! I don’t think I’ve seen one of those type of needles before.