Continued from Mastering BLS Ventilation: Introduction and Mastering BLS Ventilation: Hardware
Now that we understand the goals and the basic tools, let’s talk about the most important techniques for optimizing airway management and providing BLS ventilation to apneic patients.
Hand Technique
How do you hold a BVM to the patient’s face?
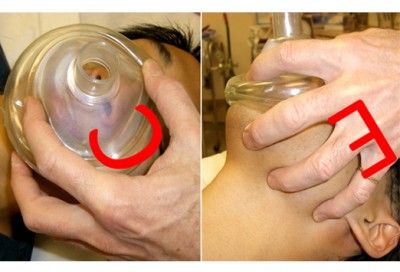
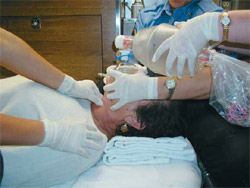
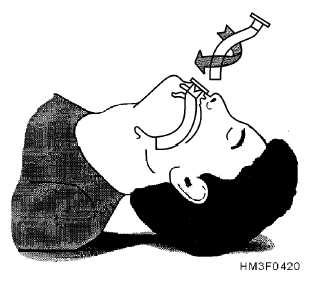
As a rule, we’re taught something called the “EC clamp.” It looks like this:
In theory, this lets us press the mask against the patient’s face (using the “C” of our thumb and forefinger) while pulling the jaw forward (using the “E” of our other fingers behind the mandible), and still leaves one hand free to squeeze the bag.
In theory.
In reality, this is tricky at best. Partly it’s because we’re trying to seal the edges of a circle by pressing on only one side, which usually results in a leak from the other side. Partly it’s because pulling the jaw forward like this — a highly necessary action — takes a fair amount of force, and we’re in a poor position to grip from. It also doesn’t help that, if no OPA is present, this method usually squeezes the mouth shut, leaving only the nasal passage for an airway.
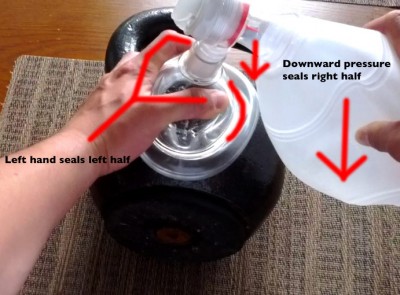
One useful tip: positioning the bag directly opposite your EC hand and pulling it downward can help seal off the most common point for leaks.
Does the EC technique work? It can work. And it’s fast and versatile to apply, so it’s a reasonable place to start. However, if you find that it’s not working, don’t be too surprised. You would be wise to practice the hell out of it on mannequins (or ideally in an OR or similar setting), but not everyone has that opportunity. What’s the alternative?
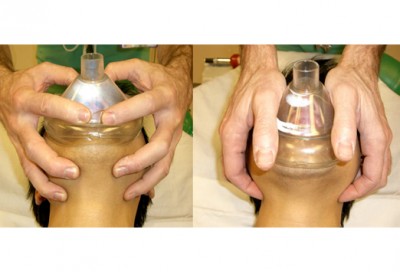
Use two hands. The inelegant nature of the EC clamp has been widely recognized for years, despite the fact that many of us in emergency medicine pretend otherwise. In fact, if you flip open your EMT textbook or the handouts from your last CPR class, you will notice that one-person BVM use is strongly discouraged. (In my Limmer textbook, it’s last in preference after the two-person BVM and even the pocket mask.) In the field, this is ignored, because we adopt the attitude that any EMT should be able to sit at the patient’s head and “handle the airway” without help. But that doesn’t change the fact that it’s a crummy technique, and many of the patients who are “bagged” this way only survive because they didn’t need much help to begin with.
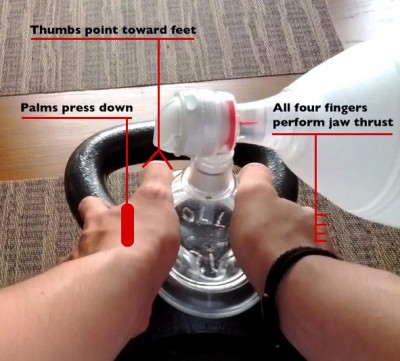
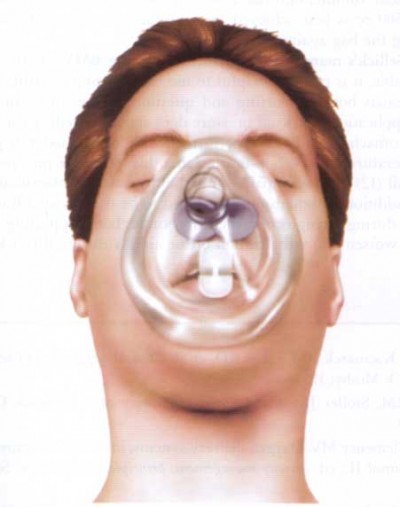
What does work reliably is placing both hands on the mask, thumbs toward the feet and fingers behind the jaw. This way you have a hand on both sides and can easily obtain a seal (and if there is a leak it’s readily located), while also providing a strong bilateral grip to protract the jaw. You can sustain this position for a long time, and as a bonus, it tends to open rather than close the mouth.
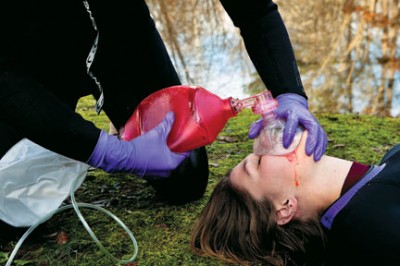
The downside is that it doesn’t leave a hand to squeeze with. Ideally, another rescuer should squeeze the bag. This lets you focus on maintaining the airway while they focus on bagging slowly, gently, and at an appropriate rate. (But remind them to stop squeezing when they see chest rise; with two hands it’s tempting to try and empty the whole bag, which is far in excess of what’s necessary if you have a good seal.) It can even help to separate the mask from the bag entirely, position it perfectly on the face, clamp down your grip, and then allow the bag to be attached and ventilation begun; this ensures everything is where it ought to be. On scene you often have enough personnel for this; in the back of the ambulance you may or may not. Can you still execute this method alone?
You can, and I highly recommend that you work out the logistics now, with your own unique body type and equipment. For patients in a bed or a high stretcher, you can often stand behind the head, hold the seal with your hands, and squeeze the bag with your elbow against your side. In the patient compartment, you can sit in the tech seat and squeeze the bag against one leg with your elbow, or between your knees if you’re an experienced Thighmaster. A supine patient on the ground can be the trickiest position; you may be able to squeeze the bag against a leg or something similar, but often your best bet will simply be to recruit help. (Again, please experiment with this now, so you’re not improvising while a patient turns blue.) Just remember that using two people to bag isn’t a failure, and has no impact on your sexual adequacy; it’s a legitimate method which is supported by literature and explicitly recommended by the experts we’re supposed to be listening to.
The Sniffing Position
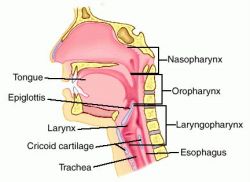
We understand now that successful BLS airway management means maximizing the passable upper airway and minimizing obstructions. Bringing the jaw forward will always be helpful, by pulling the tongue and other anterior structures away from the posterior pharyngeal wall. Now let’s look a little closer at the position of the head itself.
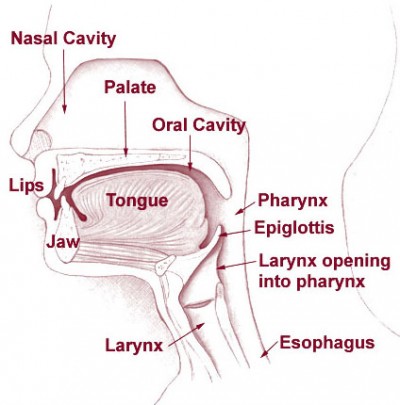
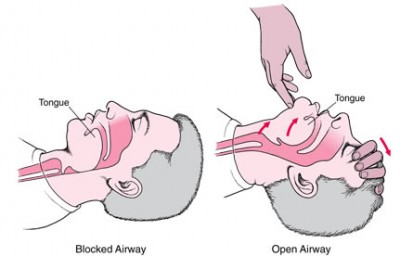
We’re taught to rotate the head back in the head-tilt chin-lift maneuver. Why do we do this? In essence, because it helps align the oral and nasal passages with the pharynx.
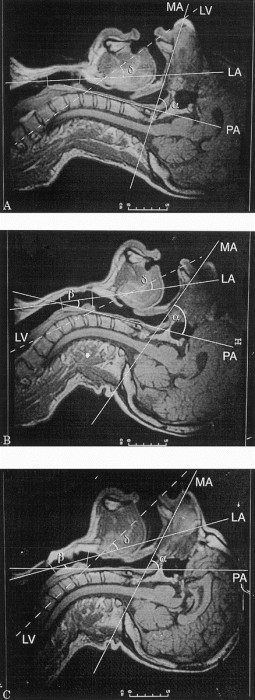
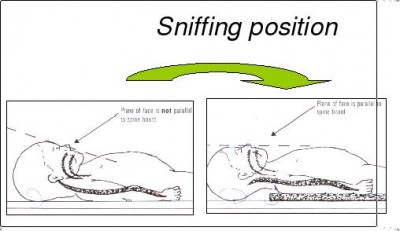
In other words, in a neutral position there’s an angle that approaches 90 degrees between the oral cavity (through which air initially passes — or the nasal cavity, which is nearly parallel) and the pharynx (the initial portion of the passage down into the lungs). Such a sharp angle increases the resistance to air and increases the likelihood of occlusion. By rotating the head backwards along the atlanto-occipital joint — i.e. where the skull meets the spine — we can straighten out this corner. We can’t make it completely straight, because the head doesn’t rotate that far (if it did you’d be able to directly face the sky without leaning), but we can improve the angle substantially.
The trouble is that when we do this, we change another angle too. The angle between the pharynx and the trachea tends to sharpen in the vicinity of the larynx as we tilt the head backward. Since the pharynx follows the alignment of the upper neck and lower head, and the trachea follows the alignment of the lower neck and thorax — with the larynx and glottis smack in the middle — there’s an additional angle here that should be straightened as much as possible.
The good news is that with a supine patient lying on a flat surface, such as a bed or stretcher, simply rotating the head back will partially accomplish this. That’s because our occiput — the back of the skull — is somewhat bulbous and protruding, and when you tilt the head back, it rolls over this rounded prominence, elevating the head. Thus, a standard head tilt produces a small amount of neck-to-thorax flexion, which helps improve the angle at the larynx.
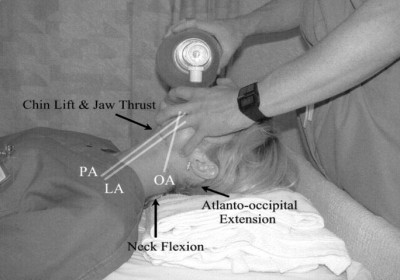
Many patients benefit from greater head movement, however. What we’re trying to do is shift the head forward — anteriorly — while maintaining (not increasing or decreasing) atlanto-occipital extension. In combination, this creates what’s known as the sniffing position, as it resembles someone ostentatiously “sniffing the air.” (“Leading with the chin” may be a more intuitive description.) It’s widely taught as the optimal position for intubation, but it can also reduce resistance to BVM ventilation; you may even encounter patients with perilaryngeal swelling (particularly epiglottitis) who assume this position intuitively to maintain their narrowing airway.
To establish the sniffing position, you need to pad behind the head. It’s sensible to treat each patient somewhat individually, but a good starting point is to elevate the head until the ear (that is, the canal or meatus) is horizontally aligned with, or slightly in front of, the notch of the clavicles. This is often only a few inches (average is ~7cm) beyond the elevation you’ll get from the occiput against the bed alone, but you’ll certainly need to put something back there. Pillows are usually too soft unless you fold them gratuitously, but a folded towel or blanket can work well, or really anything flat.
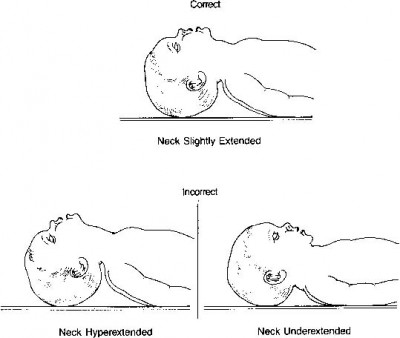
A few special cases are worth mentioning. First, children. Kids are notorious for having enormous heads compared to their bodies, and the frequent result is that after rotating the cranium, you’ll have created all the anterior movement you need. In fact, it’s possible you’ll need to pad the back and upper shoulders in order to avoid hyperflexion of the neck.
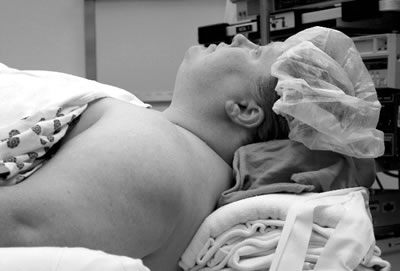
Now consider obese patients. Their general airway challenges make them great candidates for this technique, but because they have extra adipose tissue on their back — which elevates their torso relative to their head — they have the opposite problem as kids: you may need to provide substantially more padding behind the head in order to achieve ear-sternal alignment.
Interestingly, though, in very big patients you may encounter a different situation. Because relatively more adipose tissue collects in the lower back and hips than in the upper back and shoulders, while supine, the morbidly obese patient may actually be “upside down”; their torso is angled uphill, resulting in their head and chest being crunched together even while lying “flat.” To achieve anything like reasonable airway positions, you’ll need to first correct this by elevating (really just leveling) their upper back. This is called ramping, and may require a substantial amount of linen, although you might be able to get part of the way there by raising the back of the stretcher a little (thus preferentially elevating their upper back, since most people slip down a fair amount). Once you’ve achieved body normality, you can create your sniffing position, aligning ear to clavicles in the usual fashion.
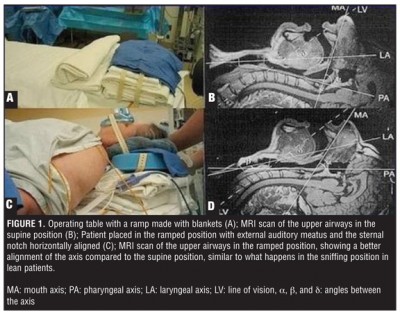
Image courtesy of http://bariatrictimes.com/2012/02/16/airway-management-in-bariatric-surgery-a-challenge-for-anesthesiologists/
Truth be told, there are advantages to sitting up almost any respiratory patient. It reduces the chance of airway occlusion from soft tissues, helps blood and secretions drain, reduces impedance on the chest wall, and prevents the abdominal viscera from compressing the diaphragm. The only reason we don’t manage everyone this way is because it’s hard to do much with a patient sitting high or semi-Fowler’s, such as bagging them or airway insertion. But for the patient who’s still breathing spontaneously, the simplest airway intervention is simply to keep them upright or perhaps in the lateral recovery position.
Key Points
- The two-hand BVM technique is preferable to the EC technique whenever possible, and it’s far easier to perform with a second person to assist.
- Optimal airway diameter and angles can be achieved by protracting the jaw and simultaneously elevating and extending the head into a “sniffing position.”
- Pediatric patients may not need additional head elevation to achieve this, or may even need padding of the back.
- Obese patients may need substantial head elevation.
- Very obese patients may need to be “ramped” to level their torso before attempting other airway maneuvers.
- When more aggressive management is not needed, an upright or lateral supine position provides the simplest protection of the airway.
Tune in next time for a few extra tricks to increase our airway options, and a comprehensive approach for bringing it all together.
Continued at Mastering BLS Ventilation: Supplemental Methods and finally Mastering BLS Ventilation: Algorithms
Recent Comments