Murder by Checklist

Reader Steve Carroll passed along this recent case report from the Annals of Emergency Medicine.

It’s behind a paywall, so let’s summarize.


What happened

A young adult male was shot three times — right lower quadrant, left flank, and proximal right thigh. Both internal and external bleeding were severe. A physician bystander* tried to control it with direct pressure, to no avail.

With two hands and a lot of force, however (he weighed over 200 pounds), he was able to hold continuous, direct pressure to the upper abdomen, tamponading the aorta proximal to all three wounds.


Manual aortic pressure


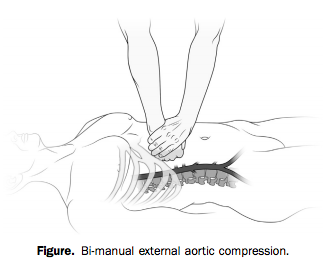
Bleeding was arrested and the patient regained consciousness as long as compression was held. The bystander tried to pass the job off to another, smaller person, who was unable to provide adequate pressure.

When the scene was secured and paramedics arrived, they took over the task of aortic compression. But every time they interrupted pressure to move him to the stretcher or into the ambulance, the patient lost consciousness again. Finally en route, “it was abandoned to obtain vital signs, intravenous access, and a cervical collar.”

The result?

Within minutes, the patient again bled externally and became unresponsive. Four minutes into the 9-minute transfer, he had a pulseless electrical activity cardiac arrest, presumed a result of severe hypovolemia. Advanced cardiac life support resuscitation was initiated and continued for the remaining 5-minute transfer to the ED.

The patient did not survive.


When the cookbook goes bad

The idea of aortic compression is fascinating, but I don’t think it’s the most important lesson to this story.

Much has been said about the drawbacks of rigidly prescriptive protocol-based practice in EMS. But one could argue that our standard teachings allow for you to defer interventions like IV access if you’re caught up preventing hemorrhage. Like they say, sometimes you never get past the ABCs.

The problem here is not necessarily the protocols or the training. It’s the culture. And it’s not just us, because you see similar behavior in the hospital and in other domains.

It’s the idea that certain things just need to be done, regardless of their appropriateness for the patient. It’s the idea that certain patients come with a checklist of actions that need to be dealt with before you arrive at the ED. Doesn’t matter when. Doesn’t matter if they matter.

It’s this reasoning: “If I deliver a trauma patient without a collar, vital signs, and two large-bore IVs, the ER is going to tear me a new one.”

In other words, if you don’t get through the checklist, that’s your fault. But if the patient dies, that’s nobody’s fault.

From the outside, this doesn’t make much sense, because it has nothing to do with the patient’s pathology and what might help them. It has everything to do with the relationship between the paramedic and the ER, or the paramedic and the CQI staff, or the paramedic and the regional medical direction.

Because we work alone out there, without anybody directly overseeing our practice, the only time our actions are judged is when we drop off the patient. Which has led many of us to prioritize the appearance of “the package.” Not the care we deliver on scene or en route. Just the way things look when we arrive.

That’s why crews have idled in ED ambulance bays trying over and over to “get the tube” before unloading. That’s why we’ve had patients walk to the ambulance, climb inside, and sit down, only to be strapped down to a board.

And that’s why we’ve let people bleed to death while we record their blood pressure and needle a vein.

It’s okay to do our ritual checklist-driven dance for the routine patients, because that’s what checklists are for; all the little things that seem like a good idea when there’s time and resources to achieve them. But there’s something deeply wrong when you turn away from something critical — something lifesaving — something that actually helps — in order to achieve some bullshit that doesn’t matter one bit.

If you stop tamponading a wound to place a cervical collar, that cervical collar killed the patient. If you stop chest compressions to intubate, that tube killed the patient. If you delay transport in penetrating trauma to find an IV, that IV killed the patient.

No, let’s be honest. If you do those things, you killed the patient.

Do what actually matters for the patient in front of you. Nobody will ever criticize you for it, and if they do, they are not someone whose criticism should bother you. The only thing that should bother you is killing people while you finish your checklist.


* Correction: the bystander who intervened was not a physician, but “MD” (Matthew Douma), the lead author, who is an RN. — Editor, 7/22/14

Staying in Place: Compensation and Endpoints

Red queen running


Man’s leaning against a wall. He doesn’t move for hours. Just stands there not moving. Finally, someone says, “You been here all day — don’t you have anything to do?”

“I’m doing it,” he answers.

“Doing what?”

“Holding up the wall.”


And who’s to say he’s not? Maybe he’s working as hard as he can to make sure that wall doesn’t fall down.

In this situation, the man is a compensating mechanism. He is struggling to prevent changes in the wall; keeping that wall upright is an endpoint he cares to maintain, to sustain, to keep intact.

How do we know that the wall isn’t holding up the man? Because we don’t care about the man. Whether he leans or falls doesn’t matter much to anybody. But it would be a terrible thing if the wall collapsed. So we’ll let the man lean or shift in order to prop up the wall when it starts to totter — we’ll use him, adjust him, to compensate for any wall-changes. That’s why he’s there.

If the wall gets weak enough or tilts too far, though, he won’t be able to keep it up. He’ll try, but he’s not infinitely strong, and then maybe the wall begins to tilt or collapses completely. Since we know that under normal circumstances, he’s doing his best to prevent this, if we walk in and see that the wall is tilting, that is not a good sign. It may mean that despite his best efforts, the man has exhausted his strength and is no longer able to resist further wall-changes; or it may mean that, for some reason, the man isn’t doing his job properly. Either way, any further tilting will be unopposed, and will probably happen rapidly and uncontrollably.


Compensators and endpoints

This same dynamic plays out within the human body. As we know, living organisms seek to maintain a certain homeostatic equilibrium. We put our vital metabolic processes in motion and we don’t want them to halt or change, despite any insults or fluctuations imposed upon us by our surrounding environment. So our bodies struggle to keep all of our complex systems at an even keel, using a diverse and powerful array of knobs, dials, and other regulatory tools. Not too hot or too cool, not too acid or too basic, not too fast or too slow. Just right.

The kicker is this, however. Some of our physical parameters are more important than others. In other words, while some parameters have room to adjust, others aren’t negotiable, can’t change much, without derailing our basic ability to function and survive. Things like blood pressure (or at least tissue perfusion, for which blood pressure is a pretty good surrogate measure) are essential to life; your pressure can fluctuate a little, but if it drops too low, you are unquestionably going to suffer organ damage and then die. And yet there are many insults that could potentially lower our blood pressure if we let them: if we bleed a little, or pee a little, or don’t drink enough water, or sweat, or even just stand up instead of sitting down. How do we preserve this vital parameter despite such influences?

By compensating, of course. Our body gladly modulates certain processes in order to preserve other, more important parameters. So in order to maintain blood pressure, perhaps we accelerate our heartrate. In an ideal world, it might be nice if the heart were thumping along at — let’s say — a mellow 80 beats per minute. It’ll use little less energy and less oxygen than if it were beating faster. But it’s really important to keep our blood pressure up, and speeding up the heart can increase the pressure, so we gladly make that trade and induce tachycardia. (Many of these compensatory systems are linked to the sympathetic nervous system, our body’s standard “all hands on deck” response to stress and crisis.)

So imagine we find a patient who’s bleeding and notice that he’s tachycardic, with a normal blood pressure. This suggests a compensated shock; the body is using tachycardia to maintain that normal pressure we see; although his volume is lower than usual, the critical endpoint of adequate blood pressure is still intact.

But what if instead, we found him tachycardic and hypotensive? Well, that’s not good. We see that the body is trying to compensate, but we also see that the important endpoint — blood pressure — is falling nonetheless. The body would never intentionally allow that; BP is too important. So we recognize this as decompensated shock. The hypovolemia has progressed so far, and volume is now so low, that he can’t make up the difference anymore — the compensatory slack has run out — and any further decreases in volume will probably lead to an immediate and unopposed drop in pressure. There’s nothing more the body can do on its own; it’s out of rope.

The skilled clinician — or “homeostatic technician” as Jeff Guy says — uses this predictable progression to understand what’s happening in almost any crisis. Because primary insults are initially covered up by compensatory mechanisms, they may not be immediately apparent, and the earliest and most detectable signs of physical insult are usually nothing more than the footprints of the answering compensation. Thus, when when we encounter those, we know to suspect the underlying problem even if it’s not obvious yet. It’s like seeing brakelights flash from cars on the road ahead; even if you can’t see an obstacle yet, you know people are slowing down for something.

Obvious signs of decompensation usually show up late. Once the primary, underlying problem is revealed by failure of the corrective mechanisms, it’s often progressed so far that it’s too late to address. If you wait to brake until you can see the wreck itself, you might not be able to stop in time.


Two signposts for decompensation

There are two great ways to recognize which signs and symptoms connote decompensation.

The first is to understand which physical parameters are endpoints — which functions the body tries to preserve at all costs. These processes are only compromised as a last resort, so if you see them deteriorate, things are in the end-game; the body doesn’t intentionally sacrifice these for the benefit of anything else.

The second clue is more subtle. In this case, you observe a compensatory mechanism (not an endpoint), but find that it’s no longer successfully compensating — it’s failing, and starting to unwind and scale back, rather than doing its job. The changes in the compensatory system are inappropriate, resulting in less of what we need, not more. This happens when our systems are so damaged that they can’t even fix problems and pursue homeostasis anymore; our infrastructure, maintenance, and repair systems are breaking down. Consider this: we saw how tachycardia could be compensatory, but could bradycardia ever be beneficial in shock? Probably not. So if we found a shocked patient with bradycardia (and likely hypotension, the failing endpoint), we should be very alarmed indeed. There’s nothing helpful, compensatory, or beneficial about bradycardia in the setting of shock, so we recognize that the body would never go there on purpose. It’ll only happen when the machinery itself is falling apart.

Consider, for instance, Cushing’s Triad, the collection of signs often encountered after severe traumatic brain injury, when intracranial pressure has increased enough to squeeze the brain out from the skull like toothpaste. The triad includes hypertension, bradycardia, and irregular or slow respirations. What’s interesting is that, while all are a result of increased ICP, one of these is compensatory, while the others are merely the result of damage. Hypertension is the body’s compensatory attempt to force blood into the brain despite the elevated pressure in the skull. But bradycardia and bradypnea simply result from pressure upon the regulatory centers of the brain tasked with maintaining breathing and heart-rate. That’s why hypertension may be seen earlier, while the other two signs won’t usually manifest until the brain is actively herniating. One signals compensation, the other two decompensation.

Of course, there can be other reasons why compensatory mechanisms might fail, or at least exhibit lackluster performance. Some medications or other aspects of a medical history (potentially unrelated to the current complaint) might throw a wrench in the system. For instance, beta blockers (such as metoprolol and other -olol drugs) limit heart-rate as part of their basic mechanism, so patients with beta blockade often have trouble mustering compensatory tachycardia during shock states. That doesn’t mean they’re any less shocked; in fact, it means they’re more susceptible to hypotension, and that you must be especially on the lookout, because you won’t see one of the red flags (a rapid heart-rate) you might usually expect. Elderly patients with many comorbidities are generally not able to muster up effective compensation for anything, so they can deteriorate quickly, and without much fanfare. Ironically, healthy pediatric patients are the opposite: since they’re so “springy” and smoothly functioning, they compensate very well, with few changes in observable endpoints, until suddenly running out of slack and crashing hard because they’re already so far from shore.

Here are a few important compensatory signs, breakdowns of compensatory systems, and vital physical endpoints:


Appropriate signs of compensation

  • Tachycardia — increases cardiac output
  • Vasoconstriction (cool, pale skin) — raises blood pressure
  • Diaphoresis (sweatiness) — decreases temperature when necessary, but is often just a side effect of sympathetic stimulation
  • Tachypnea — increases oxygenation, CO2 blowoff, and cardiac preload
  • Fever — part of the immune system’s response to infection
  • Shivering — warms a hypothermic body

Inappropriate changes in compensatory mechanisms

  • Bradycardia — reduces cardiac output, rarely useful in illness; as a chronic finding may be the result of high levels of cardiovascular fitness (in healthy young patients) or medications (in sick old patients); but acutely, it is an ominous finding
  • Bradypnea — reduces oxygenation, CO2 blowoff, and cardiac preload
  • Hypothermia (or normothermia when a fever is expected) — suggests a failure of temperature regulation

Inviolable endpoints

  • Blood pressure — can elevate in stress states, but should not drop below resting levels
  • Mental status — except in the presence of a drug or similar agent directly affecting cognition, maintaining appropriate alertness and mentation are always a top priority for the body
  • Blood glucose — kept at normal levels in almost all situations, except when the regulatory systems fail, as in diabetes mellitus
  • pH — most of the cellular machinery fall apart if significant acidosis or alkalosis occurs
  • Low O2 saturation or cyanosis — although oxygen saturation can dip briefly without harm, and in some patients (particularly those with COPD, or long-time smokers) it may run low at baseline, a significant acute drop — or the clinical equivalent, which is frank cyanosis — is always inappropriate.

Mastering BLS Ventilation: Algorithms

Continued from Mastering BLS Ventilation: Introduction, then Mastering BLS Ventilation: Hardware, then Mastering BLS Ventilation: Core Techniques, and finally Mastering BLS Ventilation: Supplemental Methods

Over the past few weeks, we’ve explored a large number of BLS tools for maintaining a patent airway and pushing oxygen through it. This is good, because the only reliable way to address this dilemma is by having a large toolbox. Nobody can oxygenate every patient with just one trick, no matter how skilled they are.

But a box of tools isn’t an approach to the airway, no matter how big it is. It’s just a box. You need more than that — you need a plan. If I toss you an apneic person, what are you going to do? What if that fails? What’s plan B? And plan C? Then what happens?

The only way to answer these questions is by creating your own scheme, a roadmap to fall back upon. I can’t give it to you, because I don’t know your variables. I don’t know your specific skillsets, what you’re comfortable with, what you’ve practiced and in what situations, versus what you’ve never done in your life. I don’t know what your local protocols are, and what equipment you have available (including extra toys like supraglottic airways or Narcan/naloxone), your typical transport times, or the general availability of ALS. I don’t know what type of patients you usually encounter, how many personnel you have on hand to manage them, and what sort of extrications are involved.

But you know those things. Roll it all into a ball so you understand your resources and challenges, consider the various tools we’ve discussed, and make a plan.

Click to expand

Click here for a PDF version (recommended if printing)

Here’s an example I concocted. This is a flowchart patterned after the airway algorithms commonly used in the ED or the ICU, and it incorporates most of the ideas we’ve talked about. It assumes certain things, so I’m not putting it forward as something to follow religiously. Rather, it’s meant as an example: this is the type of thinking you need to be doing. You probably won’t take the time to chart it out, but you should at least be thinking about it now, because figuring it out on scene with the sick person is too late. Mentally walk through what you’d do at each juncture, imagining yourself treating a real patient in your real ambulance using your real gear. Think about your responses to each dilemma, and if you discover you’re unsure about any details, seek out additional training or practice to patch those holes; for instance, spending some time with a (high quality) mannequin and a BVM can be beneficial. Even just a few minutes playing with the BVM (try bagging yourself until you really understand how the pressures and airflows work), the non-rebreather, your various airways, and so forth can help develop familiarity with little-used tools, so you truly understand how all the valves function, how to size and adjust everything, even where it can be found in your bags. This is particularly important if you rarely use these tools, because infrequent or not, you still need to exhibit mastery when the time comes.

Questions, comments, or remarks on our proposed model are welcome.

Thanks for sticking with us through this exploration of the art and science of BLS ventilation.

Mastering BLS Ventilation: Supplemental Methods

Continued from Mastering BLS Ventilation: Introduction, then Mastering BLS Ventilation: Hardware, and finally Mastering BLS Ventilation: Core Techniques


We said before that robust management of the “A’s and B’s” requires having a wide range of options and tools available to you. At the BLS level, we don’t have many, but we do have a few. Now that we’ve explored the most important methods, let’s look at a few supplemental tricks and points to ponder.


Sellick’s Maneuver

Once again, remember our upper airway anatomy: the larynx and trachea, through which air flows to the lungs, are positioned anterior to the esophagus, through which we’d prefer air did not flow. What’s more, these twin tubes are different types of structures. The trachea is built largely of cartilaginous rings, the same semi-rigid material that makes up the wobbly front of your nose; it’s not as stiff as bone, but it holds its shape well (go ahead, give your Adam’s apple a squeeze). The esophagus, on the other hand, is a fairly soft tube made of mostly muscle, and can easily be compressed flat.

This suggests a potentially useful trick. If we press upon the front of the larynx, it will retain its shape and move posteriorly, compressing the esophagus. In other words, although you’re pushing on the airway, it’ll remain open, while the esophagus behind it narrows and flattens. It’s like squishing a cardboard toilet paper roll with a metal pipe; they’re both tubes, but one is thin and easily distensible while the other is stiff and strong.

Since one of our challenges in BVM ventilation is getting air to go down the right tube, it makes intuitive sense that flattening the esophagus (the wrong tube) will help us push air into the trachea (the right tube). If we’re not successful with that, it may at least help prevent regurgitation from coming back out from the esophagus. This is particularly important because maneuvers like the sniffing position help straighten both of those tubes, so although they do open the airway, they also tend to increase the risk of gastric inflation. Worse, overly-aggressive bagging — from a first responder, for instance — can wedge open the LES guarding the stomach, and it can remain this way after you take over. Once someone’s forced it open, even gentle ventilations can enter the stomach.

This is called Sellick’s maneuver, or simply cricoid pressure. It’s properly applied by pressing gently upon the cricoid cartilage, which is a good spot because the cartilaginous ring there creates a full circle (most of the other cartilages are C-shaped). It’s helpful during intubation, since it tends to move the glottic opening into the line of sight, but has also traditionally been used to assist with bagging.

To find the cricoid cartilage, palpate the most prominent bulge of the trachea, the “Adam’s apple” or laryngeal prominence. Move your finger downward over a small indentation (the cricothyroid ligament or membrane, where emergency cricothyrotomy would be performed) until you find another, smaller bulge. This is the cricoid cartilage.

Here’s the problem: theory aside, it often doesn’t work very well. A substantial body of evidence has shown that it often doesn’t do much to reduce gastric inflation, nor to impair regurgitation, and can even partially occlude the airway. This led the AHA to state that “. . . the routine use of cricoid pressure in adult cardiac arrest is not recommended” in the 2010 update to their BLS recommendations.

That doesn’t mean it’s useless, but it certainly suggests it shouldn’t be one of our first moves. It’ll help if we take care to do it correctly: pressure should generally be gentle (too hard and you’ll compress the semi-rigid larynx itself), straight back (it’s easy to “roll” to one side and fail to transmit the pressure to the esophagus), and applied nowhere but the cricoid cartilage. I also find that using your index and middle fingers, as in the illustration above, better facilitates this type of pressure than a thumb-and-forefinger grip. Use it as a last resort after other methods to minimize gastric inflation have failed — particularly the simplest and most effective, which is simply bagging with less force (ease the air in, don’t shoot it in) — titrate the amount of pressure to the desired effect, and in the end, don’t be surprised if it fails.


Pocket Masks

People may look at you like you’ve got six heads if you suggest it, but using a “pocket mask” is still a valid and indeed a recommended method for ventilation. Many BLS units carry the devices, which are essentially the same type of mask you see on the BVM, plus a port for supplemental O2 and a one-way or filtered valve to prevent cootie exchange. (If you don’t have such a device, you could simply detach the mask from your BVM and breathe into the hole, removing your mouth between breaths to let the patient exhale. This won’t be as effective of a barrier to infection, since there’s no one-way port, so it’s your call — but the risks are probably minor. You might even be able to increase FiO2 by leaving a cannula on the patient… or wearing one yourself.)

The advantages of this method are numerous. First of all, because you have two hands available to hold the mask, you’ll rarely have difficulty making a seal. Second, it’s extremely easy to titrate the volume and pressure of the breaths you give; unlike with the BVM, where you’re brusquely squeezing a rubber sac, with the pocket mask you’re using your pulmonary apparatus (your lungs) to assist the patient’s pulmonary apparatus, and it’s very easy to maintain tight control over the variables. Simply breathe in normally (not a deep breath) and exhale into the mask with gentle force, stopping when you see the chest rise. You should be able to do this with almost infinitely gentle pressure, making gastric inflation very unlikely.

The disadvantages: you can’t provide 100% oxygen, although if you attach the tubing and crank up a high flow, you can probably provide ample FiO2 for anybody without significant V/Q problems. But the bigger problem is the “ick” factor. Although research has shown that the risk of contracting an infectious disease during mouth-to-mask ventilation is very small, many providers still aren’t comfortable getting that close, preferring to literally stay at arm’s length. But remember: if you’re unable to effectively ventilate an apneic patient and you’ve exhausted all other options, this is a life-or-death situation, and ickiness should not be a key concern.


Mouth to Mouth

What if even the pocket mask fails, or for some reason you have no equipment of any kind available?

There’s always direct mouth-to-mouth ventilation. Nobody will fault you for opting out of this, because of the aforementioned ick factor and the theoretical chance of disease transmission, although again, research has suggested the risk is small. But if all else fails, it should be considered an option, and whether you’ll attempt it is solely up to you. Sheet-type barrier devices, which some people carry on their keychains, may reduce either ick factor or real risk, although you’re probably unlikely to find one around unless you carry your own. Remember that you’ll need to pinch or otherwise seal the nose; if your hands are busy maintaining an airway, you may be able to accomplish this by pressing your cheek against the nares.

If the mouth is obstructed or otherwise non-patent, mouth-to-nose ventilation is a viable alternative; simply ensure their mouth is shut and breathe into the nares. If a stoma is present in the neck, mouth-to-stoma or mask-to-stoma (an infant-size mask may yield the best seal) ventilation can be an option, although depending on how it’s constructed you may need to seal both the nose and mouth to make it work.

Just options, folks. Airways need options.


Jaw Thrusts

Along with manipulating the head, we know that shifting the jaw forward is essential for opening the upper airway. In fact, when we walked the Halls of the Student EMT, the wise men told us that for patients in spinal immobilization, it’s all we’re allowed to do. (A little later they usually said “. . . however, a patent airway takes priority over spinal precautions,” but most of us had already dozed off at that point.)

In any case, translating the jaw forward as far as possible, no matter how you do it, can open the airway substantially.

Along with the classic jaw thrust, there’s another method that’s rarely seen anymore. It’s real easy: with one hand, grab their mandible by the chin and lower teeth and pull up. It works. Could you get bitten? Yes. You also can’t bag them while you’re holding their jaw in your hand like Hamlet. So it’s more of a first aid tactic, but it’s very idiot-proof, so it’s nice to know about. You can see it working in this video.


Risk Factors for Difficult BVM Ventilation

It’s one thing to have a wide range of options for dealing with difficult-to-bag patients, but it’s also helpful to know before you dive in when a patient is likely to become difficult. It can help inform your decisions about priorities and flow of care, as well as the need for ALS and transport destinations.

Patients who are often challenging to bag include:

  • The obese. Ample soft tissue tends to occlude the upper airway (this is why they often suffer from sleep apnea), adipose tissue bears down on their chest and diaphragm, and they’re generally difficult to position how you’d like. Ramp them and get a good sniffing position ahead of time (don’t try to dynamically head-tilt them while you apply the mask — situate them beforehand, so all you’ll need to do while you bag is maintain the jaw thrust), use airway adjuncts liberally, and plan ahead — don’t ever assume it’ll go smoothly, or you’ll find yourself in over your head without backup plans.
  • Bearded patients. Thick beards and other facial hair make obtaining a mask seal difficult. It can help if you smear it down with some water-based lubricant (such as your NPA lube), but it can also make a mess of everything until you’re slip-sliding away like Paul Simon. You could also shave them a bit if you have a razor (with your AED gear, for instance), although they probably won’t thank you later unless it’s quite necessary.
  • Sleep apnea. If you happen to know (via history) that the patient suffers from sleep apnea — or to a lesser extent, even that they snore at night — this indicates an existing predisposition toward upper airway occlusion when their level of consciousness is mildly depressed, so you can expect it to be that much worse when they’re entirely comatose.
  • The elderly. Everything is harder with old people, including bag-mask ventilation, for numerous reasons.
  • Anyone with a difficult-to-protract mandible. You probably won’t know this by looking, but if you go to initially address the airway and find that you’re unable to lift the jaw until the lower teeth are at least aligned with the upper teeth (preferably until they’re anterior), you’re probably going to have a hard time, and will need to compensate by achieving optimal extension and a sniffing position.
  • Anyone with gross trauma to the face or neck, which may create airway occlusion, hinder your ability to make a mask seal, or generate substantial blood and other fluids requiring aggressive suctioning.
  • Edentulous (toothless) patients. Aside from the fact that they’re usually elderly, patients without teeth have minimal structure to the oral cavity, giving you little to press against with the mask and obtain a seal. If dentures are present, it will help to leave them in; if not, make sure to place an OPA, which provides a little support at least. Make an effort to outwardly “spread” the air-filled skirt of the mask before applying it, which helps ensure that its maximum surface area remains in contact rather than curled uselessly underneath. Also consider this alternate mask placement, which may be more successful: the mask is shifted upward, so the lower edge meets the lower lip directly.


The End-Expiratory Pop

This is an interesting, unusual, and advanced technique which I’ve only ever seen advocated by the Department of Critical Care at the University of Pittsburgh. Briefly, it consists of the following: you bag with a two-person technique if at all possible, ensuring an excellent seal (which is mandatory) and letting you focus solely on the bag. You inflate as normal, release the bag and let the patient exhale, and then near the end of the expiratory phase, you “catch” them with a small squeeze to the bag, preventing their lungs from fully deflating. This may not seem possible, because there’s a valve present that allows exhaled air to vent, but that valve’s position is determined by the relative pressures on each side, so if you insufflate gas at a higher pressure than the patient’s exhaled gas, it’ll open in rather than out. This creates a sealed, temporarily closed system supported by the pressure you’ve created in the bag. If you don’t believe it, try bagging with the mask sealed against a table, or even upon your own face using clean gear.

View an example of the technique in this video clip, from :25 to :55. Here they’re simulating assisting with spontaneous respirations, probably one of the best applications for this method.

This yields two advantages: first, it gives you an excellent “feel” for pulmonary compliance. With a leak-free seal and balanced inspiration/expiration, compliance should remain consistent. If the resistance you feel suddenly decreases, you most likely have a leak. If it increases, you likely have either an obstruction or are “breath stacking,” failing to fully allow for expiration before beginning the next breath. With practice you can develop an excellent tactile sense of the bag-lung interface… as long as your mask seal remains flawless.

Second, and more profoundly, this actually creates positive end-expiratory pressure, or PEEP. In other words, you’re maintaining positive pressure in the lungs even after exhalation, where the alveoli ordinarily might collapse. By never quite “touching ground,” pressure-wise, you keep alveoli partially distended and portions of the bronchial tree “splinted” open that otherwise might have collapsed, particularly in disorders like COPD or CHF. This is the same principle used by CPAP or BiPAP devices, and it’s a wonderful boon that’s often the only way to effectively oxygenate patients with significant atelactasis (collapsed alveoli) and shunt (portions of the lungs that air is unable to reach). If you have a patent airway and are introducing adequate amounts of 100% oxygen, yet the patient remains hypoxic (according to skin signs or pulse oximetry), it’s almost certainly because of a V/Q mismatch like this, and that situation cannot be solved without PEEP or radically more aggressive measures.

The reason this trick is so cool is because it’s probably the only way to apply PEEP at the BLS level, since in most areas we do not carry CPAP devices, or even PEEP valves for the BVM. It’s theoretically possible to tape over or otherwise partially occlude the exhalation port of the BVM, narrowing the space for expiration and therefore providing some back-pressure, but this is totally unmeasurable, not easily titrated, and interferes with the entire phase of expiration. Although trickier, the “Pittsburgh PEEP pop” is better.

Why squeeze at the end of expiration? If you squeeze earlier, you’ll interfere with exhalation of gas, which needs to happen if we’re going to adequately blow off CO2 and avoid “stacking” breaths. If you squeeze later, you missed your chance to prevent a “zero pressure” state in the lungs, so you’re starting from zero again.


Key Points

  1. Sellick’s maneuver (i.e. cricoid pressure) can be helpful for reducing gastric inflation, but is often ineffective or even counterproductive. Use it as a last resort, applying only gentle and direct pressure, and if it’s not working, stop.
  2. Mouth-to-mask, mouth-to-mouth, mouth-to-nose, or mouth-to-stoma can all be effective backups to BVM ventilation, particularly when unable to achieve a mask seal or unable to ventilate without inflating the stomach.
  3. Expect obese, bearded, elderly, toothless, or traumatic patients to be difficult to bag.
  4. A small amount of PEEP can be created with a normal BVM using a small end-expiratory squeeze; this also helps confirm the ongoing integrity of the mask seal.

Next time we’ll give a method for combining all of these concepts into a cohesive approach to the BLS airway.

Continued at Mastering BLS Ventilation: Algorithms

Mastering BLS Ventilation: Core Techniques

Continued from Mastering BLS Ventilation: Introduction and Mastering BLS Ventilation: Hardware

Now that we understand the goals and the basic tools, let’s talk about the most important techniques for optimizing airway management and providing BLS ventilation to apneic patients.


Hand Technique

How do you hold a BVM to the patient’s face?

As a rule, we’re taught something called the “EC clamp.” It looks like this:

In theory, this lets us press the mask against the patient’s face (using the “C” of our thumb and forefinger) while pulling the jaw forward (using the “E” of our other fingers behind the mandible), and still leaves one hand free to squeeze the bag.

In theory.

In reality, this is tricky at best. Partly it’s because we’re trying to seal the edges of a circle by pressing on only one side, which usually results in a leak from the other side. Partly it’s because pulling the jaw forward like this — a highly necessary action — takes a fair amount of force, and we’re in a poor position to grip from. It also doesn’t help that, if no OPA is present, this method usually squeezes the mouth shut, leaving only the nasal passage for an airway.

One useful tip: positioning the bag directly opposite your EC hand and pulling it downward can help seal off the most common point for leaks.

Does the EC technique work? It can work. And it’s fast and versatile to apply, so it’s a reasonable place to start. However, if you find that it’s not working, don’t be too surprised. You would be wise to practice the hell out of it on mannequins (or ideally in an OR or similar setting), but not everyone has that opportunity. What’s the alternative?

Use two hands. The inelegant nature of the EC clamp has been widely recognized for years, despite the fact that many of us in emergency medicine pretend otherwise. In fact, if you flip open your EMT textbook or the handouts from your last CPR class, you will notice that one-person BVM use is strongly discouraged. (In my Limmer textbook, it’s last in preference after the two-person BVM and even the pocket mask.) In the field, this is ignored, because we adopt the attitude that any EMT should be able to sit at the patient’s head and “handle the airway” without help. But that doesn’t change the fact that it’s a crummy technique, and many of the patients who are “bagged” this way only survive because they didn’t need much help to begin with.

What does work reliably is placing both hands on the mask, thumbs toward the feet and fingers behind the jaw. This way you have a hand on both sides and can easily obtain a seal (and if there is a leak it’s readily located), while also providing a strong bilateral grip to protract the jaw. You can sustain this position for a long time, and as a bonus, it tends to open rather than close the mouth.

Basic two-hand seal

A slightly different version with thumbs wrapped around, resembling a "double EC"

Both methods compared

The downside is that it doesn’t leave a hand to squeeze with. Ideally, another rescuer should squeeze the bag. This lets you focus on maintaining the airway while they focus on bagging slowly, gently, and at an appropriate rate. (But remind them to stop squeezing when they see chest rise; with two hands it’s tempting to try and empty the whole bag, which is far in excess of what’s necessary if you have a good seal.) It can even help to separate the mask from the bag entirely, position it perfectly on the face, clamp down your grip, and then allow the bag to be attached and ventilation begun; this ensures everything is where it ought to be. On scene you often have enough personnel for this; in the back of the ambulance you may or may not. Can you still execute this method alone?

You can, and I highly recommend that you work out the logistics now, with your own unique body type and equipment. For patients in a bed or a high stretcher, you can often stand behind the head, hold the seal with your hands, and squeeze the bag with your elbow against your side. In the patient compartment, you can sit in the tech seat and squeeze the bag against one leg with your elbow, or between your knees if you’re an experienced Thighmaster. A supine patient on the ground can be the trickiest position; you may be able to squeeze the bag against a leg or something similar, but often your best bet will simply be to recruit help. (Again, please experiment with this now, so you’re not improvising while a patient turns blue.) Just remember that using two people to bag isn’t a failure, and has no impact on your sexual adequacy; it’s a legitimate method which is supported by literature and explicitly recommended by the experts we’re supposed to be listening to.


The Sniffing Position

We understand now that successful BLS airway management means maximizing the passable upper airway and minimizing obstructions. Bringing the jaw forward will always be helpful, by pulling the tongue and other anterior structures away from the posterior pharyngeal wall. Now let’s look a little closer at the position of the head itself.

We’re taught to rotate the head back in the head-tilt chin-lift maneuver. Why do we do this? In essence, because it helps align the oral and nasal passages with the pharynx.

In other words, in a neutral position there’s an angle that approaches 90 degrees between the oral cavity (through which air initially passes — or the nasal cavity, which is nearly parallel) and the pharynx (the initial portion of the passage down into the lungs). Such a sharp angle increases the resistance to air and increases the likelihood of occlusion. By rotating the head backwards along the atlanto-occipital joint — i.e. where the skull meets the spine — we can straighten out this corner. We can’t make it completely straight, because the head doesn’t rotate that far (if it did you’d be able to directly face the sky without leaning), but we can improve the angle substantially.

The trouble is that when we do this, we change another angle too. The angle between the pharynx and the trachea tends to sharpen in the vicinity of the larynx as we tilt the head backward. Since the pharynx follows the alignment of the upper neck and lower head, and the trachea follows the alignment of the lower neck and thorax — with the larynx and glottis smack in the middle — there’s an additional angle here that should be straightened as much as possible.

Image courtesy of http://tinyurl.com/c6logld

The good news is that with a supine patient lying on a flat surface, such as a bed or stretcher, simply rotating the head back will partially accomplish this. That’s because our occiput — the back of the skull — is somewhat bulbous and protruding, and when you tilt the head back, it rolls over this rounded prominence, elevating the head. Thus, a standard head tilt produces a small amount of neck-to-thorax flexion, which helps improve the angle at the larynx.

Many patients benefit from greater head movement, however. What we’re trying to do is shift the head forward — anteriorly — while maintaining (not increasing or decreasing) atlanto-occipital extension. In combination, this creates what’s known as the sniffing position, as it resembles someone ostentatiously “sniffing the air.” (“Leading with the chin” may be a more intuitive description.) It’s widely taught as the optimal position for intubation, but it can also reduce resistance to BVM ventilation; you may even encounter patients with perilaryngeal swelling (particularly epiglottitis) who assume this position intuitively to maintain their narrowing airway.

To establish the sniffing position, you need to pad behind the head. It’s sensible to treat each patient somewhat individually, but a good starting point is to elevate the head until the ear (that is, the canal or meatus) is horizontally aligned with, or slightly in front of, the notch of the clavicles. This is often only a few inches (average is ~7cm) beyond the elevation you’ll get from the occiput against the bed alone, but you’ll certainly need to put something back there. Pillows are usually too soft unless you fold them gratuitously, but a folded towel or blanket can work well, or really anything flat.

 A few special cases are worth mentioning. First, children. Kids are notorious for having enormous heads compared to their bodies, and the frequent result is that after rotating the cranium, you’ll have created all the anterior movement you need. In fact, it’s possible you’ll need to pad the back and upper shoulders in order to avoid hyperflexion of the neck.

Image courtesy of http://www.narenthorn.or.th/node/77?page=0%2C2

Now consider obese patients. Their general airway challenges make them great candidates for this technique, but because they have extra adipose tissue on their back — which elevates their torso relative to their head — they have the opposite problem as kids: you may need to provide substantially more padding behind the head in order to achieve ear-sternal alignment.

Interestingly, though, in very big patients you may encounter a different situation. Because relatively more adipose tissue collects in the lower back and hips than in the upper back and shoulders, while supine, the morbidly obese patient may actually be “upside down”; their torso is angled uphill, resulting in their head and chest being crunched together even while lying “flat.” To achieve anything like reasonable airway positions, you’ll need to first correct this by elevating (really just leveling) their upper back. This is called ramping, and may require a substantial amount of linen, although you might be able to get part of the way there by raising the back of the stretcher a little (thus preferentially elevating their upper back, since most people slip down a fair amount). Once you’ve achieved body normality, you can create your sniffing position, aligning ear to clavicles in the usual fashion.

Image courtesy of http://bariatrictimes.com/2012/02/16/airway-management-in-bariatric-surgery-a-challenge-for-anesthesiologists/

Truth be told, there are advantages to sitting up almost any respiratory patient. It reduces the chance of airway occlusion from soft tissues, helps blood and secretions drain, reduces impedance on the chest wall, and prevents the abdominal viscera from compressing the diaphragm. The only reason we don’t manage everyone this way is because it’s hard to do much with a patient sitting high or semi-Fowler’s, such as bagging them or airway insertion. But for the patient who’s still breathing spontaneously, the simplest airway intervention is simply to keep them upright or perhaps in the lateral recovery position.


Key Points

  1. The two-hand BVM technique is preferable to the EC technique whenever possible, and it’s far easier to perform with a second person to assist.
  2. Optimal airway diameter and angles can be achieved by protracting the jaw and simultaneously elevating and extending the head into a “sniffing position.”
  3. Pediatric patients may not need additional head elevation to achieve this, or may even need padding of the back.
  4. Obese patients may need substantial head elevation.
  5. Very obese patients may need to be “ramped” to level their torso before attempting other airway maneuvers.
  6. When more aggressive management is not needed, an upright or lateral supine position provides the simplest protection of the airway.


Tune in next time for a few extra tricks to increase our airway options, and a comprehensive approach for bringing it all together.

Continued at Mastering BLS Ventilation: Supplemental Methods and finally Mastering BLS Ventilation: Algorithms