See also what Agonal Respirations, Seizures, and Cardiac Arrest and CPR look like
Jugular vein distention or JVD (alternately JVP — jugular vein pressure or jugular vein pulsation) is right up there among the most mentioned but least described clinical phenomena in EMS. If you tried to count how many times it occurs in your textbook, you’d run out of fingers, but many of us graduate without ever seeing so much as a picture of it, never mind developing the acumen to reliably recognize it in an emergency.
JVD is simply the visible “bulging” of the external jugular veins on either side of the neck. These are large veins that drain blood from the head and return it directly to the heart. Since they’re located near the surface, they provide a reasonably good measure of systemic venous pressure.
JVD is elevated any time venous return is greater than the heart’s ability to pump the blood back out. Remember that we’re not talking about the vessels that plug into the left heart; that involves the pulmonary arteries and veins, which are not visible in the neck. (Instead, the best indicator of pulmonary hypertension is audible fluid in the lungs.) Rather, we’re talking about the systemic vasculature, which drains into the right ventricle via the right atrium. When veins aren’t getting emptied, we look downstream to discover what portion of the pump is failing. JVD is therefore caused by right heart failure. (Of course, the most common cause of right heart failure is left heart failure, so that doesn’t mean it’s an isolated event.) If JVD isn’t the heart’s fault, then we look to fluid levels. Too much circulating volume will lead to bulging veins for obvious reasons; the flexible tubes are simply extra full.
Although it’s probably most often seen, and most diagnostic, in volume-overloaded CHF patients, the main reason JVD is harped upon in EMS is because it’s a useful sign of several acute emergencies. Mainly, these are obstructive cardiac conditions, where some sort of pressure is impeding the heart’s ability to expand, and immediate care to relieve the pressure is needed in order to prevent incurable deadness. Much like the bladder, the heart is just a supple bag of squishy muscle, and although muscle is very good at squeezing, it has no ability to actively expand. The heart therefore fills only with whatever blood passively flows into it, and if it’s being externally squeezed by pressure in the chest, it can’t fill very much.
Tension pneumothorax is perhaps the most common cause, where air leaks from the lungs into the chest cavity with no way to escape; as the pressure in the chest increases, it bears down on the heart. Associated symptoms are respiratory difficulty, decreased breath sounds on the affected side, and hypotension. Pneumothorax can be readily corrected by paramedics using needle decompression.
Cardiac tamponade is another cause, where fluid leaks from the heart into the pericardium, an inflexible sac that surrounds it (this leakage is called a pericardial effusion), eventually filling the available space and compressing the myocardium. Associated symptoms are hypotension and muffled heart sounds (these plus JVD are known as Beck’s triad). Tamponade cannot be treated in the field, but an emergency department can perform a pericardiocentesis, where a needle is inserted through the pericardium. (For the medics out there, electrical alternans on the monitor is also supportive of tamponade.)
A rather less common syndrome that can produce similar obstructive effects is severe constrictive pericarditis, inflammation of the pericardium usually caused by infection.
JVD is not an all-or-nothing finding — the amount of distention visible at the neck will depend on the degree of venous pressure. Gravity wants to pull blood back down, so the more venous pressure, the higher on the neck distention will climb; profound JVD reaches many inches up the neck, slight JVD will only cover a few centimeters. The pressure can actually be quantified by measuring the vertical height of the highest point of distention (measured from the heart itself, using the angle of Louis as a landmark), but this is probably more detail than is needed in the field. Suffice to say that distention reaching more than 2-4cm of vertical distance (as opposed to the distance on the neck) above the chest is usually considered pathological, and less than 1-2cm can be considered suggestive of hypovolemia.
If it changes with respiration, JVD should rise during expiration and fall with inspiration. Breathing in involves using your diaphragm to create “suction” in the chest, reducing pressure and allowing greater venous return — draining the jugulars. A paradoxical rise in JVD during inspiration (think: up when the chest goes up) is known as Kussmaul’s sign (not to be confused with Kussmaul respirations, which is a pattern of breathing), and is particularly suggestive of obstructive pathologies.
JVD can be difficult to appreciate in all but the most significant cases. It helps to turn the patient’s head away and illuminate the area with angled backlighting, which creates a “shadow” effect. Jugular pulsation should not be confused with a visibly bounding carotid pulse. To distinguish them, remember that although jugular veins may visibly pulsate, their rhythm is generally complex, with multiple pulsations for each single heartbeat (you can feel the carotid to compare the two). The jugular “pulse” will also never be palpable; the distention can be easily occluded by the fingers and will feel like nothing.
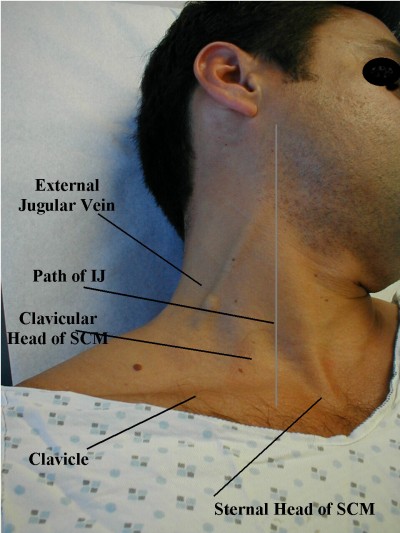
Strictly speaking, the internal jugular is usually considered more diagnostically useful than the external jugular, but it’s far harder to examine, so the latter is often used. For various reasons, many people also find the right jugular more useful than the left, although in an ambulance it’s harder to examine.
Most often, JVD is examined in an inclined or semi-Fowler’s position of 30-45 degrees. If the patient is supine, a total lack of visible JVD is actually pathological and indicative of low volume; in this position the jugular veins are usually well-filled. (Think: flat veins in a flat patient is bad.) JVD when the head is elevated is more to our interest.
Some examples of visible JVD follow, plus some examination tips. It is recommended that you start checking this on your healthy patients now, so you’ll know what it looks like before you try to make a diagnostic call using its presence. And until you do, stop documenting “no JVD” on your assessments!
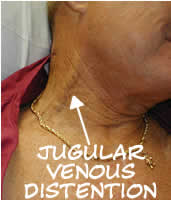
Significant JVD
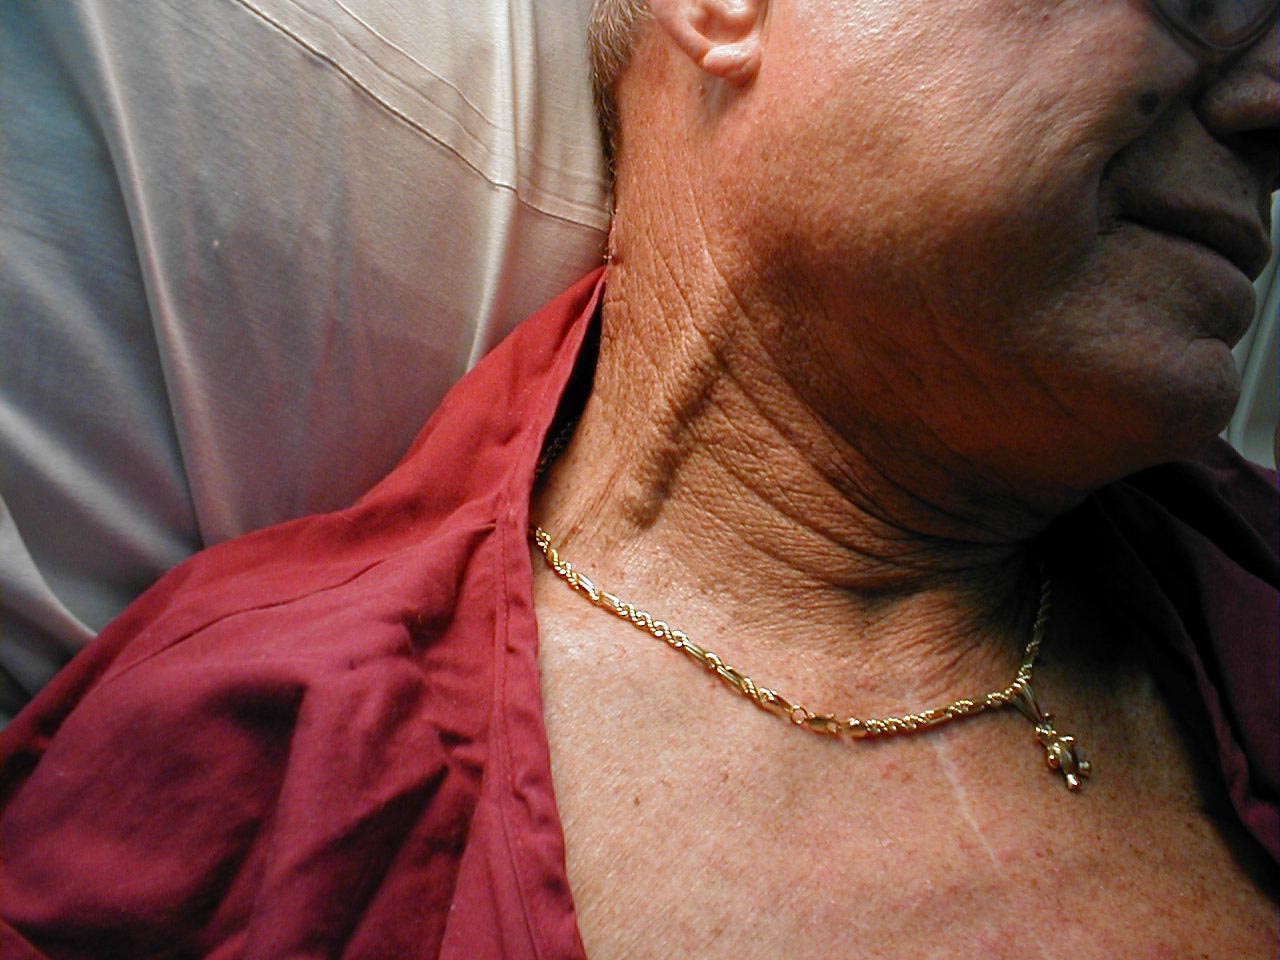
A different, much larger view of the same (click to enlarge)
Click through for a good discussion of JVD assessment
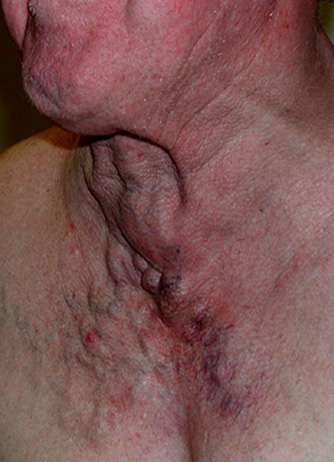
Some more subtle JVD
The basic method of measuring JVD

A nicely thick and squiggly external jugular
Here’s a student making her external jugular “pop” by heavily bearing down, aka the Valsalva maneuver. This markedly increases thoracic pressure, increasing venous backup; it’s an exaggeration of the effect seen during normal exhalation.
Another example of someone inducing JVD by a Valsalva
http://www.youtube.com/watch?v=FlhQGqdEfg8
Here’s a great video demonstrating the appearance of JVD, how to measure it, and testing the abdominojugular reflex (formerly known as the hepatojugular), which involves pressing down on the abdomen to raise thoracic pressure.
A brief clip of jugular venous pulsation, visible mainly toward the suprasternal notch.
http://www.youtube.com/watch?v=sOpn6_r7Wo4
Recent Comments