Vital Signs: Blood Pressure

For other Vital Signs posts, see: Respirations and Pulse

In the grand scheme of medical skills, taking a manual blood pressure is far from difficult, but sick people and austere conditions can combine to make it another thing entirely. Obtaining a BP on an ill patient while rattling down the road is legitimately one of the most difficult psychomotor skills an EMT-Basic has to master.

Mastering it starts with stacking the odds in your favor. A good stethoscope is better than a lousy one — you don’t need a $500 cardiology model, but something with good insulation and tight-fitting earpieces can make a real difference. Of course, you’ll also want to try to take your blood pressures at times of peace: on scene, before the rig starts moving, or even shoehorned in while stopped at traffic lights.

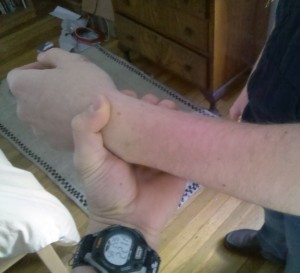
The elbow-supported technique for finding the brachial pulse is also ideal for taking a BP; trying to hear anything when the arm is slightly flexed is a recipe for frustration. But ensure that however you arrange things, the arm is completely relaxed, because muscular tension can radically throw a measurement; this will require fully supporting the arm and sometimes reassuring the patient. “Just relax” is the line I always deliver while busily pumping the bulb.

Where to put the gauge? Wherever. I’ll usually clip it to one of the stretcher straps, but you can find a bit of blanket that it’ll nestle into, secure it to a shirt, clip it to your watchband or the edge of the cuff, or just ask the patient to hold it for you. The built-in strap on the cuff is only a good location if you’re at the patient’s right side, which is typically not where we sit while we’re transporting. There’s probably a huge market niche out there for “EMS style” cuffs with their handedness reversed… but I digress.

Although I don’t always follow all of these steps, here’s the basic approach I recommend for a routine blood pressure check:

  • Support the arm, ideally at a position that is horizontally level with the heart.
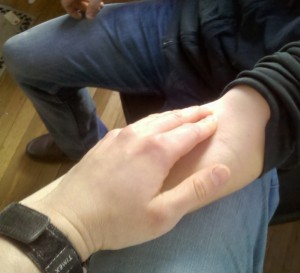
  • Palpate the antecubital fossa until you find the pulse point. Note this location.
  • Palpating at the radial or the AC, pump up the cuff until you lose the pulse. Note this number and deflate the cuff.
  • Place your scope on the AC and inflate the cuff past the previous number. Obtain your pressure in the ordinary fashion.

Starting with a palpated pressure may seem redundant, and it can be, but it has two advantages: first, it gives you a rough sense of what systolic to look for, and second, if you’re unable to auscultate a pressure, you’ll still have a palpated one to record. This is actually the officially recommended method, although it seems rarely done nowadays.

Palpated pressures are legitimate, although when they start becoming the norm it can be a sign of lazy care. The diastolic can be a valuable number, though, particularly in traumatic or cardiac cases, so remember that auscultating is still the default standard of care. And remember, particularly if you’re mixing methods, that palpated pressures often will differ from auscultated pressures (including those taken by machine), usually by 10-15 points on the low side.

What if you’re not getting anything from the arm? Well, you can try the other arm, of course. But really, the thing to remember is that you can take a blood pressure anywhere there’s a pulse, although it’s much easier when that pulse is strong and the artery proximal to it can be easily occluded. Remember that although you can palpate a pressure from any distal spot on the same artery, near or far (barring anastamoses), auscultation — which is essentially listening to the turbulence created immediately downstream of the occlusion — requires placing your scope just below the cuff, and will not be successful farther downstream. Putting the cuff (pedi cuffs when needed) on the forearm and measuring at the radial is effective; thigh cuffs work too, although the popliteal can be an evasive pulse to locate. You can even cuff the lower calf and palpate a pedal or tibial pulse, if you’re daring. Go nuts, and try to experiment before the call when you actually need it. Do make an effort, though, to use an appropriate sized cuff for the extremity; mis-sized cuffs can actually yield significantly erroneous readings. For the morbidly obese, I usually prefer to place a regular cuff on the forearm than to use a thigh cuff on the upper arm, but see what works for you.

As a final note, remember that cuffing the neck and palpating the temporal pulse is never an appropriate method of patient assessment, no matter how little blood you may suspect is reaching their brain.

On maintenance: during your morning checkout, pump some air into the cuff, close the valve and give the whole thing a squeeze to check for leaks. There’s nothing better than discovering these after you’ve wrapped it around a critical patient’s arm.

On sphygmomanometers: for obvious reasons, the resting point for the needle should be at zero. (Very cheap cuffs sometimes have a pin-stop here for the needle to rest against; this is a problem because the dial can be miscalibrated without showing it. Pin-stop gauges shouldn’t be used unless your service is seriously broke.) If you have one that needs zeroing, most cuffs can be adjusted by pulling the tubing off the dial, grasping the metal nipple with some pliers (or very strong fingers), and twisting it in either direction until the needle is zeroed. Alternately, fans of mental math can just add or subtract the false “zero” number each time they take a pressure.

And finally, on tourniquets: the immortal Dr. Scott Weingart of Emcrit has described his practice of using BP cuffs as tourniquets. You’ll hear about this from time to time, but there’s always someone who points out the damned things leak like sieves and that’s the last property you want in a tourniquet. Dr. Weingart’s solution is to pump up the cuff until bleeding is controlled (or 250mmHg, whichever is sooner), then clamp both tubes with locking hemostats. (He uses smooth ones to avoid damaging the rubber; he recommends padding with a 4×4 if you’re using a ridged hemostat.) My hemostats are all in the shop, and this may or may not fly with your agency — modifying equipment for “off-label” use is always somewhat shaky ground for us field peons — but I think it’s a splendid idea if you can swing it.

Vital Signs: Pulse

For other Vital Signs posts, see: Respirations and Blood Pressure

Ah, the almighty pulse. If I have a favorite vital sign, this is it; let me lay hands on a patient and take a pulse and my assessment is already well under way.

On the conscious patient our go-to point is the radial pulse, and like golf, mastering the radial is all in the grip. Techniques may vary here, but I always find the radial easier to palpate if you approach from the ulnar side of the arm, coming “underneath” rather than over the top of the radius. This also lets you take a pulse while easily holding onto their limb, rather than forcing you to find a place to rest it, or supporting the arm with one hand while you palpate with the other. Just grab and count, very natural. If you have no luck, you can always keep hold of their arm while using your other hand to do some searching.

The textbooks always seem to show this being done with two delicate fingers, which is silly; more fingers means more coverage, so I always use at least three. (Your little finger is kinda short, otherwise it’d be four.) Use a moderate pressure, but if you’re having trouble, try pressing both lighter and firmer, as well as moving to different spots. (While I usually wear my watch in the normal position, you’ll notice here that when taking a pulse this way, I flip it around my wrist so I can see the face.)

The main way to ensure you’re never baffled by the pulse, however, is by always being willing to look elsewhere. Some people simply won’t have a radial, and this fact may or may not have significance — it may mean they’re hypotensive, or that their arm is locally hypoperfused, but it also may be a chronic condition. Hemodialysis patients with arterio-venous fistulas in their arm are especially notorious for having peculiar or absent radial pulses, as the arteries near the fistula have been scavenged and rerouted. Make like a picky renter — go elsewhere!

Your next attempt after the radial should be the brachial. Now, in classes and textbooks I have always been taught to look for a radial in the upper arm, beneath the bicep, but I’ve never had luck with this. Rather, my target is the antecubital fossa, the same territory made popular by blood pressures and large-bore IV sticks.

Again, positioning is key here. To effectively feel this pulse, the elbow should be in full extension, but relaxed. Depending on the patient’s position, you may accomplish this by wrapping your arm around theirs and holding their elbow in your hand, but from your bench seat in the truck, an easier way to do it is to simply rest their elbow on your knee. (Either way, it’s important to support them at the elbow, because this allows gravity to force their arm into extension.) The brachial can be a real lifesaver when a radial isn’t forthcoming, and I go to it readily and often.

Logically, the next step would be a carotid pulse, but the truth is that on conscious, alert patients, this is always a little awkward; people don’t like having their neck touched. If they need it, they need it, but for the routine pulse check, I try to steer clear. The same goes for a femoral pulse, for the same reasons; there was a story at my old service of a brash young EMT who got canned for “feeling a femoral” on an inebriated coed from a campus we served.

Instead, if I can’t find a radial or brachial on either arm, I’ll often take an apical “pulse,” simply auscultating at the chest for heart sounds. This is not, strictly speaking, a pulse, insofar as it’s not counting actual perfusing beats so much as counting any cardiac noise (it therefore tells you nothing about blood pressure), but it’s a good fallback — and if you’re very suave it can even yield additional clinical information, regarding murmurs, rubs, etc.

Here are a some other tricks that can be useful:

  • Inflate a BP cuff and count the bounces on the sphygmomanometer needle. Although this is not an indicator of systolic or diastolic pressure, it is a legitimate way to measure a pulse.
  • If pulse oximetry is available, the device will usually calculate a pulse for you, and if there’s a displayed waveform you can also confirm it from that.
  • The aforementioned AV fistulas can be used to your advantage. Gentle palpation of visible, active fistulas should let you feel a pulsing vibration called a thrill (an indicator of healthy flow), and this is easily counted for an accurate pulse rate. (Auscultating at the fistula should reveal a buzzing sound called bruit, which can be used similarly.)
  • If you’re able to locate a difficult pulse point, such as a dorsalis pedis, X’ng the spot with a pen can make subsequent checks much easier.
  • Lowering the arm below the level of the heart can occasionally make a radial more readily palpable, especially in hypotensive situations.

Finally, when all else fails, remember your perpetual fallback: skin signs. A patient with no available pulses and no obtainable blood pressure can still give you a general sense of perfusion, both centrally and to each extremity, if you assess the color and temperature of his skin. (This is especially valuable for infants, for whom proper pulse checks can be difficult, and blood pressures even more so.) And then there’s the sidekick to this, which is capillary refill. Current teaching is that cap refill is not a meaningful sign except in the very young, because numerous chronic conditions can cause delayed refill without poor arterial pressure, and this is true; a slow cap refill in an adult shouldn’t mean much to you. However, a rapid refill is still a pretty specific sign of good perfusion, because there’s not many conditions that can fake that (with the possibly exception of distributive shocks, such as septic or anaphylactic). A quick pat-down is an ever-ready way to rapidly assess anyone’s hemodynamic status within a couple seconds.

Vital Signs: Respirations

In the eyes of many EMTs, taking vital signs is BLS bread and butter. I’m not sure if I agree, since there’s other butter I’d hate losing more, but unquestionably vitals are something we do an awful lot of and probably ought be good at. Mainly, it’s the big three: pulse, pressure, and respiratory rate (the fourth vital sign is temperature, which is not considered vital prehospitally, and the de facto fifth sign is O2 saturation, which is not always available).

But woe unto the poor freshly-anointed Basic who enters the field and discovers that taking a blood pressure off his classmate at a quiet desk has almost nothing in common with playing hunt-the-Korotkoff on an elderly PVD patient in the back of a vehicle that sounds, to the layman, almost indistinguishable from a steam locomotive. With experience, we figure it out and we get by, but I’m always interested in the tricks that people have come to rely on, and here are some of my own. Let’s start with…


Respirations

The man who said that any blind monkey can count respirations has never tried it on sick people.

The first challenge here is getting away with staring at someone’s chest without giving them the skeevs. Women may be a little more wary about this, but if you’re unsubtle enough even men may ask if you “like what you see.” One method is a classic: while taking a pulse, count your beats and then start counting respirations without looking away or dropping their wrist. It gives you an excuse to stare blankly, and the patient is rarely the wiser. Good multitaskers can even count a pulse while simultaneously counting respirations over the same interval of time, although this is a bit much for my own second-tier brain.

Alternately, you can place yourself out of the patient’s field of vision, a technique that girl-oglers will recognize. In the back of the rig, you can usually pull this off by simply moving behind the stretcher — the captain’s chair is often too far, blocking your vision unless the stretcher is very reclined, but moving to the end of the bench seat is usually far enough and more convenient anyway.

How about the shallow respirations that virtually can’t be seen? You can put a hand on their chest to feel, but this is a little weird in the conscious patient and again betrays your intentions. You’re better off maximizing your visibility. Make sure there are no piles of blankets or folds of clothing in the way, and try watching both the abdomen and the thorax, as different people breathe in different fashions. If you’re still having no luck, auscultate! Place your stethoscope and count from the lung sounds. In fact, respiratory distress patients will sometimes produce wheezes or crackles that are audible from the bedside, allowing you to get a count with the naked ear.

Some texts recommend counting for at least 30 seconds; this is accurate, but feels like a geological epoch. Unless respirations are highly irregular, I count for 15. That does mean that your results will always be a multiple of 4, but here’s a way to improve it: count partial breaths as well. If you start with the chest “up” and 15 seconds later end on a “down,” call it a half stroke — so 4.5 x 4 would mean a respiratory rate of 18. You can get even fancier with quarter-strokes but that may be a little silly unless their rate is very slow.

A final note: “ehhh, looks normal” is not a valid method for counting respirations. There are times for estimation, but one hospital-based study showed that an overwhelming number of patients were documented at triage as breathing exactly 16 times a minute. A statistical miracle! In other words, you’re not as good at eyeballing as you think; take a few seconds and do your job.

For other Vital Signs posts, see: Pulse and Blood Pressure

The Art of Driving Well

Who here knows how to drive?

When it’s all said and done, I don’t know whether the job you do is public or private; I don’t know whether it’s slow or busy, large or small, paid or volunteer. I don’t know whether your trucks are red or white, and I don’t know what the last letter in your acronym is.

But I do know that if you work in EMS, odds are good that part of your job is transporting sick human beings to hospitals. If not you, then you’re watching someone else do it. And if you’re not part of a flight crew, then that probably means driving an ambulance.

Why doesn’t this get more of our attention? We train our clinical skills, we develop our medical knowledge and streamline our system operations, but driving the ambulance is something we do every time a patient gets transported, and yet we usually only discuss it when we’re griping that our partner just bounced us into a wall. And the only top-down improvement in this area is typically in the context of reducing agency expenses from on-duty MVCs, which is important but only a small part of the topic.

So it’s something we do a lot, but not something we seem to talk about. Let’s talk about it.


Good driving and why it matters

There are three prongs of competent driving with patients aboard; they interact, and can even work in opposition, but maximizing all three should be your ultimate goal.

The first is safety. Most of the attention given to driving is on this front, and understandably so. Safe driving means you won’t cost your service money, of course. But it also means you’ll survive to the end of your shift, and the end of a career of shifts, and so will your partner. Too heroic for self-preservation? Then think of it this way: you’ll survive to help your patients, too. You have precious cargo — a serious crash involving an ambulance with an already-critical patient is the definition of an ugly MCI.

Much ink has been spilled and training time devoted to the topic of safety, so we won’t belabor it here.

The second prong is patient care. As driver you cannot do very much to assist in the care of the patient behind you, but you can do a great deal to interfere with it. The first time you stepped into the back of an ambulance, you were probably amazed at how difficult simple tasks became, such as taking a blood pressure or writing legibly. Unfortunately, these tasks still need to take place, whether you’re parked motionless or rattling down a rural highway at 65. And even if nothing needs to be done except convey your patient from point A to point B, this is a process that can either be pleasant or harrowing. If it’s been a long time since you strapped your own posterior onto a stretcher and looked at the ceiling, give it a try. Then imagine you have chronic pain in your back, bone-deep decubitus ulcers, recent hip surgery, and frail, cachectic arms that can’t stabilize you against turns. If you were a limo driver, would anybody tip you?

At best, your driving will present the most minimal impediment possible to the care of your patient; everyone on board will ideally forget they are in a moving vehicle at all. At worst, you can harm your patient and utterly prevent essential treatment from taking place. How you steer that wheel can kill people. Paying attention yet?

The third prong is speed. This is the one most easily understood by Ricky Rescue, because the traditional image of EMS is about screaming sirens and violating speed limits; a substantial portion of early training therefore consists of rudely eliminating these notions. Yet it remains the case that, all else being equal, a faster trip is better than a slower one; if you can drive just as safely, and just as smoothly, but get there sooner, then everyone will be better off. This can stand somewhat in opposition to the other two considerations, and how you should weigh them will depend on the patient. But we’d like to have it all.


The first and last rule of good driving

What is it that makes for a good ride? Or put another way, what makes for a bad ride? When you start moving and everything starts getting harder, why?

We might say it’s because you’re in a quickly moving vehicle, which seems almost too obvious; speed is bad. But this isn’t so. In a commercial jet cruising without turbulence, you’re moving faster than you ever will in a Ford van, but you could probably play a game of Jenga without any difficulty. Whether the vehicle around you is moving fast, slow, or not at all is not by itself relevant to your perceived experience; it’s all just a moving frame of reference, and inside those four walls everything is still. Velocity is not your problem.

Acceleration is also not your problem. Imagine a brand-new ambulance parked at one end of an airport tarmac. Point it down a mile-long runway and drive it in a straight line, accelerating firmly but steadily from 0 to 30 MPH. Nobody aboard would complain about this. Smooth acceleration is nothing but a steady hand pushing you backward, and is easily compensated for. Acceleration and deceleration — that is to say, changes in your velocity — do not make for a poor ride.

What you’re feeling throw you around when your partner drives like Andretti is your inertia; as Newton observed, bodies in motion like to stay in motion, bodies at rest like to stay at rest. Motion itself is no problem, because it doesn’t interfere with our inertia; acceleration is no problem, because it’s a steady, continuous force like gravity. What we actually care about is change in acceleration; we care about how fast you transition from 0 to 30 MPH, or 30 to 0. Those who took high school physics may remember the name of this property: it’s called jerk, the third derivative of position, and is aptly named. Jerk is what you feel when your train starts to move, and what you feel when it stops. Jerk is what jostles your perfectly-positioned 20-gauge from just above the patient’s left arm to just inside your right thigh. Jerk is what makes fractures hurt, slams your head into compartments, pushes bags off shelves, wears down vehicles, and creates extraneous compartment noise. Jerk sucks.

Our principal goal is therefore to reduce jerk. Why is understanding this important? Because by acknowledging that jerk is the real enemy, we can exonerate the other suspects. If speed is not the enemy, we can actually drive as fast or as slow as we please; other than being treacherously unsafe, doing 95 will not interfere with the intubation taking place in back any more than doing 50 (this is a simplification, though; keep reading for more). And if acceleration/deceleration is not the enemy, we can get up to speed or come down from it more or less as we please, so long as we do it at a constant rate. Many drivers will be humming down a throughway, see a light change ahead of them, and think that to stop in time they must jam on their brakes, thus jerking everybody on board. This is rarely the case. How quickly you stop is largely a factor of how far you depress the brake pedal (and consequently how hard the pads squeeze the wheels). It is not a factor of how fast the pedal reaches that point. In other words, if you can spare the mere second or two required to ease your foot into the pedal, then once you get it to that point you will be slowing just as rapidly as if you’d stomped on it—but the process will be perceived by those on board as smooth rather than jerky.

If these concepts are alien to you, you can start to understand them by simply paying attention to your own body while behind the wheel. At what times do you feel yourself pulled forward, back, or to either side? You are in a radically more stable and comfortable position than anybody in the patient compartment, so if you feel it, they feel it tenfold. If you’re still not sure, try the old glass-of-water standby: fill a cup near to the top with water and place it somewhere steady. Whenever you see the water splash, you are jerking your passengers; and if it spills over the edge, you’re really making them hate you.


Minimizing jerk

How do we get there?

The example above hints at the easiest method of managing jerk. Vehicle jerk is primarily determined by how quickly your pedals move. You have two pedals: gas and brake. I don’t care where they’re positioned. The gas can be down on the mat, or the brake can be the same, or anywhere in between. But I don’t ever want those pedals to move quickly. If you want that gas floored, it should get there slowly, like you’re stepping in molasses; and when it comes back off, it should take just as long.

Planning is a large part of this. At any given time, you should know where you’re going and how you’re going to get there — not just in the large sense, such as your overall route to your destination, but in the immediate sense of what lane you need to be in and when you’ll next need to turn or stop. Look forward: is the next action you’ll be taking to stop at the line of cars a block ahead? Then start doing that now, because the longer you wait, the less room you’ll have to do it. If you start easing onto the brakes now, you can “spread” that deceleration over 100 yards, which means your rate of slowing can itself be slow and the change in that rate — your jerk — can be close to zero. Touch the brake now, not too hard, and don’t move your foot from that spot; you’ll start leaking speed at a steady and constant rate, and if everything works out, you’ll ease to a stop exactly where you want to be, just far enough behind the car ahead to be safe.

When you start moving again, the opposite occurs. Traffic ahead bolts away and your instinct will be to follow, to stay as close to the pack as you can, as if it were a race. Tame your instincts and ease into the gas. Will space open up ahead of you? It will. But it will only take a moment or two to reach whatever level of acceleration you desire, and then you can rejoin the flow of traffic, and nobody’s Jenga game will be the worse for wear.

All of this is easy in theory, harder in practice. You might say, for instance, that your service area is a hell-zone of urban streets and heavy traffic; if your foot is slow, you’ll never get anywhere and might not survive the trip. Not so. All that’s required is a certain amount of foresight and forebearance. You can always plan for expected events, such as red lights and stop signs; you can even plan for suspicious possibilities like stale greens and cars that smell like they’ll cut you off. You can’t plan for everything, but you can “expect the unexpected.” Leave room — room at your sides if possible, but particularly room ahead, as much cushion as you think you’d ever need and then some more. Not only will this give you more space to stop, and reduce the urge to stick close to your leader, but it will mean that small changes in the flow of traffic — those little forward creeps that are so common in rush hour — can be ignored altogether. Just because that Prius moved forward a foot doesn’t mean you need to. Nobody’s getting anywhere new.

Of course, a certain amount of hostility is to be expected. I drive in Boston and there are times when letting that foot of space go unoccupied may start a shooting war with the cars behind me. But the reality is that no real harm is being done — and the only people I’m truly responsible to are my co-worker in the back and the patient in his care. Do your job well and traffic can take care of itself.


The terminal bump

Special consideration should be given to the unique jerking sensation felt at the final moment of deceleration before you come to a complete stop, and to the similar but lesser sensation felt at the first moment of acceleration from a standstill. This is the feeling of your vehicle easing forward or back on its suspension, and is so distinctive — and so particularly obnoxious — that I’ve driven frequent fliers who specifically request that I try to minimize it.

You can perform a very smooth and gentle deceleration and still feel a bump at the very end. The sensitivity of this phenomenon to your driving is orders of magnitude greater than at other times. How to avoid it? You must simply be that much more cautious; it might take you as long to get from 5 MPH to 0 than it took you to get from 30 to 5. You must not only ease off the gas, and ease onto the brake — when you get to this level of fine-tuning, you will have to ease back off the brake as you approach 0, in order to more gently reach a complete stop. The brake pedal goes down as you slow, up as you approach the final bump, then back down to drain off your final bits of speed and hold you still. The gold standard here should be to stop so smoothly that nobody on board knows when it has occurred. You’ll achieve this rarely, but you can get close.

Accelerating out of the stop is the same story — the first few MPH are the hardest. Start by easing off the brake, working up to idle speed, then ease onto the gas as gently as you can. Your hardware can sometimes make this easier or harder; some vehicles will have a catch or irregularity in their acceleration curve that make it impossible to get past a certain speed without feeling it. Such is life.


Turn, turn, turn

What about turns? Turns are more complex than linear driving. Turning smoothly does require easing into and out of the arc, to minimize initial and final jerk; you can’t waggle the wheel like you’re testing the suspension, or you’ll play pinball with your passengers. But you’ll also need to think about your speed.

I know, I know, I said that speed doesn’t matter. Jerk is the most important factor in smooth driving. But when you make a hard turn, you are applying a sideways acceleration to your occupants; they are being pushed left or right with a gravity-like weight. If this is done smoothly, it is better than if it is done with jerk, but even a smooth-yet-hard turn will put your partner and patient in the position of having to resist it. If seated on the bench, your partner is either being shoved into the wall or onto the patient; simultaneously, the patient is being thrown against the side of the stretcher, with little ability to stabilize himself laterally. This is not good.

This force is determined by an interplay of how tightly you turn and how fast you are moving. Very gentle turns can be taken at high speed, and buttonhook turns can only be made at the slowest speeds. Unlike straight driving, which is more nuanced, this tends to be an all-or-nothing affair: in any given turn, you will either feel it, or you won’t. If you feel it, you need to slow down. With practice, you will learn to eyeball an approaching curve and slow to about the right speed, where “right” is the maximum speed you can safely maintain without feeling the sideways push. If you enter a turn and start to feel it, simply slow down more; this often happens even to the best drivers in “spiral” turns that tighten further as you follow them.

Now, there is one trick that will pay you endless dividends here; there is a method by which you can take tighter turns at faster speeds without invoking lateral inertia. This is by following the proper line.

Novice drivers of large vehicles like ambulances or trucks are often surprised at their large turning radius; in order to make turns while staying on the road, they must turn “wide,” starting at the outside edge of the legal road and aiming for the inside edge. By doing this, they “create” road for themselves; they add some of the width of the road to the length they’re traversing. We’re going to do something similar here, following an outside line — not because it helps us stay on the road, but because it lets us turn more gently.

turning with a correct line, an inside line, and an outside line

Image courtesy ModernRacer.com, used with permission

Taking the outside line on a turn involves maneuvering as close to the outer edge of your lane as possible before the turn begins. If turning left, you will hug the right edge of your lane; if turning right, you ride the left edge. As the road begins to curve, you aim your turn for the inside corner, touch it as you pass, and ease back out again, eventually returning to the outside edge — if all goes well, just as as the road straightens out. Ideally, your steering wheel will stay in the same position through the entire turn.

This may seem complicated, but it’s not. All it takes is making your turns by “tagging” three points in order: you’ll tag the outside, the inside, and then the outside, connecting the dots as smoothly as possible. By taking this line, you’ll be turning the wheel as little as necessary; in effect, you’ll be behaving as if the turn were less sharp than it truly is. This will allow you to maintain a higher speed through it without feeling sideways force. This is something you can do on all turns, sharp or gentle; in fact, some easy turns on wide roads won’t require you to steer at all!

If this seems too difficult, you can work up to it with a simpler version. Rather than three contact points, you’ll use only two; you’ll take an “inside” line, starting on the inside edge of the turn and then easing over to the outside (more similar to the red line in the illustration). This won’t be as effective, but it will be better than simply driving mindlessly, and you can practice the skills necessary to “clip the apex” — as professional drivers say — every time.


Bumps, holes, and lousy roads

After considering straight driving and turning, the last challenge to a decent ride is breaks in the road surface itself. Bumps or potholes are not the sort of thing you can change with your driving; the best you can do is try to minimize their effect. Sometimes even your best efforts will result in a steady but bumpy transport.

Here again, speed will play a role. Although bumps are the same size no matter how fast you hit them, their effect is magnified at high speed; hurtling through a maze of potholes can either be a gentle rocking or a barrage of artillery. Very large obstacles like speed bumps should, when possible, be taken only at a bare crawl.

Traveling more slowly also makes it easier to avoid obstacles altogether. This becomes a tradeoff between bumps and swerves: some holes can only be avoided by turning so hard that you’ll throw everyone sideways, and you’ll have to decide which ones are worth it. But the slower you go, the more time you’ll have both to notice them and avoid them. Don’t turn your lane into a slalom course; it’s neither safe nor beneficial to your passengers. But avoid what you can, using the space available.

When it’s not possible to avoid obstacles altogether, you can sometimes minimize them by taking them with only one set of wheels. This is an old trick of the trade for navigating speedbumps, which often don’t cover the entire road and can be partially avoided by putting either your left or right wheels through their gaps. However, when traversing barriers of any significant height (such as entering or leaving elevated ramps), you’re better off squaring up and taking it with both wheels simultaneously; the sideways rocking induced by hitting it at an angle is far worse.


Special considerations

What about driving with lights and sirens — you know, the big stuff, critical patients, balls to the wall?

Nothing’s different here. Remember your three goals: safety, speed, and good care. A minimum level of safety is not optional. Beyond that, you can use the techniques above, particularly taking the best lines on turns, to maximize speed while still giving the best care — but past that point, you’ll have to prioritize one or the other. Your assessment, particularly as dictated by your partner, will determine this; some patients benefit most from certain things happening right now (such as critical airway interventions) whereas some mostly need to get to the ED immediately (such as apparent STEMIs). With that said, I have almost never heard a tech opine that they wished they were moving faster, whereas I have heard many complaints about poor and dangerous race-car transports. In 99% of cases, reasonable speed that emphasizes a good ride — in other words, the same driving you’re already routinely practicing — is the appropriate goal.

One benefit of driving hot is that you’ll have more space to play with. You can’t rely on this — you still must visually clear the road every time — but you can often use other lanes in order to widen your turns, even traversing the entire sweep of the road, rather than just using the space in your own lane. So long as traffic is giving you ample room, this lets you take much better lines, and therefore turn faster.

In some cases, specific circumstances can dictate changes in your driving. See that rear view mirror, the one that’s never any help seeing the road? That’s for looking into the passenger compartment (although if your rig is a Type I or similar style with poor visibility between cab and compartment, you’ll have to rely more heavily on verbal communication). If your partner is trying to place an IV, perform invasive techniques like surgical cricothyroidotomy, or record a 12-lead ECG, it may be worth driving with special caution — or even pulling to a stop long enough for the hairiest steps to be completed.

There are also times when you will need to consider the effect of lights and sirens on your patient. It goes without saying that anybody will be made more anxious by a hot transport (particularly if your partner is, poker-faced, trying to convince them that they should relax); but some patients are particularly sensitive to this. ACS patients or those with high-risk AAA are not people whose hearts should be racing, and lights and sirens are one of the most well-trained cues in our modern culture that an emergency is taking place. And what about psychiatric calls, or even the respiratory patient with suspected hyperventilation syndrome? Again, safety is not a “sometimes” consideration, but there are times when siren use can be minimized if not avoided entirely. (Emergency lights are typically fairly benign in this respect.)


Got it?

Driving fast is sexy, much like nasal intubation, epinephrine, and traumatic amputations. Driving well is not sexy, but like vital signs and good patient histories, it is an everyday and essential part of our job that absolutely has the potential to profoundly affect patient care. Doing it exceptionally is an art, but doing it competently is easy, and it should be viewed as a fundamental skill for any competent prehospital provider working in a transporting system. Driving is a BLS skill — period.

Give it some thought. Just once, just for one shift, try some of these techniques. And the next time you’re bouncing around on the bench, wondering if your partner has forgotten what it’s like back there, take that opportunity to remind yourself of exactly how important good driving can be.