Mastering BLS Ventilation: Introduction

Sometimes, patients can’t breathe. When that happens, we need to breathe for them.

Simple enough. This is life support at its most fundamental, and many of the interventions classified as “BLS” are found here — techniques and devices for artificially supporting the body’s airway and breathing.

And it doesn’t seem so hard. When they taught it in class, it only took a day or two, and a few pages in the textbook encompassed the subject. How to size an OPA, how to hold the BVM, something about jaw thrusts, and you’re through. Spend a few minutes playing with a mannequin and now you’re an expert.

In the real world, though, this is not child’s play. Managing the airway of a sick, apneic patient is, at best, a high priority; at worst, it’s an unqualified catastrophe. Case reports and horror stories of airways gone wrong can be found under every roof: the failed intubation, the disastrous cricothyrotomy, the foreign body obstruction that couldn’t be cleared. These are emergencies because as we all know, without an airway, you cannot survive. It’s simple stuff.

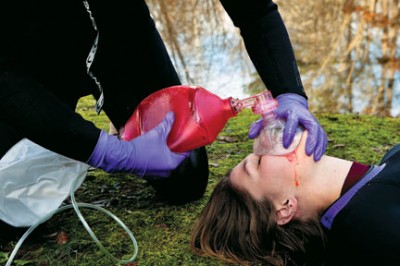
And then there’s the BVM — aka the bag-valve-mask or “Ambubag.” Ask a room full of novice EMTs and they’ll all agree it’s about as straightforward as tying your shoes: slap it on, squeeze, any idiot could do it. But ask the senior medic in the corner, and he may paint a grimmer picture. Jeff Guy has described it as a more difficult skill than endotracheal intubation, yet one of the hot topics today in prehospital medicine is whether paramedics should remove intubation from their scope of practice because it’s too hard. But nobody’s going to take away the BVM. It’s irreplaceable; it’s the first and last line, the means of ventilation that any patient starts with, and the fallback if your next move fails. The only problem is that doing it well, and for really tough patients, doing it at all, is a purely skill-based exercise. It’s the Jedi’s lightsaber: simple, versatile, but designed for an expert.

The point is that establishing a patent airway in a sick person who can’t do it themselves, and ventilating them using that airway, is such an important task that it generally mandates a large toolbox. Airways are often managed via complex flowcharts or algorithms, where one method can yield to another if it fails, and then to another and another. Countless different devices and methods are available, so that even when obstacles are present, any moron can stumble onto something that works before the patient crashes altogether.

And then there’s us. The Basic EMT stands at the bottom of the spectrum in terms of training, yet is expected to oxygenate any patient using nothing but the meager BLS jump-kit. He has the BVM, a couple of basic airways, masks, cannulas, suction, positioning — and beyond that, just his wits and skills. And as for those, he probably spent little to no time actually practicing them in class, and may perform them only rarely in the field.

This won’t do. When it comes to psychomotor skills, these are the most essential, because we don’t have a Plan B. If BLS techniques fail, our only recourse is to sprint for the hospital or ALS, and hope nobody dies along the way.

So let’s talk about all the principles and tricks of creating a BLS airway and ventilating with the BVM. First, we’ll need to understand why it’s hard.


Basic Physiology

Ordinarily, we suck at breathing.

I mean we literally suck. We drop the diaphragm and widen the ribs, expanding the area inside our chest. This expands the lungs, forcing them to suck air into the only opening available — through the mouth and nose, down the pharynx, through the trachea, and into the bronchial tree.

That’s assuming that the airway is open, of course.

Now, what if I whack you over the head, and your body loses the ability to spontaneously breathe? We’ll want to breathe for you. Can we pull down your diaphragm and expand your chest? Not very easily, unless we stick a plunger on your sternum, or put you in an iron lung. Instead, we reverse this process: rather than creating negative pressure inside the chest, we force positive pressure in from the outside. Rather than sucking, we blow.

Blowing is a little tricky, though. One of the main problems is that there’s more than one place for air to go. Consider the pharynx, the working area of your upper airway. We can get there via two paths: the oropharynx (via the mouth and over the tongue), or the nasopharynx (via the nostrils), but they arrive at the same place, the laryngopharynx (or hypopharynx). What happens next?

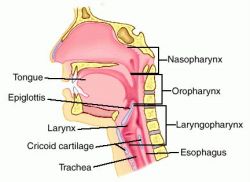
If we peered into your hypopharyngeal space, we would see that two openings emerge below. One leads to a tube which lies posterior (toward your back): your esophagus, which conveys cheeseburgers and beer into your stomach. One leads to a tube which lies anterior (toward your front): your trachea, which brings air into the lungs for gas exchange. Remember these relative positions — the trachea is in front, and you can palpate it at the neck (the “Adam’s apple” is part of it). The esophagus lies behind this, and is not usually externally palpable.

Given that food and air both enter via the pharynx, how do we ensure that cheeseburgers ends up in the esophagus and air ends up in the trachea? Well, the gatehouse to the trachea is the larynx (the “voicebox,” where vocalization occurs), and the opening to this chamber is called the glottis. The glottis is normally open, but when you swallow, a couple of drape-like vestibular folds and a little flap, the epiglottis, are pulled in to cover the larynx. The result is that food is forced into the esophagus.

What about the other direction? The esophagus is formed from rings of muscles called esophageal sphincters, which help “milk” food downward when you swallow. The bottommost ring is the lower esophageal sphincter, which opens during swallowing, but otherwise is mostly constricted, sealing off the esophagus from the stomach itself. This prevents air from passing down and gastric contents from coming up (something we know as heartburn).

To summarize, as you sit here reading this, your esophagus is clamped off by your lower esophageal sphincter, and your trachea is open, allowing you to breathe. But if you take a bite of your coffee-cake, your epiglottis and vestibular folds will block off your airway, your esophageal sphincter will open, and the food bolus will be directed into your stomach.


Down the wrong pipe

The trouble with blowing instead of sucking is that we have no way of aiming where we blow.

I know what you’re thinking. If we force air down the pharynx, the esophageal sphincter should block off the stomach, ensuring that it flows into the larynx and down the trachea. Right?

Here’s the problem. Even ordinarily, your esophageal sphincter only clamps down with a small amount of force — say around 30 cmH2O (centimeters of water, a unit of pressure). This is plenty to prevent air from flowing in during regular respiration. But if air were to be pushed in with greater than 30 cmH2O of force, it will squeeze past the sphincter and enter the stomach. And if we clamp a BVM over your face and squish the bag, we can easily exceed that much pressure.

It gets worse. In order for the esophageal sphincter to work even that well, it requires muscular tone (constant stimulation), just like your postural muscles need tone to keep you from falling over. What happens when you’re unconscious? Sphincter tone decreases. So in the people we’ll actually be bagging, opening pressure may be 20–25 cmH2O or even less. Thus it’s even easier for positive pressure ventilations to force their way into the stomach.

The result? When squeezing the BVM, air often enters the stomach along with (or instead of) entering the lungs. Not only is this pointless, it makes it even harder to inflate the lungs (a bigger abdomen creates pressure on the diaphragm), decreases cardiac preload, and increases the risk of vomiting — which will further obstruct the airway.

The easiest solution is to put a tube into the trachea and seal it off — i.e. endotracheal intubation (or variations on that theme, such as a blind airway). Then we can blow air directly into the lungs without any chance that it’ll enter the wrong pipe. Unfortunately, those are tools we often lack as BLS providers.


Angles and Tissues

All of those structures we’ve been describing? They’re soft.

Soft and squishy. And it’s not just the esophageal sphincter that loses tone when you become unconscious.

In ordinary circumstances, the airway is a supple but structured arrangement of tissues that maintains its form. This is important, because there’s not very much space in there. So in the unresponsive patient, it’s no surprise that some of those tissues might collapse together, blocking off the lumen between them. (Check out this fluoroscopic video.)

The tongue is the worst. Tongues are basically big blobby muscles, attached at only one end, and if you remove all firming tone, they just flop wherever gravity takes them. So put an unconscious person supine, and gravity pulls the tongue back into the pharynx, blocking all airflow.

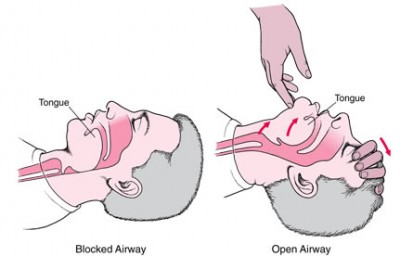
Or the larynx and supralaryngeal tissues run into the posterior pharyngeal wall. Or the soft palate does. Either way, anterior structures end up touching posterior structures, leaving no room in between. Our airway involves a tight 90 degree turn, and this is not a design that remains open without active maintenance. So if we want to breathe for these people, we need to find a way to unblock everything. (Like the jaw thrust — check out this airway cam.)


Mask Madness

Trying to push air into someone’s lungs by holding a mask over their face is like trying to blow up a tire by… well, holding a mask over the valve.

I teach CPR, and I can count on one hand the number of times I’ve handed the BVM to somebody and watched them achieve chest rise on the mannequin the first time. Heck, I demo the things and I don’t always pull it off.

Effectively sealing an air-filled plastic mask to someone’s face and then squeezing the bag is a task meant for more hands than any human possesses. Doing it on somebody who’s dying is exponentially more difficult. Add in the fact that they’re probably obese, toothless, vomiting, crumpled in a corner or bouncing around an ambulance, and enshrouded in a thick ZZ Top beard. Now try to get it all done without losing your cool or breaking your proper ventilatory rate. Having fun yet?


Key points

  1. BLS ventilation using basic airways, positioning, and the BVM is a difficult, complex, and undertrained skillset for the EMT-B. Yet since we often lack rescue devices or alternate ventilation methods, it is critical that we learn to master it.
  2. Preventing gastric inflation would be difficult even in healthy people, and is extremely difficult in the apneic and unresponsive patient.
  3. Loss of tone in unconscious patients lying supine reliably produces soft tissue airway obstruction which must be cleared.
  4. Obtaining a proper mask seal is a necessary prerequisite for BVM use, but is often difficult or impossible for a single rescuer.

Tune in next time to see some solutions to these challenges.

Continued at Mastering BLS Ventilation: Hardware, then Mastering BLS Ventilation: Core Techniques, then Mastering BLS Ventilation: Supplemental Methods, then finally Mastering BLS Ventilation: Algorithms

Glucometry: Clinical Interpretation

Continued from Glucometry: Introduction and Glucometry: How to Do it

Implementing glucometry into your overall assessment means understanding three things: when to use it, what the results mean, and when it fails.


Indications

First of all, by and large the only people with derangements of their blood sugar should be diabetics. The rest of us are generally able to maintain euglycemia through our homeostatic mechanisms, except perhaps in critical illness causing organ failure and similar abnormal states. Now, if someone injected you — a non-diabetic — with a syringe of insulin, you’d become terribly hypoglycemic, since it would overwhelm your body’s ability to compensate for the loss of glucose. But nobody’s likely to do that if you’re not a diabetic, unless it’s meant for somebody else and a drug error occurs, or I suppose if they’re trying to assassinate you.

With that said, people walk around who are diabetic and don’t know it. I’ve lost track of the patients I’ve transported who presented with signs suggestive of a diabetic emergency, denied a history of diabetes, and came back with a BGL of 600. Well, my friend, I have some bad news for you. “Everybody is diabetic, even if they’re not” is my attitude. Almost a fifth of older Americans are diagnosed, and the older and sicker they are, the more common it is.

Which brings us back to: who needs a BGL?

The most correct answer is anybody with clinical indications of either hypo- or hyperglycemia. As we saw, diabetes itself is really associated with hyperglycemia, which is why the classic signs of hyperglycemia are usually used to diagnose diabetes: polyuria (excessive urination, as extra glucose is excreted by the kidneys and brings water along with it osmotically), polydipsia (excessive thirst and water consumption, to replace the fluids urinated out), and polyphagia (constant hunger, since despite all the sugar floating around it’s not reaching the cells very easily). If your patient is complaining of those, you might be the first one to discover their condition. The diagnosis doesn’t require elaborate tests and imaging; a fasting glucose over 126 BGL tested on multiple occasions, or just once in combination with clinical symptoms, or a post-prandial (after eating) glucose exceeding 200, is the definition of type II DM. (With that said, I wouldn’t go around diagnosing your patients; that’s not your job, and you’re not quite that good.)

Once the glucose gets higher than the “renal threshold” — usually around 180 in average folks — the body starts to excrete it into the urine. This can actually be detectable by chemical dip-stick, or even by odor and texture at very high levels.

When hyperglycemia becomes severe and prolonged enough, we start to worry about diabetic ketoacidosis. Although burning fat and protein is not necessarily dangerous (some popular diets actually put you into a mild ketogenic state intentionally), extensive accumulation of ketones caused by a total lack of insulin (as in type I diabetics — DKA is rarely seen in type II) creates a metabolic acidosis in the body. This is when the long-term harm of hyperglycemia becomes a short-term hazard. DKA causes altered mental status, usually elevated states of confusion and disorientation, and combative behavior isn’t uncommon. Combined with the acetone odor that sometimes presents on the patient’s breath — which can smell like alcohol — DKA patients can seem suspiciously like drunks, and treating them like drunks is a great way to go down a bad path. (A word of wisdom: not only is everybody diabetic, but drunks are definitely diabetic.) DKA also frequently presents with symptoms of dehydration, due to the osmotic water loss in the urine; nausea and vomiting; and deep, rapid Kussmaul breathing to blow off the acidic CO2.

A few situations can cause short-term hyperglycemia, including stressors of any kind (there’s even “white coat hyperglycemia,” where patients tend to produce elevated sugars at the doctor’s office), but these typically won’t produce anything like the massive levels leading to DKA.

With all of that said, you need to really build up some glucose before hyperglycemia becomes symptomatic, and even more than that before it becomes acutely dangerous and unstable. That’s why as a rule, we’re more concerned with hypoglycemia, usually due to medication administration, physical exertion, or metabolic demand exceeding what was expected. Hypoglycemia again presents as altered mental status, in this case more often an inhibited rather than an elevated state: confusion, lethargy, disorientation, inability to focus or follow commands, weakness, headache, seizures, and eventually coma and death. The fun part is that the impairments can present as focal as well as generalized deficits: unilateral weakness of the limbs or face, speech slurring, poor gait, vision abnormalities, and more. In fact, hypoglycemia is a neurological chameleon, and can look like almost anything; it’s particularly notorious for imitating strokes, and for causing (not imitating) seizures. Interestingly, kids are particularly prone to hypoglycemia due to their gigantic heads, full of glucose-hungry brain.

Despite all this, the primary manifestations of early hypoglycemia are actually not symptoms of hypoglycemia. Rather, they’re caused by catecholamines — by the body releasing stress hormones, primarily epinephrine, in a response to the emergency. (This is not an irrational move: epinephrine helps us release and retain glucose.) As a result, we often seen the same signs we’d expect in anybody with a profound sympathetic stimulus: pale and diaphoretic skin, anxiety and shakiness, tachycardia and hypertension, even dilated pupils. Wise diabetics recognize the early signs of this sympathetic response and drink some Pepsi. As levels keep dropping, these symptoms combine with the neurological effects of glucose starvation to produce a confused, sweaty, increasingly stuporous individual. If left untreated, finally the sugar drops until we’re looking at the picture of impaired and diminished consciousness caused by true hypoglycemia. So just like always, the signs of compensation are our early warning system; once the body decompensates, it’s already late in the game.

To make a long story short, anybody with altered mental status, or any kind of general systemic complaint (weakness, fatigue, anxiety, nausea, etc.) should probably get their glucose tested, whether or not they have a known history of diabetes. This is true even if you suspect another cause, such as stroke. Not only can diabetic emergencies look like anything, they can also be comorbid; it is extremely common for patients to have another problem, yet also to bring a high or low sugar along for the ride, due to the illness throwing a wrench in their normal intrinsic and extrinsic glycemic homeostatic systems.

A number of years ago, there was some limited but compelling research that suggested poorly-controlled blood glucose (meaning not severe derangements but merely small deviations from the ideal range) was associated with increased mortality among an inpatient population with a wide variety of conditions. In other words, if you were hospitalized with something like sepsis, you were more likely to end up dying if your sugar tended to float around 160 instead of 110. As a result, it become trendy to practice extremely tight and aggressive glucose management for virtually everybody; diabetic patients were being tested every few hours and ping-ponged around using medication to keep their numbers textbook-perfect. More recently a number of studies have suggested that this may be less important than was thought, and in fact that excessive paranoia leads to a lot of iatrogenic harm from accidental insulin overdoses. This battle is still being fought in the hospitals, but for our purposes a reasonable take-away would be: when managing acute illness, from sepsis to head injury to cardiac arrest, once everything else is done it’s not a bad idea to check the patient’s sugar.


What’s the Number Mean?

So you’ve taken a blood glucose, either by capillary finger-stick or from a venous sample. Now what?

We mentioned that the “normal” range is something like 70–140. Diabetics seeking to control their condition and not have their toes falling off in a few years usually strive for tighter control of their BGL than is needed for acute care; a sugar of 175 is a little on the high side for a routine check, but a pretty meaningless elevation for our purposes.

All things are also relative, in that a given BGL must be compared to the patient’s baseline to predict its effects. In other words, poorly-controlled diabetics who are routinely sitting at 200 may become symptomatic of hypoglycemia at relatively high levels, whereas very well-controlled diabetics who usually run lower may be able to drop very low indeed without noticing it. However, a few rules-of-thumb are useful:

Non-diabetics usually become noticeably symptomatic below a sugar of, on average, about 53. (Diabetics, particularly those who are usually poorly-controlled, are more variable — their average symptomatic threshold is more like 78.)

After a recent meal, diabetics may demonstrate hyperglycemia to various degrees depending on whether they ate a Cobb salad or an entire chocolate cake. Non-diabetics should not exceed 200 or so. A few people can exhibit hypoglycemia after meals, due to alcohol consumption, “dumping syndrome,” or some other phenomena, but far more often they’ll exhibit similar symptoms without any true hypoglycemia; some people get shaky and sick due to postprandial epinephrine release.

After an unusual period of fasting (“haven’t eaten since yesterday”), non-diabetics should still have a largely unremarkable sugar. For diabetics, it will depend mainly on how much and what type of medication they’re using.

There’s usually a gap of 10–20 mg/dL between hypoglycemia that’s noticeable to the patient (i.e. sympathetic effects) and hypoglycemia that causes cognitive impairment (i.e. neurological changes). This is their safety margin, when they’re taught to eat or drink some fast carbs; if it keeps dropping they may no longer be able to take care of themselves.

But here’s the problem: the sympathetic “warning signs” can be mediated or impaired for various reasons. For one thing, if your body has to flip that switch often, you become numbed to it, and your hypoglycemic thresholds becomes lower and lower. And many patients with various metabolic and endocrine failures simply can’t muster much of a stress response — the same reason why the elderly may not produce tachycardia and other shock signs when they become hypovolemic. Finally, drugs like beta blockers that directly block sympathetic activity can seriously obscure hypoglycemia. Grab your nearest bottle of beta blockers and read the list of adverse effects: one will be hypoglycemic unawareness, a five-dollar term that means beta blockade can make it difficult to know when your sugar drops low.

Another important consideration in evaluating glucose levels is the expected trend. For instance, a BGL of 70 in a diabetic patient might not excite anybody. However, if you’re testing her because her nurse said that she just accidentally received four times her normal insulin dose, then a BGL of 70 should be alarming, because it’s probably going to keep dropping, and she doesn’t have very far to go.

To make a long story short, the clinical effects of both hypo- and hyperglycemia can vary substantially. What to do? It’s simple: assess the patient physically, obtain a history of their oral intake, medications, and metabolic demands (such as exercise), test their sugar if there’s any possibility of glucose derangement, and compare all those data against each other. A low number in the setting of obvious clinical symptoms is bad. A low number in an asymptomatic patient, or a normal number in a patient with highly suggestive signs and symptoms, should force you to bring out your thinking cap and weigh the odds.

What about treatment? Severe hypoglycemia needs ALS or the hospital — they’ll receive IV dextrose. Severe hyperglycemia needs the hospital only, where they’ll receive carefully-dosed insulin; this is generally considered too dangerous to administer in the field (although patients may have their own), so paramedics are reduced to giving fluid boluses, which may help dilute high glucose concentrations (not a very elegant solution) and is probably needed by a patient in DKA anyway, but isn’t really a fix.

What about oral glucose, in the cute little tubes we carry? Typically these are gels containing 15g of glucose, taken orally (either swallowed or held in the mouth — against the cheek or under the tongue — until it’s absorbed). Do they work? Sure. But it’s not much sugar and it’s not very fast. I found one source that suggests 15g of oral glucose should raise the BGL by 50 mg/dL within 15 minutes of administration — but I’ve never found it to be nearly that effective. In my experience, a bump of about 10 mg/dL per tube is about the best you can hope for in the short-term. If you need more than that, go with the medics and the IV syrup.


Testing Errors

When is a tested capillary or venous glucose unreliable? Usually it’s your fault.

Well over 90% of BGLs that test outside the maximum error range (remember, around 15%) are due to user error. Some of the main ones:

  • Your meter requires lot coding, and you failed to do so or used strips from the wrong lot.
  • You failed to clean the skin before lancing, contaminating the sample (not to mention creating an infection risk), or you had some D50 on your glove and it got mixed in there.
  • Rather than gently wicking the sample into the strip, you “smeared” the two together with mechanical pressure, interfering with the expected reaction process.
  • You drew blood from an arm with an IV infusion of D50, TPN, or other meds distal to it. Particularly when peripheral perfusion is poor, always try to sample at a different limb from any running drips.
  • You tried to reuse a non-reusable strip (gross).

Okay, okay, so nobody’s perfect. Factors that may not be as obvious include:

  • Temperature. The test reaction is designed to function within a specific temperature range, which is broad (often around 40–104 degrees) but not limitless, so don’t use them in freezing weather, and try not to leave your equipment ungaraged without climate control when it’s very hot or cold out.
  • Altitude. Just in case you’re an Everest expedition doctor.
  • Humidity. The strips have trouble when it gets very humid.
  • Air. The reagents in the strips will actually degrade if exposed to air for sufficient periods of time, so make sure that you keep them in their tightly-sealed case, and follow their printed expiration dates.
  • Time. If you draw whole blood and leave it around (much more likely to happen in the laboratory than in the ambulance), the erythrocytes will metabolize glucose at about 5-7% per hour.

The good news is that in many of these situations, internal error-checking within the glucometer will recognize the problem, and flash an error rather than a reading. Errors messages are usually numbered and can be informative, but each manufacturer uses different codes, so read the manual if you want to know what “ER2” means. (Hint: not enough blood in the sample is by far the most common.) Many of the other problems can be caught if you regularly check the meter using a known-value test solution, which you should be doing anyway according to most drug and safety agreements. (By the way, both the test strips and those vials of solution are usually meant to expire a few months after opening — the printed date is for an unopened bottle — so if they’ve around forever it’s probably time to retire them.)

What about physiological states that can interfere with the reading? We’ve discussed a few, but briefly:

  • Hematocrit. Anemia from any cause, including cancer or blood loss, causes falsely high readings. High crit, common in neonates, causes falsely low readings.
  • PaO2. Oxygen interferes with the electrochemical redox reaction; thus high concentrations of dissolved oxygen cause falsely low readings, and low PaO2 (i.e. hypoxia) cause falsely high readings, potentially masking a true hypoglycemia.
  • pH. Primarily in meters using the glucose oxidase enzyme, alkalosis will cause falsely elevated readings, while acidosis causes falsely low readings. The acidosis of DKA can therefore cause falsely low readings, masking the profound underlying hyperglycemia, so if the clinical picture screams DKA, don’t necessarily let the glucometer tell you different.
  • Macronutrients. High levels of circulating proteins or fats can cause falsely low readings due to dilution.
  • Hypoperfusion and inadequate circulation. See our previous remarks on this, and remember that venous sources will be more accurate than capillary.

Finally, are there medications that can interfere with glucometer accuracy? There sure are. These in particularly are highly device-dependent, with the glucose oxidase-type meters most often affected. Generally, the effects are not profound, but occasionally they may be clinically relevant.

  • Ascorbic acid. Better known as Vitamin C, some people take megadoses of this stuff, thinking it’ll cure their cold or flu. Depending on the meter it can cause falsely high or low readings, usually a minimal change, but at “megadose” levels the effect can be significant.
  • Acetaminophen. Also known as Tylenol. The effect is similar to ascorbic acid, but even more modest; it should only be considered in major overdoses, and even then the difference is unlikely to break 35.
  • Dopamine. Massive doses, such as might be used for intensive inotropic support, can modestly influence glucose dehydrogenase-based meters.
  • Mannitol. High doses can elevated the measured BGL by around 35.
  • Icodextrin. This is a dialysate solution used for peritoneal dialysis (not hemodialysis — this is where they pump fluid into the abdomen, let it sit, then drain it out), mainly in patients with diabetes. It metabolizes to maltose, which can cause falsely elevated readings in certain meters. There’s at least one tragic and unfortunate case report of a patient death resulting from massive insulin overdose due to this effect, not noticed until the true BGL was obtained by laboratory analysis. If your patient undergoes peritoneal dialysis, try to find out what dialysate is used, and if that’s not possible, it may be safest to assume their sugar is lower than you’re measuring.


Conclusions

After all this you’re probably thinking glucometry is so convoluted and rife with pitfalls that you’re better off just eyeballing how sweet your patients are. But don’t let me turn you off! This remains one of the best assessment aids we have, because diabetic emergencies remain some of the most common, most treatable, and most easily confused disorders that we encounter. We can’t perform exploratory surgery, and we may never see prehospital CT scans, but this is a diagnostic test that’s so cheap and simple, with such real potential to affect your decisions, that it should be available everywhere. If you maintain your equipment, learn how to do it right, and keep a few basic confounders in mind, it’ll serve you well as one of your most reliable tools.

The Slow Ride

As I was discharging the patient to rehab, she described the municipal EMS crew that had initially brought her from home with a fractured hip. “It took 20 minutes to get here,” she said, “and my house is only a mile down the road.”

Annoyed? Hardly. She couldn’t have been happier.

It’s well and good to be a really great driver. (In fact, if you ask me, it’s just about an essential skill.) Good drivers can push the efficiency of the “smooth vs. fast” curve, and this is important, because we want it both ways. But every now and then, you get a patient who simply needs to be transported at the distant, snowy left side of that balance. A patient who almost can’t be moved at all.

These are the patients with unfixated hip fractures. Or grim decubitus ulcers. Perhaps terrible, chronic back pain. Anybody who’s doing okay at rest, but experiences agony upon uncontrolled movement. Some of these are emergency patients, some are routine transfers, and a few of the latter may even be repeat customers while their problems gradually heal (or never do). Whoever they are, they’re patients you wish you could transport by either teleporter or hovercraft.

You touch them, and they scream. You move them, and they scream. You look at them vigorously, and they open their mouth to get ready to scream.

I can’t help you with extrication or getting them onto the stretcher; that’s your problem (or at least another post). But once you hit the road, there’s a solution. All it takes is patience. Here’s the formula:

  1. Move to the rightmost lane.
  2. Throw on your 4-way hazards.
  3. Drive about 5 MPH.
  4. Avoid every single bump.

Please understand what I’m saying here. I already know that you drive pretty well; you try to give your partner a great ride, and that usually means driving a little slower than you would in your personal vehicle. But for these patients, that’s still too rough. So you slow it down more, so you can pick a better path between cracks and potholes, and when you do hit a bump its effects are less dramatic. And that’s still too rough. So you slow, slow, slow it down. As slow as you need in order to completely negate the bumps, bounces, and turns. Your actual speed will depend on the quality of the road; on beautifully smooth, brand new city roads, you may be able to eke out 10, even 20 MPH. On particularly bad roads, with irregularities that look like speedbumps — or come to think of it, when you’re traversing actual speedbumps — you may literally be crawling along at about 1 MPH.

In most cases, you will probably find yourself driving with the brake pedal rather than the gas pedal. In other words, you’ll be lucky if your foot ever touches the accelerator; most of the time, you’ll “accelerate” by easing off the brake a bit more, and decelerate by pushing it harder. (Remember to ease in and out; in smooth driving, everything happens slowly!)

Obviously, this is only appropriate when you’re in no particular hurry. Critical patients need to move a little faster. Furthermore, your ability to execute this maneuver is somewhat dependent on how far you’re actually driving; the shorter the trip, the better, because a long trip taken at 1 MPH will end up lasting all week. The prototypical transport begging for the slow ride is the stable hip fracture from the nursing home, heading to the ED across town — not too far, but with nasty urban roads the whole way.

Other tips:

  • Other drivers will probably not be thrilled at this behavior. As long as there are multiple lanes, stay to the right, and they can go around. If you’re stuck on a one-lane road for a while, periodically try to pull aside and let vehicles pass.
  • Although it may seem smart to throw on your emergency lights, most drivers expect an ambulance running hot to be moving faster than traffic, not slower, so it generally causes more confusion than it’s worth.
  • At this speed, you have some real options for maneuvering. Mentally trace the double track that your wheels will describe on the ground ahead (remembering that your rear wheels may be slightly fatter, if you have “dualies” back there), and choose a route that places that path between the worst bumps. You can go left, you can go right, or you can straddle them.
  • When crossing a wide, straight barrier, such as a speed bump, railroad track, or the threshold of a ramp, try to “square up” first, striking it perpendicularly so you’ll make contact with left and right tires simultaneously. The back-and-forth rocking created by hitting it diagonally, resulting in asymmetrically bouncing across 1-2-3-4 wheels, is miserable no matter how small the actual bump.
  • Remember that the pain level of many unstable musculoskeletal injuries can be improved by smart, snug splinting. If you have time to drive like this, you probably have time to splint well — which may allow you to drive a little faster!
  • Although this may be obvious: paramedics, remember that you carry analgesics for a reason; Basics, remember that paramedics are available.

Pulling this off takes a little confidence, and a healthy dose of not giving a damn. And there will occasionally be roads or driving conditions that make it actually unsafe. But short of that, no matter how many stares you get, it’s a perfectly sensible maneuver, and one of the very best things you can do for these patients.

Finally, we offer a recommended soundtrack.

What it Looks Like: Cardiac Arrest and CPR

Update: Our friends at EMS 12 Lead have put together a “sister post” to this one, with further discussion and some additional clips. Check it out!


Although we’ve talked about the fundamentals of good CPR before (and then again), the fact remains that the first step of any resuscitation is recognizing the presence of cardiac arrest. In fact, failure to do this in a timely fashion is a common problem at all levels of healthcare: because these situations don’t happen often, we are reluctant to accept when they’re happening now. (Real emergencies don’t come heralded by a change in soundtrack.) The result is delays, often for many minutes, before anybody initiates CPR and attempts defibrillation. We can’t just point fingers at the bystanders and lay providers — it’s also the EMTs, the nurses, even the doctors doing this. “Is that a pulse?” we muse. “I think there’s a pulse. Here, come feel.”

It’s true that cardiac arrest, at least in the early stages, is often not easily distinguished from other maladies (such as unconsciousness due to seizure or drugs). A few clues may be immediately obvious, such as pallor of the skin if some time has passed, or if a bystander actually witnesses the patient suddenly collapse. However, in the end, the way to make this call quickly and reliably is to simply follow the algorithm. You’re not the first person to deal with this, and the American Heart Association has spent years simplifying the decision process — because the goal isn’t to eventually “figure it out,” the idea is to immediately recognize it and start lifesaving measures within seconds.

Is the patient responsive? (No; they appear unconscious, and make no response whatsoever to painful stimuli.) Are they breathing normally? (No; they’re not breathing, or merely performing agonal, “gasping” breaths.) Is there a carotid pulse? (No, no pulse is palpable within a few seconds.) That’s good enough for us. Start pushing on their chest and don’t stop unless it’s absolutely essential — and the only things that are absolutely essential are checking their cardiac rhythm (just a few seconds) and delivering a shock (less than a second).

We’re going to look at a number of examples of real-life cardiac arrest (or “codes” in the usual lingo). As a rule, the actual CPR that you’ll see here is of relatively poor quality. This is due to a number of factors, but primarily it’s because 1) Many of these clips are five, ten, or fifteen years old, from a time when CPR was taught and practiced differently; and 2) Even today, many people do not perform good CPR.

So: focus on the patients. Watch how they present, their breathing, their skin, their responses to the interventions. Watch the challenges that the providers face as far as managing the patient and the environment. Watch how their approaches differ by region, circumstance, or personal preference. But for the most part, do not do what they are doing. We’ll watch a couple examples of really good CPR at the end so you know what to strive for.


We’ve linked this before, and for good reason; it’s one of the best videos I know of a real code. This is older CPR, with less emphasis on compressions and more on ventilation, but otherwise fairly true to the textbook. Notice the early “activation” of EMS, and the brief pulse check. Notice how rather than trying to “one-man” the BVM, they take advantage of the many available hands, allowing one person to hold the mask and one to squeeze the bag. Notice how they quickly dry the chest for the AED without being obsessive about it. As for the compressions, nowadays we would like to see them faster and deeper, with fewer and briefer pauses.

In the patient, watch the spastic, gulping movements of the mouth and tongue; this is agonal breathing. Notice also the decorticate posturing of the upper body, suggesting neurological dysfunction. Finally, notice how (after the third round of CPR + defibrillation), he begins to breathe spontaneously, with obvious chest rise, and this is clearly different from the prior agonal respirations.


(watch through 8:45) Despite the numerous pauses for commentary, this is also good. The initial compressions are rapid — a little too rapid, which is okay, but not deep enough, and if they were deeper they would likely be at a more reasonable rate. The second compressor goes deeper, but does not recoil fully at the top. The third (male) rescuer gives perhaps the best compressions, but notice his elbows — although pushing hard and deep, he allows his elbows to bend slightly each time. This is a very common error in otherwise skilled compressors, and is a good way to fatigue yourself quickly. Make a conscious effort to lock the elbows out completely, allowing you throw your full weight behind each compression rather than “pressing” with the arms. Notice also how frequently the rescuers stop compressions for one reason or another. Chest compressions need to build upon each other for several compressions before you’re producing anything like the coronary perfusion pressures you want to see; repeatedly stopping and starting sacrifices all your hard work.

In the patient, notice the pallor (paleness) of his skin, and the total lack of tone (limp flaccidity) of his body. Notice how he convulses with the shock, and how his chest rises and expands with ventilations. Finally, notice how his abdomen recoils outward in a seesaw manner with each downward compression of the chest.


(watch through 7:10) This is a chest pain patient that codes on camera. Despite the low image quality, notice how poorly he immediately presents; he is obviously fatigued, wan, and struggling with some sort of pain or other internal distress. Upon attempting to stand, he loses consciousness and demonstrates agonal respirations (listen to the heavy snoring). They ask if he has a history of seizures; a substantial number of cardiac arrests are initially mistaken for seizures, and may present with seizure-like activity (such as foaming of the mouth). There is obvious difficulty with compressions due to the high position of the stretcher. Bubba was very fortunate to arrest in the immediate presence of paramedics.


(watch through 3:43) Notice again the initial hesitation due to bystanders believing a seizure is occurring. These compressions have the kind of violent depth we want, although at about half the rate. Notice again the slight arm bend.


A chest pain patient who deteriorates into a full arrest while on camera for a UK documentary. Depicts a good portion of the code.


[Added 5/8/13 — ed.]

(watch until the credits)

ED footage of EMS bringing in a code. Shows the practice of “code surfing,” where a rescuer rides the stretcher to provide ongoing compressions during movement — a great idea if you can do it safely and effectively (it helps to use someone small!) Notice how fast some of the compressions are performed, but it’s tough to reach good depth at those rates, particularly when the arms aren’t held straight. Although the captions note that the patient had ROSC, it’s extremely unlikely that he survived to discharge; when patients are transported without achieving ROSC in the field, they almost never walk out of the hospital. Cardiac arrests are worked on scene; transport without a pulse is simply giving up, unless you have good reason to think there’s a reversible etiology of arrest that the hospital can address.


[Added 8/21/12 — ed.]

(watch through 12:05, or stay for some bystander interviews) Another near-drowning. Decent-looking compressions and a reasonable attempt to minimize interruptions, although notice the pauses for intubation and at various other times. Unknown outcome.


(watch through 2:25) This is a volunteer crew from AMR’s disaster response team in Haiti. There seems to be initial confusion about whether the patient is pulseless or merely apneic, hence the initial focus is on the airway; nowadays we would frown upon interrupting compressions for intubation, and the bagging after the tube has been placed is far too fast (every 6-8 seconds only, please). The teamwork is good, and return of spontaneous circulation (ROSC) is achieved after a few minutes. Notice the decision to defer a blood pressure measurement, since the patient has a strong radial pulse — an indicator of a decent pressure, if not an exact number. The patient does have fixed and dilated pupils, indicating a probable poor neurological status.

Keep watching only if desired; the patient is transported to the field hospital, where she rearrests, and the doctor there halts resuscitation efforts.


(watch through 23:50) This is a neonatal resuscitation immediately following a field delivery of twins; one infant is apneic following birth. BVM ventilations and compressions are performed, as well as an aborted attempt at intubation; however, in the end the neonatal fundamentals of warming, suctioning, stimulation, and supplemental oxygen end up effectively reviving the child.


http://www.youtube.com/watch?v=afo3-dhRnA0

[will not embed; click through to view video then return] Another infant resuscitation, this one in the ED. Excellent footage of compressions, ventilation, and the typical hubbub of a code, as well as an IO (intraosseous) line that infiltrates and the use of ultrasound to assess for cardiac function during PEA.


CPR on a near-drowning. A fine example of the typical poor quality of bystander compressions; notice the negligible depth and general uncertainty about whether to intervene.


A collapse at a sporting event. There is no backstory available on this, so it may not be a true arrest, but if so it would be consistent with commotio cordis, when a blow to the chest (such as a punch) causes an arrhythmia (due to an R-on-T induced by the physical blow; this is the evil brother of a precordial thump, with the opposite effect). This type of arrest has extremely good prognosis for recovery if immediate CPR and defibrillation is performed, since there may be little to no underlying disease; it’s a healthy young patient who simply got whacked wrong.


(watch through :38) Some brief miscellaneous footage of an arrest post-drowning, with a few pretty good compressions.


(watch through :57) Another near-drowning. Nice compressions. Notice the pallor and lack of tone.


[Added 10/11/13 — ed.]

This is clearly an old video, although it’s not clear from what year. Regardless, it’s a great opportunity to list the things you’d do differently today. Since we know that the keys to a successful resuscitation are immediate, deep, fast, uninterrupted compressions, along with rapid defibrillation, do you think this patient had a good outcome? How many of the interventions they performed instead of that stuff are still recommended care? If you were on that scene, would you be an advocate (some might say a CPR Nazi) to ensure that things were done properly?


Finally, let’s look at a couple examples of really spot-on, perfect resuscitation. Since perfection is rare in life, and having a camera in the room is even rarer, these will be simulations.

Click here for a teaching video from the Austin/Travis County medical director’s office. It demonstrates their “pit crew” model, where each member has a designated role, and each action is carefully crafted to match the latest evidence for best practices to promote survival. Notice how compressions begin almost immediately, once the rescuers have noted a lack of responsiveness, breathing, and pulse — and compressions stop for almost nothing, no matter what else is happening. (I would call these compressions very good, but a bit fast and shallow.) Secondary tasks like bagging can happen in the background. This crew does stop compressions while the AED charges, while I personally prefer to compress during this interval (between analysis and shock); the longer you delay between last compression and delivery of the shock, the less chance of getting a pulse back.


(Watch from 2:45 onward) This is the model from Salt Lake City Fire, portraying a highly progressive model. Aside from the general concepts of “compression-centered” resuscitation and the pit crew model, they’re also eliminating pauses for rhythm analysis (using the “see-through” filter on the Zoll monitors, which removes CPR artifact) and even for defibrillation (shocking without taking hands off the chest, which has not been proven safe, but generally seems to be). In other words, there’s essentially no interruption in compressions until there’s evidence of a perfusing rhythm. Notice the compression technique, where knuckles remain against the chest to lock-in the hand position, but the heel of the palm comes off at the top, ensuring full recoil. Beautiful stuff.


There you have it, folks: what dead people look like, and what it looks like when we try to bring them back. Typically the process is chaotic, and we do our best, but often drop the ball on what’s important. Nobody’s perfect, but we can direct our focus toward the pieces that matter the most, and this lets us “streamline” our efforts away from the distractions and toward the critical elements. Recognize the problem early, compress hard, deep, and fast, and don’t stop for anything unless it’s defibrillation. Ain’t so hard, is it?


Sincere thanks to James Oz (Melclin) for assistance with compiling these video clips.


Check out also what Jugular Venous DistentionSeizures, and Agonal Respirations look like

Dialing it Down a Notch

Bringing order to chaos. It’s hard to suggest a more important skill for an EMT.

Emergencies are chaotic. Heck, even non-emergent “emergencies” are chaotic. The nature of working in the field is that most situations are uncontrolled. Part of our job is to bring some order to it all, sort the raw junk into categories, discard most of the detritus, and loosely mold the whole ball of wax into something the emergency department can recognize. Call us chaos translators. This is important stuff; it’s why the House of God declared, “At a cardiac arrest, the first procedure is to take your own pulse”; and it’s why we walk rather than run, and talk rather than shout.

The thing is, it’s not just those of us on the provider side that need this. Oftentimes patients need it too. Imagine: every other day of your life, you’re walking around without acute distress, in control of your situation and knowing what to expect. Today, something you didn’t anticipate and can’t understand has ambushed you — a broken leg, a stabbing chest pain — and you don’t know how to handle that. So you called 911 to make some sense of it all.

Most ailments are side effects of other problems: the fear of going mad, the anxiety of being so alone among so many, the shortness of breath that always occurs after glimpsing your own death. Calling 911 is a fast and free way to be shown an order in the world much stronger than your own disorder. Within minutes, someone will show up at your door and ask you if you need help, someone who has witnessed so many worse cases than your own and will gladly tell you this. When your angst pail is full, he’ll try and empty it. (Bringing Out the Dead)

With some patients, this is more true than with others. With some patients, there may be little to no underlying complaint; there is mainly just panic, a crashing wave of anxiety, a psychological anaphylactic reaction to a world that is suddenly too much for them. Particularly in those cases, but to a certain extent with everybody, bringing that patient to a place of calm may be exactly what they need. I have transported patients to the hospital who clearly and unequivocally were merely hoping to go somewhere that things made sense.

The burned-out medic likes to park himself behind the stretcher, zip his lip, and allow things to burn out on their own. This may sound merciless, but there is a certain wisdom to it.

We are very good in this business at escalating the level of alarm. Eight minutes after you hang up the phone, suddenly sirens are echoing down your street, heavy boots are echoing in your hall, and five burly men are crowding into your bathroom. We have wires, we have tubes, we have many, many questions. What a mess. So sometimes, once we’ve finished ratcheting everything up, it behooves us to pause, step back, and make a conscious effort to turn down the volume.

Take the stimuli of the environment, of the situation, and dial it way back. One of our best tools is to simply get the patient away from the scene — the heart of the chaos — and into the back of the ambulance, where we’re in control. It’s quiet, it’s comfortable, and there is less to look at. Move slowly, consider dimming the lights, and whenever possible avoid transporting with lights and sirens. Demonstrate calm, relaxed confidence, as if there’s truly nothing to be excited about. Some patients with drug reactions, or some developmental or psychological disorders (such as autism spectrum), may be absolutely unmanageable unless you can reduce their level of stimulation. Just put a proverbial pillow over their senses.

If you’re stuck on scene, try to filter out the environment a little. If bystanders or other responders (such as fire and police) are milling around, either clear out unnecessary personnel or at least ask them to leave the room for a bit. Make sure only one person is asking questions, and explain everything you do before you do it.

There’s a human connection here, and if you can master it, you can create an eye of calm even as sheet metal is being ripped apart around you. Look directly into your patient’s eyes, and speak to them calmly, quietly, and directly. Take their hand. Use their name, and make sure they know yours. Narrate what’s going on as it occurs, describe what they can expect next, and try to anticipate their emotional responses (surprise, fear, confusion). If they start to lose their anchor, bring them back; their world for now should consist only of themselves and you. To achieve this you need to be capable of creating a real connection; it is their focus on you that will help them to block out everything else. Done correctly, they may not want you to leave their side once you arrive at the hospital; you’re their lifeline, and it may feel like you’re abandoning them. Try to convince them that the worst is over, and they’ve arrived somewhere that’s safe, structured, and prepared to make things right. They’ve “made it.”

Applying these ideas isn’t always simple, and learning to recognize how much each patient needs the volume turned down requires experience. But just remember that no matter who they are, no matter what their complaint, most people didn’t call 911 because they wanted things more chaotic. Try to be a carrier of calm.