Pulse Oximetry: Basics

Just tuning in? Start with Respiration and Hemoglobin, or continue to Pulse Oximetry: Application

Once upon a time, the only way to measure SaO2 was to draw a sample of arterial blood and send it down to the lab for a rapid analysis of gaseous contents — an arterial blood gas (ABG), or something similar. This result is definitive, but it takes time, and in some patients by the time you get back your ABG, its results are already long outdated. The invention of a reliable, non-invasive, real-time (or nearly so) method of monitoring arterial oxygen saturation is one of the major advances in patient assessment from the past fifty years.

Oximetry relies on a simple principle: oxygenated blood looks different from deoxygenated blood. We all know this is true. If you cut yourself and bleed from an artery — oxygenated blood — it will appear bright red. Venous blood — deoxygenated — is much darker.

We can take advantage of this. We place a sensor over a piece of your body that is perfused with blood, yet thin enough to shine light through — a finger, a toe, maybe an earlobe. Two lights shine against one side, and two sensors detect this light from the other side. One light is of a wavelength (infared at around 800–1000nm) that is mainly absorbed by oxygenated blood; the other is of a wavelength (visible red at 600–750nm) that is mainly absorbed by deoxygenated blood. By comparing how much of each light reaches the other side, we can determine how much oxygenated vs. deoxygenated blood is present.

The big turning point in this technology came when “oximetry” turned into “pulse oximetry.” See, the trouble with this shining-light trick is that there are a lot of things between light and sensor other than arterial blood — skin, muscle, venous blood, fat, sweat, nail polish, and other things, and all of these might have differing opacity depending on the patient and the sensor location. But what we can do is monitor the amount of light absorbed during systole — while the heart is pumping blood — and monitor the amount absorbed during diastole — while the heart is relaxed — and compare them. The only difference between these values should be the difference caused by the pulsation of arterial blood (since your skin, muscle, venous blood, etc. are not changing between heartbeats), so if we subtract the two, the result should be an absorption reading from SaO2 only. Cool!

Most oximeters give you a few different pieces of information when they’re applied. The most important is the SaO2, a percentage between 0% and 100% describing how saturated the hemoglobin are with oxygen. (Typically, in most cases we refer to this number as SpO2, which is simply SaO2 as determined by pulse oximetry. This can be helpful by reminding us that oximeters aren’t perfect, and aren’t necessarily giving us a direct look at the blood contents, but for most purposes they are interchangeable terms.) But due to the pulse detection we just described, most oximeters will also display a fairly reliable heart rate for you.

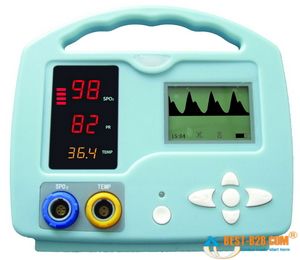
Small handheld oximeters stop there. But larger models, such as the multi-purpose patient monitors used by medics and at hospital bedsides, will also display a waveform. This is a graphical display of the pulsatile flow, with time plotted on the horizontal axis and strength of the detected pulse on the vertical. With a strong, regular pulse, this waveform should be clear and regular, usually with peaked, jagged, or saw-tooth waves. Very small irregular waves, or a waveform with a great deal of artifact, is an indicator that the oximeter is getting a weak signal, and the calculated SpO2 (as well as the calculated pulse) may not be accurate. This waveform can also be used as a kind of “ghetto Doppler,” to help look for the presence of any pulsatile flow in extremities where pulses are not readily palpable. (To be technical, this waveform is known as a photoplethysmograph, or “pleth” for short, and potentially has other applications too– but we’ll leave it alone for now.)

Most modern oximeters, properly functioning and calibrated, have an accuracy between 1% and 2% — call it 1.5% on average. However, their accuracy falls as the saturation falls, and it is generally felt that at saturations below 70% or so, the oximeter ceases to provide reliable readings. Since sats below 90% or so correspond to the “steep” portion of the oxyhemoglobin dissociation curve, where small PaO2 changes might correspond to large changes in SpO2 — in other words, an alarming change in oxygenation status — the fact that your oximeter is losing accuracy in the ranges where you most rely on it is something to keep in mind if using oximetry for continuous monitoring.

The lag time between a change in respiratory conditions (such as increasing supplemental O2 or changing the ventilatory rate) and fully registering this change on the oximeter is usually around 1 minute. And at any given time, the displayed SpO2 is a value calculated by averaging the signal over several seconds, so any near-instantaneous changes should be considered false readings.

Keep reading for our next installment, when we discuss the clinical application of oximetry, and understanding false readings.
Treat the Patient?

We’re taking a short break from our series on transfers to discuss a recent post on the EMT-Medical Student blog. One of the issues he brought up is the old saw, “Treat the patient, not the machine.” Rogue Medic struck on this as well.

What do people mean when they say this? They mean that if you attach a diagnostic tool like a pulse oximeter, and it gives you a result that is at odds with the rest of your assessment, then it is probably wrong, and you should not base your decisions on it. It can be broadened to the BLS level, including findings like vital signs, by saying: “Treat the patient, not the number.”

And it’s essentially true. In fact, something I frequently harp on is that diagnosis must always be based on a broad constellation of consistent findings, not on any one red flag. We like red flags, we want red flags, because they’re easy, but it never works that way. The body is an interdependent system, and if a pathology is present, then it almost always has multiple effects detectable in multiple places.

This idea can be looked at differently by asking another question: is it possible to be severely, acutely sick without showing it? I don’t mean long-term problems like cancer; you can’t look at someone and detect that. But if someone’s dying in front of you, of a proximate cause like hypoxia, is it always obvious based on their presentation?

Generally the answer is yes. That’s why it’s wrongheaded to look at a healthy patient with pink skin, normal respiratory rate, calmly denying shortness of breath, but with a low oxygen saturation, and say, “Oh no — he’s hypoxic!” If your oximeter says 72%, what’s more likely — that the number is wrong, or that the patient is somehow hypoxic without any other evidence of it?

Call this the phenomenon of the Hidden Killer. Is it common? Is it real?

It is not common. But it is real. And that’s what’s not recognized when people say, “Treat the patient…”

Why do we take 12-lead ECGs on chest pain patients? Because a clinical assessment alone cannot reliably detect ST elevation, which (simplifying the issue!) is diagnostic for a heart attack.

Why do we take CT scans of blunt head injury patients? Because a clinical assessment alone cannot reliably detect intracranial hemorrhage.

Why do we perform abdominal ultrasounds in multi-system trauma patients? Because a clinical assessment alone cannot reliably detect abdominal bleeding.

Now, some critics will say that all of these will indeed present with obvious, frank clinical findings. The major STEMI patient will eventually enter cardiogenic shock. The head bleed will become comatose and present with Cushing’s Triad and herniation. The abdominal hemorrhage will have guarding, distension, and eventually outright shock.

All true enough. But we’d like to find them earlier than that. It’s true that severe and late pathologies are usually obvious, but our job is to find them when they can still be treated, not after their effects are permanent or lethal. Heck, we could also just provide no medical care and wait until everyone died to make a diagnosis, which would extremely easy to assess, but a little pointless. It is rare that big problems do not have a big assessment footprint, but “small” problems can still be a big deal.

Consider the much-maligned pulse ox. Surely it does not replace a full assessment. But when used appropriately and its role understood, it provides valuable information. A drop from 99% to 94% saturation may not be clinically obvious, but it is potentially significant and surely worth knowing about. What about the patient who is non-verbal at his baseline? Is he going to complain if he drops from 95% to 87%? Will it be frankly obvious from his skin and breathing? Maybe, maybe not. (How about if he’s on a mechanical ventilator at a fixed rate?) If not obvious, does that mean it’s no big deal?

Is the pulse ox always correct? No. But like all things except magic, it’s wrong in predictable ways, ways that can be accounted for, and when it is wrong, that can tell you something too. It requires adequate peripheral circulation, and poor perfusion will make it read low. How is the patient’s distal perfusion? Pink and warm? Good capillary refill? Then you’re probably okay. Carbon monoxide poisoning will make the sat read high. Has the patient been in enclosed spaces with heaters or open flames? Working around engines? Is there any potential source of CO in their history? If not, you’re probably okay. Alternately, does their sat read unusually high compared to their clinical presentation? You might then consider carbon monoxide — something you might not have otherwise have known without the oximeter. It didn’t give you a correct number, but by knowing how and when it fails, it gave us a useful answer.

Here’s a recent example. I picked up a patient with a blood pressure of 54/4. That is a ridiculous blood pressure; arguably, nobody should have it, on the theory that a pressure that low should be pretty close to unobtainable. But, there it was. We diverted to the nearest hospital and I was subsequently chewed out by the receiving nurse.

Do I think that patient truly had a central arterial pressure of 54/4? Nah. Although she wasn’t doing well, her skin was better than that, and although she was altered and combative, she wasn’t comatose. However, her pressure was undoubtedly low, and just how low? If I don’t go with this number, then I’ve got no guidance. The clinical picture was clouded. I couldn’t ask if she knew what day it was; I couldn’t ask what her complaints were; she was non-verbal. She was tachycardic and hypoxic and diaphoretic; she was certainly sick. So, treat the patient, or treat the number? The number may not have been right, but it was concerning enough that it couldn’t be ignored without an assessment that otherwise screamed “no problems here!”, which was not what we had.

Treat the patient? We always treat the patient. A hands-on physical and history is a vital, vital tool for assessment, but other tools are also useful. Some people lament the downfall of the traditional clinical assessment, from the days when doctors with fingers like pianists made diagnoses from findings like Ewart’s sign, and it is shame, but the reason that the high-tech tools like imaging and labs have become de rigueur is that they work well — they diagnose many problems with a speed, sensitivity, and reliability that is not otherwise possible. Nobody would ever say, “Treat the patient, not the unstable cervical spine fracture,” because we recognize that’s the sort of thing you may not otherwise notice until it’s too late. That’s why we spend big bucks on CT scanners.

It all matters. It’s all useful. We should neither cast aside our individual numbers nor ignore the bigger picture. Data is something that, like money and sex, you can never have too much of.

Experience: Sweating the Small Stuff

Dr. Weingart at Emcrit gave a brief but excellent podcast about “Logistics vs. Strategy.” Go have a listen and then report back.

His point was that it’s not enough to decide what the best course of action for a patient may be. Most of our training and planning is focused on this — what’s the diagnosis? The plan? The treatment? But this is only half the battle. In a war, this would amount to our strategy, and wars aren’t won by strategy alone. You have to implement your strategy through sound execution of the basic fundamentals of logistics and tactics — keeping everyone fueled and fed, maintaining the vehicles, setting up supply lines, and so on.

In medicine, the same problem applies. It’s one thing to say, “I’ll C-spine, assist with ventilations, and transport.” That’s your plan. But can you make it work? It may be easy, but it may be hard. All three of those items — immobilize, bag, and hoof it — are potentially difficult skills, and how they occur will depend on details like the patient, the environment, and the circumstances. I know you can say “assist with ventilations,” but if I hand you a BVM and a mannequin, can you do it? Now, can you do it an a real human? How about this human who’s tied to a board and being maneuvered through a house? Oh, you haven’t tried that before? Well, go ahead and figure it out. But wouldn’t it be nice if you’d done that before the sick patient needed it?

Experience is where we learn this. We talked about how experience involves learning how textbook clinical events actually present in real patients; experience also involves learning how textbook skills are performed in real patients. You may be able to articulate how to apply a cervical collar — in fact, it’s a very simple process, so I hope you can. But until you’ve actually tried to do it, can you flip up all the right plastic bits, and insert Tab A into Slot B? Can you hold it in the right hand while securing it with the other? Can you do it from the other side? How about from behind? While standing and kneeling? Heck, do you know where the collars are?

You might get all of it right the first time you do it. Or you might fumble, but it’s easy enough, so you figure it out and the second time, you’ll have mastered it. Or maybe it takes a few times. Or maybe it’s a difficult skill like intubation, and you’ll need dozens of attempts before you’ve made all the mistakes. This is the process of developing experience. Even if you do get it the first time, until that happens, you won’t know whether you can do it or not.

But you can speed up your experience by doing the right kind of learning. Hopefully you know the basic functioning of your equipment, but how often are our situations in the field straightforward? How many times have you seen a veteran provider pull off some trick that you never imagined was possible, just because he understood some subtlety of the equipment or of pathophysiology? Have you ever used towels to modify a carseat for a small infant? Is it safe to do so? What’s the exact maximum load weight of your stretcher, and how dangerous is it to exceed that? If you trim the length of the prongs on a nasal cannula, will it compromise its effectiveness? If I took away or broke half of your equipment, could you make do with the other half? Is your portable radio waterproof? Do bloodstains come out of your uniform beanie?

You’ll learn it all eventually. But asking the questions ahead of time will make you a better provider sooner.

Check, Check, Check — Check it Out

Your day always starts the same way. You punch in and wander outside to find the ambulance that’s going to be your home, office, break room, and personal teleporter for the next 8 (or 48) hours. Then you crack it open and figure out if it’s capable of surviving that journey.

The checkout is an integral part of your shift, and it’s not rocket science. It’s simply a process of ensuring that the equipment you’re going to need is available and functional, that you know where it is, and that anything needed is restocked or repaired before… well, before you need the darned thing.

You can go through this in a wide variety of ways, and the best process for you will depend on vagaries like how your rigs are set up, what equipment you carry, and even what’s written on your physical checklist, if you have one. But here are some general tips for optimizing things.

Start with the most critical items. That means equipment that’s essential and lifesaving, such as the AED; it also means equipment whose absence can’t be substituted, worked around, or otherwise managed. For instance, 4x4s are important — direct pressure saves lives — but there’s a dozen other types of dressings you probably have floating around, so they’re not truly essential. What’s essential?

The ambulance. If you can’t transport people, you are out of service; you are worse than useless. The first thing I do is crank the engine and make sure it catches, check for warning lights, and eyeball the fuel. If required by your service, check fluids, kick tires, whatever’s needed.

Your signal and warning devices. This is a safety issue for you and your patients. While you’re up front checking the engine, flip the lights on and check that they’re all blinking. Then key the PA microphone, listening for the audible pop (or scratch it with a nail if it’s not easily audible). If the PA works, the siren generally works, since they often use the same speakers. (Actually flipping on the siren tends to be deafening and obnoxious to everyone in earshot, so I avoid it unless the PA itself is broken.)

Next up should probably be your AED. This not only brings the dead back to life, it’s the only way of doing so unless you’re going to jerry-rig something from the truck battery and jumper cables, or try the ol’ precordial thump and prayer. Different AEDs have different maintenance procedures; most perform their own internal checks once a day at least, and you can just look for the “all’s well” symbol on the display (usually a check mark). In other cases, you’ll need to key the thing on to make sure it’s working. Check that your pads are within date (the conductive gel inside eventually dries out — this is also why the packaging should remain sealed during storage), and if it’s a model that lets you preload the wires without opening the pads, make sure there’s a set plugged in.

Look through your drugs next, if you’ve got ’em. Epinephrine is absolutely lifesaving. Aspirin significantly improves outcomes. You can’t MacGyver any of it. Make sure you have whatever minimum stock you’re supposed to have, and that it’s all in date. (Most drugs don’t suddenly turn poisonous when they hit their expiration; more often they simply become less potent. However, this is a matter of professionalism as well as liability; don’t be the guy carrying drugs 6 months past expiry.)

BVMs. At least one is essential unless you plan on giving mouth-to-mouth. Multiple sizes, or at least multiple sizes of mask, are a boon, although with proper technique you should be able to make an adult size work in most cases. Check that you not only have the BVM, but that it’s got O2 tubing, a bag, and a mask attached to it, and give the mask a squeeze to make sure the collar is filled and not leaking.

Oxygen. Check your portable tank; is it charged? (A D tank with 500psi running a NRB will run dry in about 3 minutes. Is that enough in your book?) Hold it to your ear; is the regulator leaking? If so, loosen it, check the washer, put everything in place and tighten it back down. (Remember that plastic washers are technically single-use, although they often do okay for multiple uses. Metal and rubber washers last approximately forever.) If there’s a persistent leak, leave the tank closed. And whether it’s closed or open, make sure you know which it is. If it’s closed, ensure that there’s some way of re-opening the thing, whether a wrench or an attached twist-valve. Check for adequate cannulas, masks, and nebulizers, as appropriate. Check your onboard main O2 as well.

C-spine. Got boards? Got collars? Tape? Headblocks/headbeds/towel rolls? Got enough straps to immobilize as many patients as you have boards, in whatever fashion you prefer? (Although I typically use simple arrangements like box strapping, I try to have enough straps on hand for a full chest-and-groin Grady strapping in case we’re going to be cartwheeling someone through narrow halls or spiral staircases.)

Portable suction. Is everything attached where it should be? Is there tubing and a Yankauer tip, preconnected if your service allows that? Turn it on and occlude the input port with a finger; does it suck strongly? If not at all, check for unsealed ports. If it sucks weakly, and turns over sluggishly, check the battery.

BP cuff. Unless you’ve got automatic NIBP via a monitor, this is an irreplaceable assessment tool. At least one manual cuff is necessary, but preferably there should be a full range of sizes including infant, child, adult, and a large adult or thigh cuff. Does the needle read zero? (If not, adjust it as described here). If you don’t carry your own stethoscope, you’ll obviously need one of those as well.

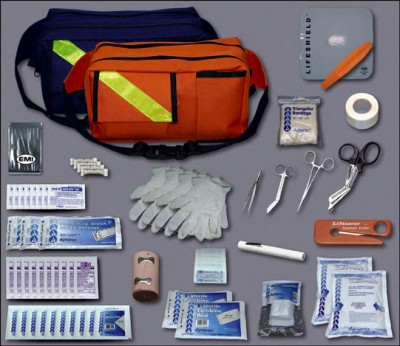
Now, everything else in your bags. Enough gauze, dressings, roller bandages, and tape. Ice packs, splints, cravats. Trauma and burn dressings. And so on.

Now, the truck cabinets. Again, start with what’s essential — but also look for the less “essential” things you use all the time. Do the lights back here work? AC and heat? Onboard suction (same routine as for the portable)? Sheets and blankets? Maybe an extension strap on the stretcher? Gloves in your size as well as your partner’s? Paperwork? Band-aids? Put everything where you want it, whether that means the BP cuff is on the bench, emesis bags on the wall, or tissues on the stretcher. There are a million ways to organize items like OPAs and cannulas; it doesn’t matter how you do it, as long as you know where things are and how to get at them. What you don’t want is to need something, whether a BVM or a set of restraints, and have to go digging for it. What you really don’t want is to need something, go digging, and discover it’s missing.

Many less-used items may be off your radar until the day you need it. I never looked for a urinal until the first time a patient asked for it. Experience is making mistakes, as they say.

Remember that although you may not use 95% of this gear 95% of the time, you are responsible for 100% of it nevertheless, and if it’s needed and not available, your keister is on the line. And rightly so.

Vital Signs: Blood Pressure

For other Vital Signs posts, see: Respirations and Pulse

In the grand scheme of medical skills, taking a manual blood pressure is far from difficult, but sick people and austere conditions can combine to make it another thing entirely. Obtaining a BP on an ill patient while rattling down the road is legitimately one of the most difficult psychomotor skills an EMT-Basic has to master.

Mastering it starts with stacking the odds in your favor. A good stethoscope is better than a lousy one — you don’t need a $500 cardiology model, but something with good insulation and tight-fitting earpieces can make a real difference. Of course, you’ll also want to try to take your blood pressures at times of peace: on scene, before the rig starts moving, or even shoehorned in while stopped at traffic lights.

The elbow-supported technique for finding the brachial pulse is also ideal for taking a BP; trying to hear anything when the arm is slightly flexed is a recipe for frustration. But ensure that however you arrange things, the arm is completely relaxed, because muscular tension can radically throw a measurement; this will require fully supporting the arm and sometimes reassuring the patient. “Just relax” is the line I always deliver while busily pumping the bulb.

Where to put the gauge? Wherever. I’ll usually clip it to one of the stretcher straps, but you can find a bit of blanket that it’ll nestle into, secure it to a shirt, clip it to your watchband or the edge of the cuff, or just ask the patient to hold it for you. The built-in strap on the cuff is only a good location if you’re at the patient’s right side, which is typically not where we sit while we’re transporting. There’s probably a huge market niche out there for “EMS style” cuffs with their handedness reversed… but I digress.

Although I don’t always follow all of these steps, here’s the basic approach I recommend for a routine blood pressure check:

  • Support the arm, ideally at a position that is horizontally level with the heart.
  • Palpate the antecubital fossa until you find the pulse point. Note this location.
  • Palpating at the radial or the AC, pump up the cuff until you lose the pulse. Note this number and deflate the cuff.
  • Place your scope on the AC and inflate the cuff past the previous number. Obtain your pressure in the ordinary fashion.

Starting with a palpated pressure may seem redundant, and it can be, but it has two advantages: first, it gives you a rough sense of what systolic to look for, and second, if you’re unable to auscultate a pressure, you’ll still have a palpated one to record. This is actually the officially recommended method, although it seems rarely done nowadays.

Palpated pressures are legitimate, although when they start becoming the norm it can be a sign of lazy care. The diastolic can be a valuable number, though, particularly in traumatic or cardiac cases, so remember that auscultating is still the default standard of care. And remember, particularly if you’re mixing methods, that palpated pressures often will differ from auscultated pressures (including those taken by machine), usually by 10-15 points on the low side.

What if you’re not getting anything from the arm? Well, you can try the other arm, of course. But really, the thing to remember is that you can take a blood pressure anywhere there’s a pulse, although it’s much easier when that pulse is strong and the artery proximal to it can be easily occluded. Remember that although you can palpate a pressure from any distal spot on the same artery, near or far (barring anastamoses), auscultation — which is essentially listening to the turbulence created immediately downstream of the occlusion — requires placing your scope just below the cuff, and will not be successful farther downstream. Putting the cuff (pedi cuffs when needed) on the forearm and measuring at the radial is effective; thigh cuffs work too, although the popliteal can be an evasive pulse to locate. You can even cuff the lower calf and palpate a pedal or tibial pulse, if you’re daring. Go nuts, and try to experiment before the call when you actually need it. Do make an effort, though, to use an appropriate sized cuff for the extremity; mis-sized cuffs can actually yield significantly erroneous readings. For the morbidly obese, I usually prefer to place a regular cuff on the forearm than to use a thigh cuff on the upper arm, but see what works for you.

As a final note, remember that cuffing the neck and palpating the temporal pulse is never an appropriate method of patient assessment, no matter how little blood you may suspect is reaching their brain.

On maintenance: during your morning checkout, pump some air into the cuff, close the valve and give the whole thing a squeeze to check for leaks. There’s nothing better than discovering these after you’ve wrapped it around a critical patient’s arm.

On sphygmomanometers: for obvious reasons, the resting point for the needle should be at zero. (Very cheap cuffs sometimes have a pin-stop here for the needle to rest against; this is a problem because the dial can be miscalibrated without showing it. Pin-stop gauges shouldn’t be used unless your service is seriously broke.) If you have one that needs zeroing, most cuffs can be adjusted by pulling the tubing off the dial, grasping the metal nipple with some pliers (or very strong fingers), and twisting it in either direction until the needle is zeroed. Alternately, fans of mental math can just add or subtract the false “zero” number each time they take a pressure.

And finally, on tourniquets: the immortal Dr. Scott Weingart of Emcrit has described his practice of using BP cuffs as tourniquets. You’ll hear about this from time to time, but there’s always someone who points out the damned things leak like sieves and that’s the last property you want in a tourniquet. Dr. Weingart’s solution is to pump up the cuff until bleeding is controlled (or 250mmHg, whichever is sooner), then clamp both tubes with locking hemostats. (He uses smooth ones to avoid damaging the rubber; he recommends padding with a 4×4 if you’re using a ridged hemostat.) My hemostats are all in the shop, and this may or may not fly with your agency — modifying equipment for “off-label” use is always somewhat shaky ground for us field peons — but I think it’s a splendid idea if you can swing it.